
Orbitus Robotics
Musimotion 2D and volumetric presentation guide
Back to Musimotion · Product support
Guide 2.2 · November 20, 2026 · Vision Pro 1.0.0 build 12 awaiting App Review
Read existing 2D presentations, switch to 3D Volume for solid objects and ink at different depths, and present inside Full Immersion on Vision Pro. Mac and iPad render the same saved 3D project through a movable camera. The illustrated sidebar, timeline and radial menus reuse the original iPad artwork; none of those designer assets have been redrawn. To make a party scene, follow the birthday surprise walkthrough. To build a music game, follow Create a rhythm scene. You can also generate a soundtrack for a 2D or spatial scene, or play Droid Arena in Full Immersion. For brush technique, see Paint, save and replay Sumi ink. For a project you are editing, see Select, edit and copy objects. To animate to music, follow Make a 3D music video. To frame a scan or pose a robot, follow Import and animate a 3D model.
These screenshots show the development editor and the Vision Pro release candidate. The approved Mac 1.0.0 build 7 is awaiting manual publication at the November 20 check. Use a matching updated build on each device for these features. Current platform status. Keep a backup before opening a new 3D project in older software: older builds do not understand the additional mode, camera and spatial ink data.
Images show actual application UI with demonstration content. The Vision Pro pictures come from simulator recordings and direct simulator screenshots. Other captures identify their platform. Select any picture to see its full size. Capture provenance Simulator evidence does not establish physical headset comfort or hand tracking.
1. Read a 2D presentation
- Use Open on Vision Pro, or your Mac/iPad document library, to select a
.musimotionpackage. Existing documents without a saved mode open in 2D. - Keep 2D selected above the canvas. Use the original illustrated File, Shapes, Images, Brushes, Effects, Text and Physics controls.
- Scrub the turquoise timeline, then press Play/Pause. Still paint, timed ink, imported media and layer animation retain their established 2D workflow.
- On Vision Pro, 3D Setup opens the optional spatial controls; Artwork Editor returns to the original editor. They edit the same project.
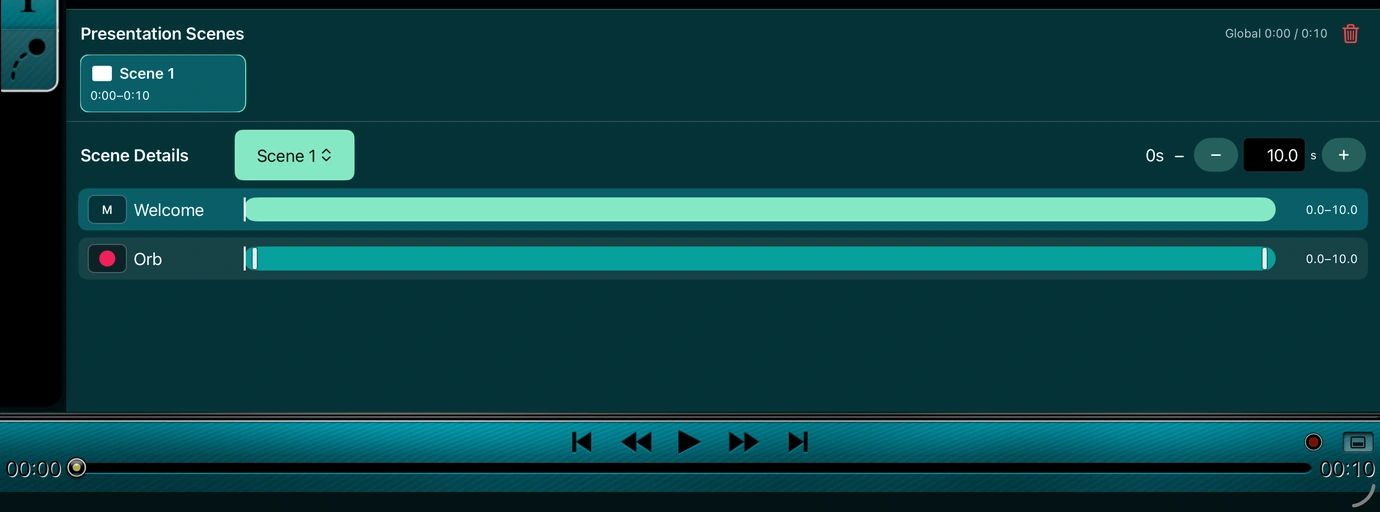
The icon at the far right of the transport row opens or closes the tracks. See the illustrated editor controls guide for moving objects, using the wheel and applying effects.
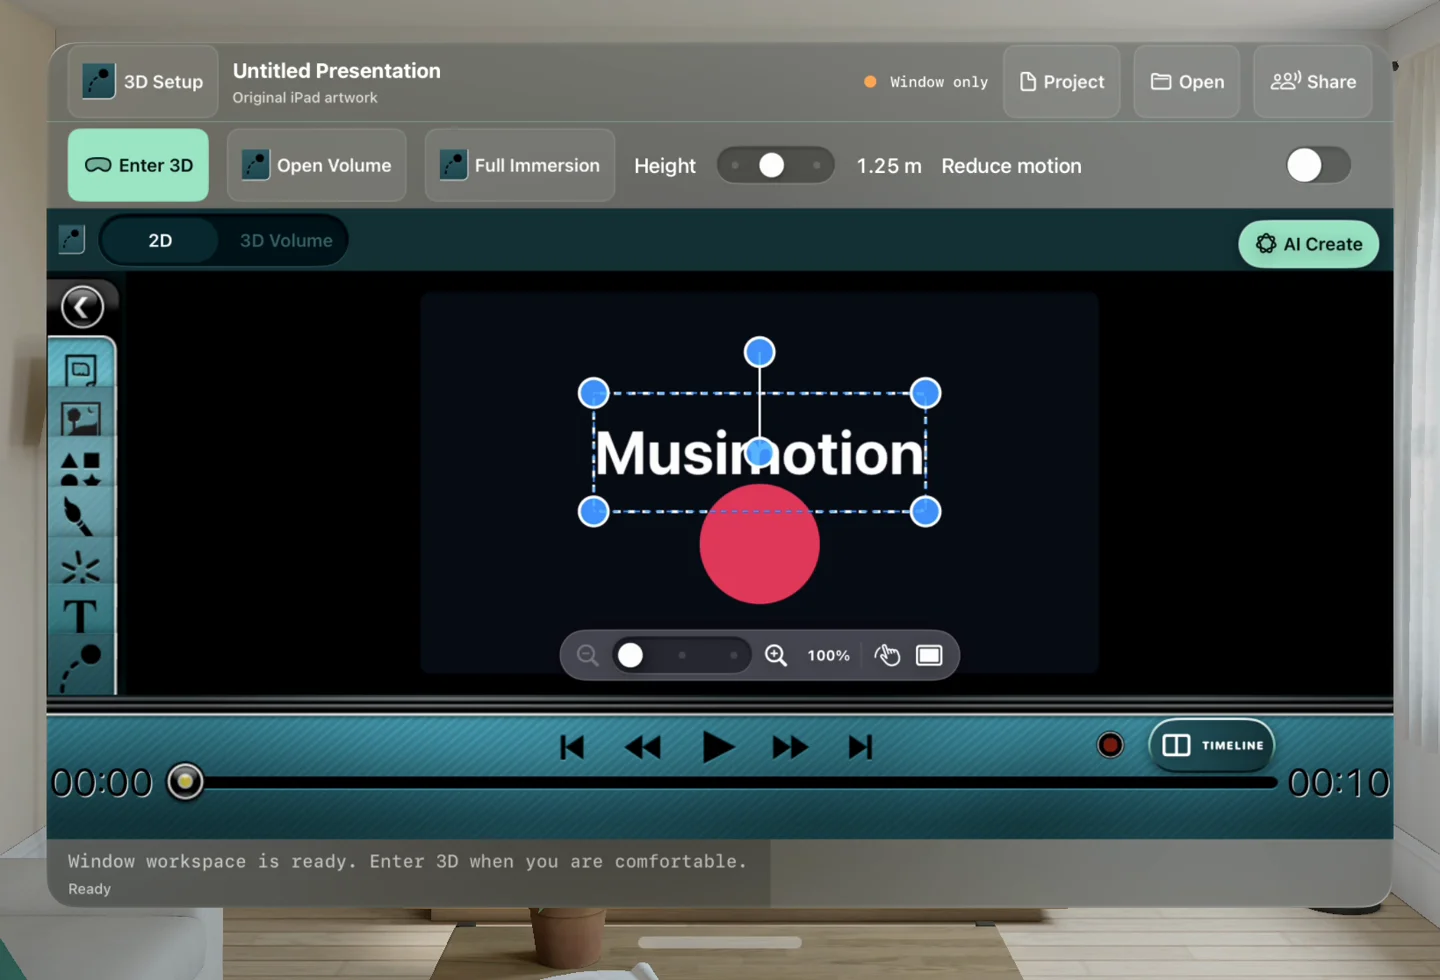
Start in the familiar editor. Choosing a spatial workspace is optional.
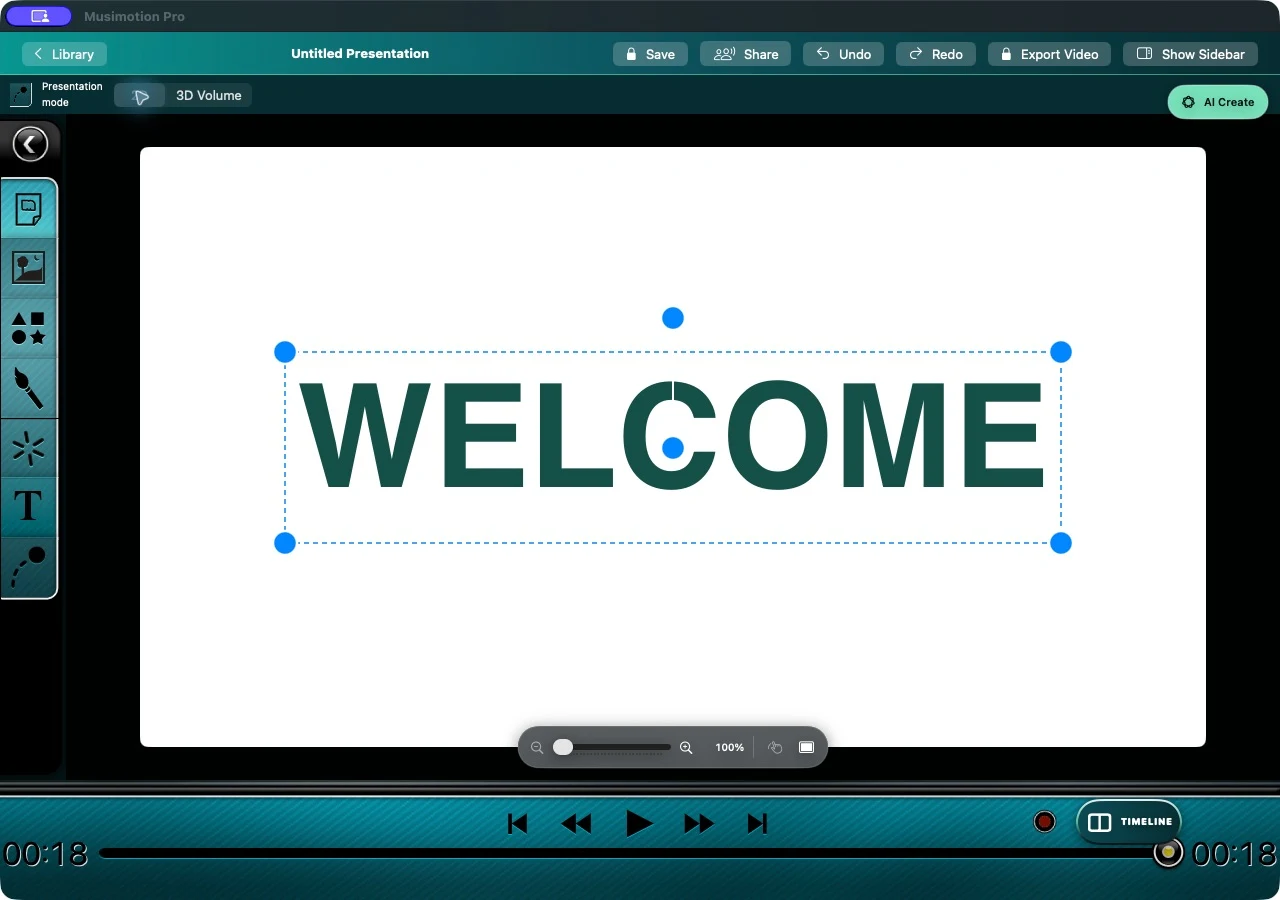
On Mac, 2D restores the flat canvas and original selection handles. Changing mode preserves the saved depth information for later 3D playback.
2. Make a banner cross the canvas in 3D
Choose Templates → Welcome Banner → Import into Presentation. On Vision Pro you can also open Project → Templates. Import appends an editable eight-second scene. To start a separate project, choose Open as New Presentation.
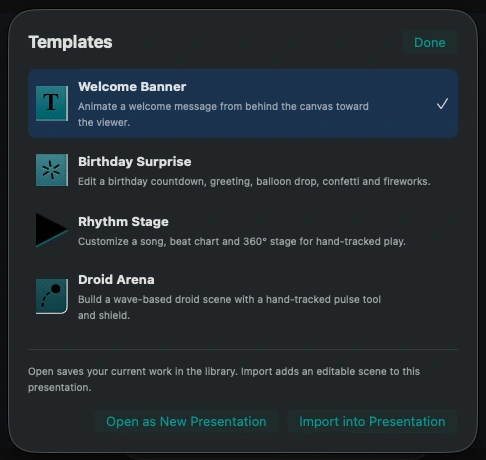
Mac. Import adds this banner scene after the existing scenes. Open creates a separate document in the library.
Click a visible letter of Welcome Banner, or select it in Objects. Choose Edit XYZ and inspect the three supplied poses. Time is relative to this scene.
Tap a field or its label to edit, then choose Save XYZ Keyframe. Saving at an existing time replaces that pose. Scrub between the poses to see the interpolation.
| Scene time | X | Y | Z | Expected result |
|---|---|---|---|---|
| 0 seconds | −0.30 | 0.30 | −0.80 | Starts left of the canvas, near the back of the volume |
| 2 seconds | 0.50 | 0.50 | −0.40 | Centred behind the canvas |
| 6 seconds | 0.50 | 0.50 | +0.40 | Centred in front of the canvas, closer to you |
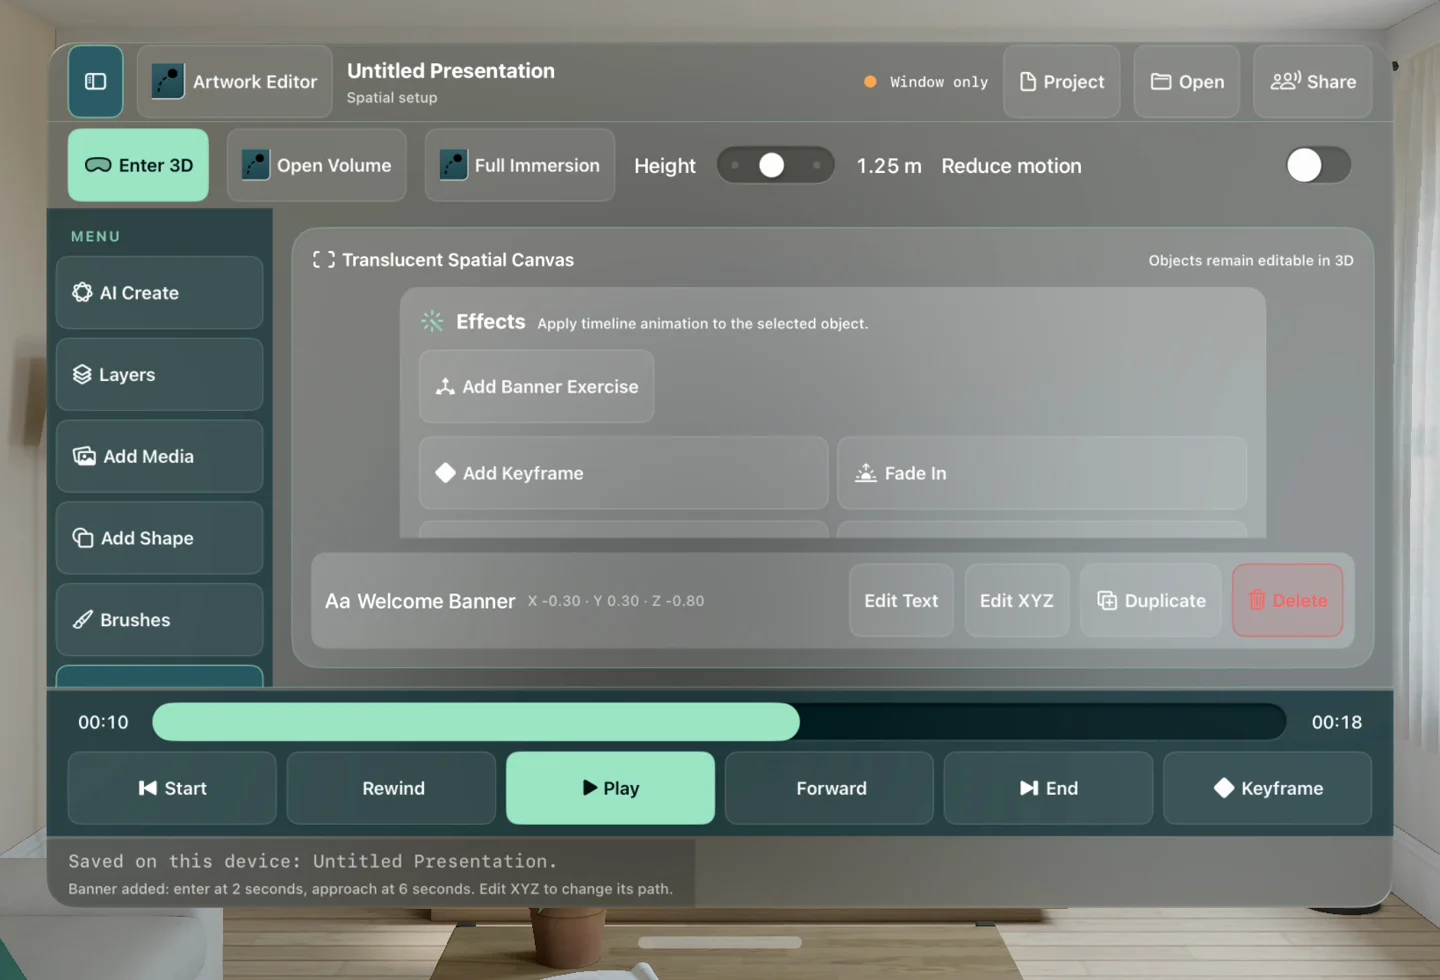
Earlier development capture of the synthetic banner. Use Templates in the current editor. It is also the input to the cross-platform depth, save/reopen and rendered-movie tests.
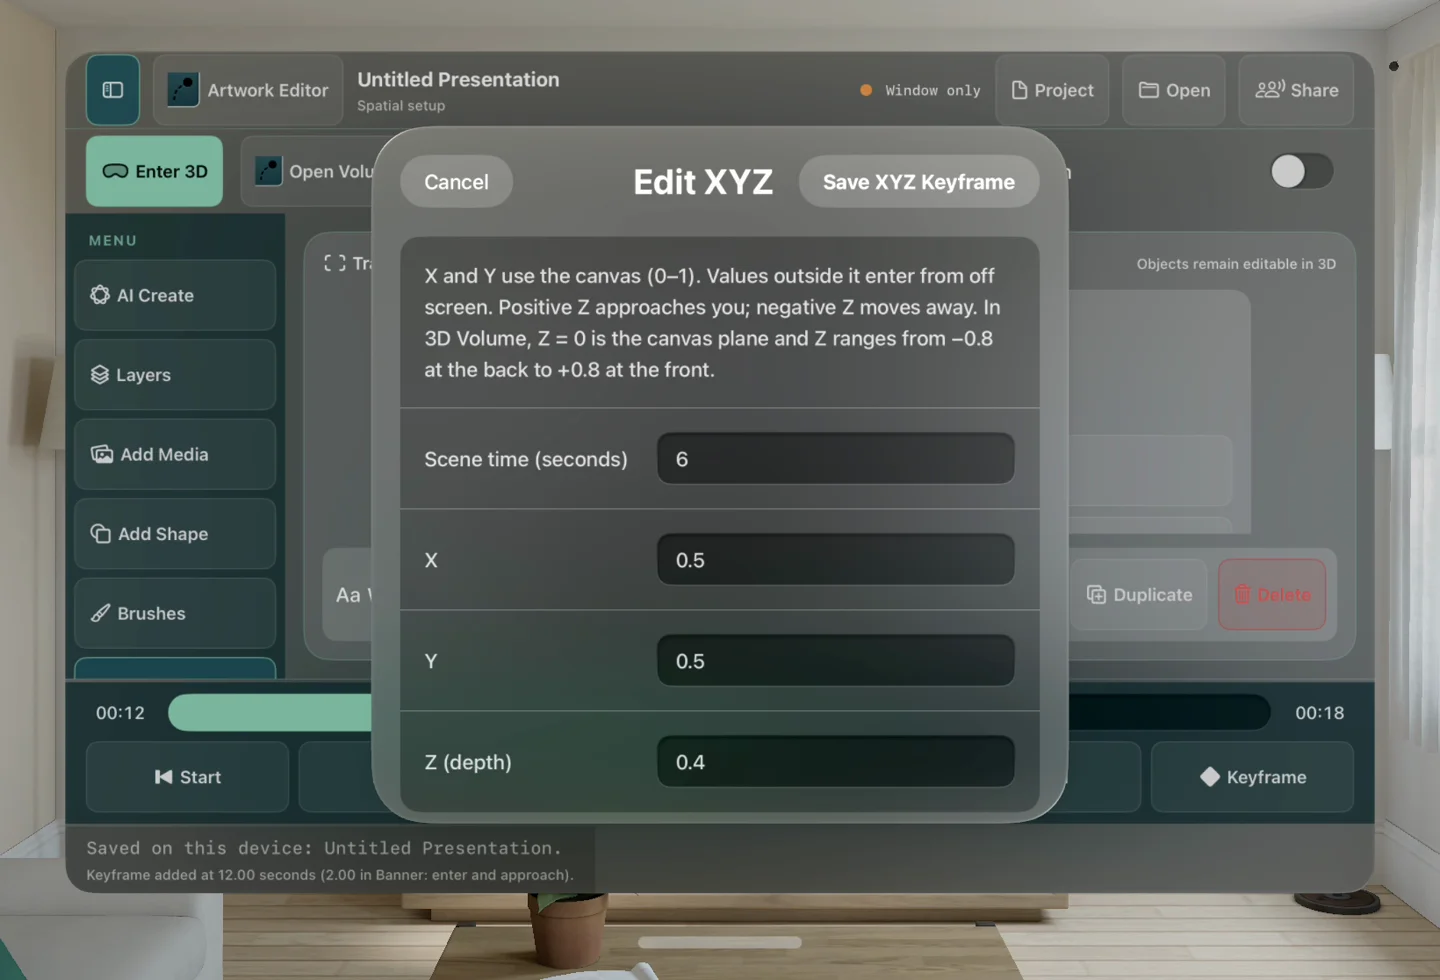
X/Y 0–1 spans the reference canvas. Z=0 is the canvas plane; negative Z goes behind it, positive Z comes out toward the front. Volume depth is −0.8…+0.8 in document space. A bounded window uniformly scales the entire volume to fit.
- In the window preview, choose Viewpoint → Right side, Left side, Above or Rear to inspect actual thickness and separation. Front and Perspective restore useful views; Closer/Farther adjust camera distance.
- Choose 2D to return to flat editing. Switching modes pauses playback and preserves the 3D coordinates, camera and ink. Choose 3D Volume again to restore the spatial view. Spatial ink is visible in 3D mode.
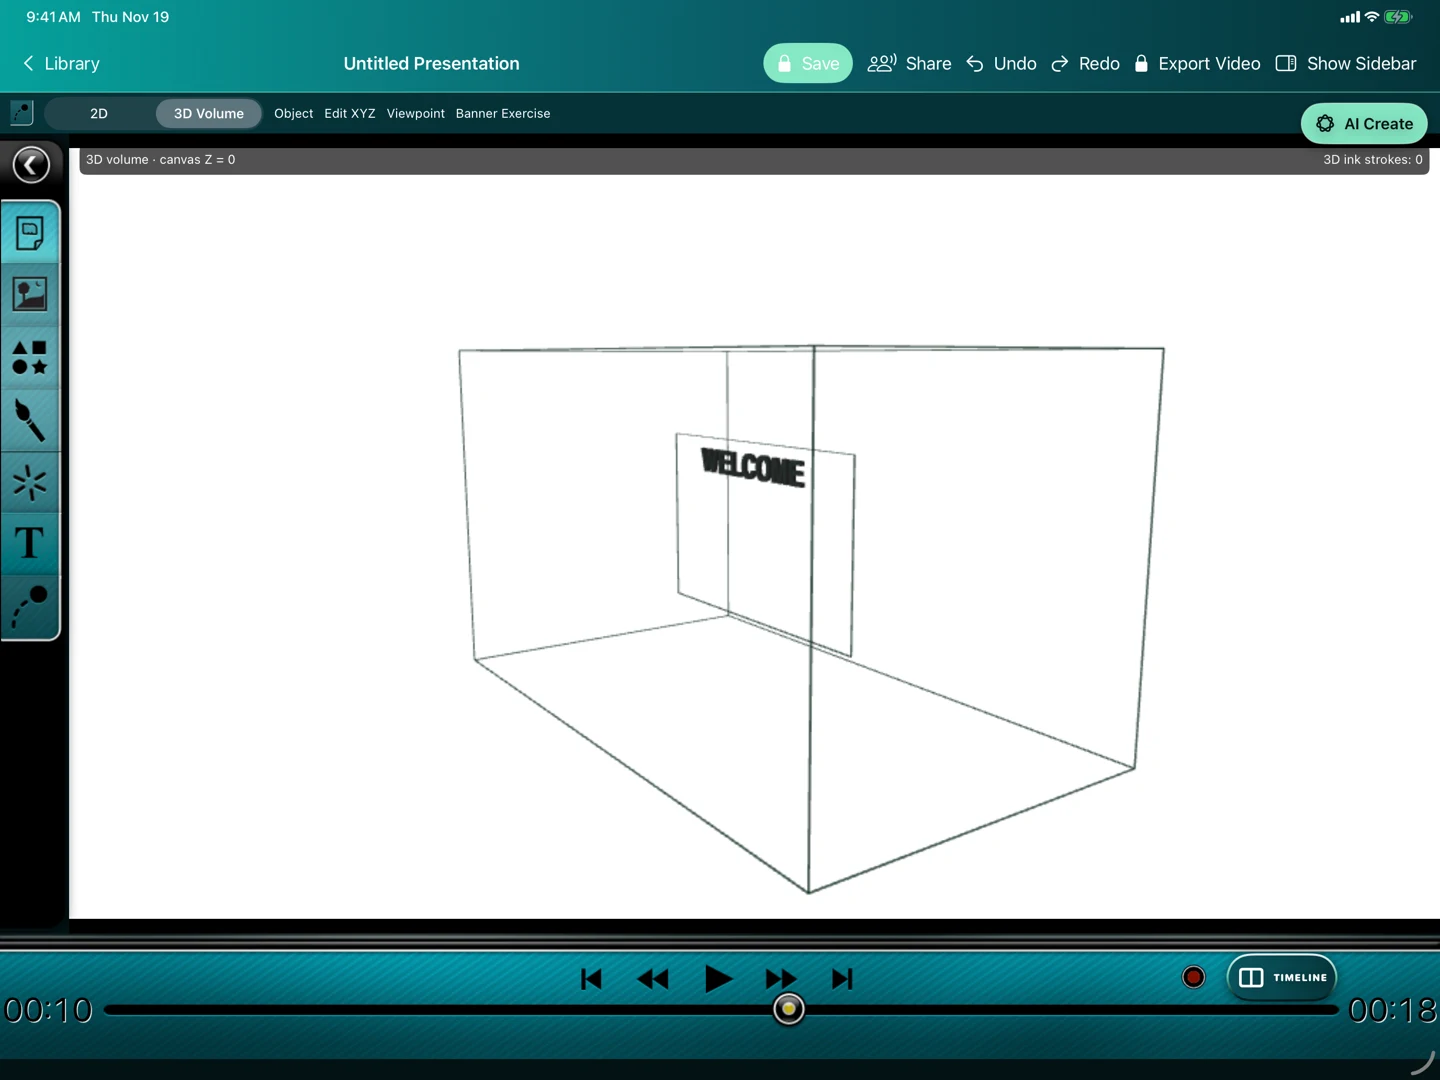
Mac and iPad use the same RealityKit scene construction as Vision Pro. Their screen shows a camera view of the volume, and their selected viewpoint is saved.
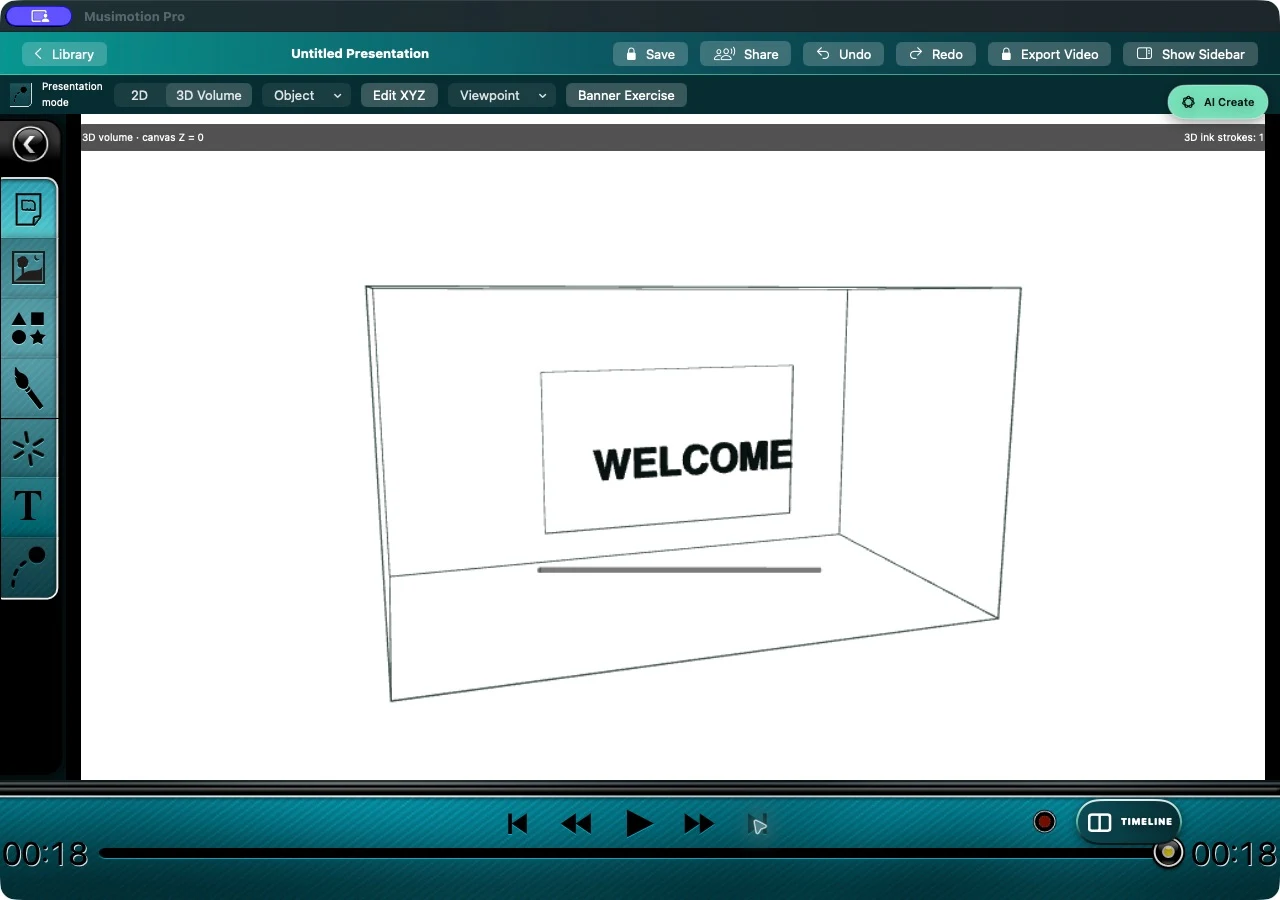
The Mac can open, render, edit XYZ and export the same package without a headset.
Invalid or out-of-range XYZ values keep the sheet open and explain the accepted range. Correct the field or choose Cancel. Do not enter a new pose until the intended object and scene time are selected.
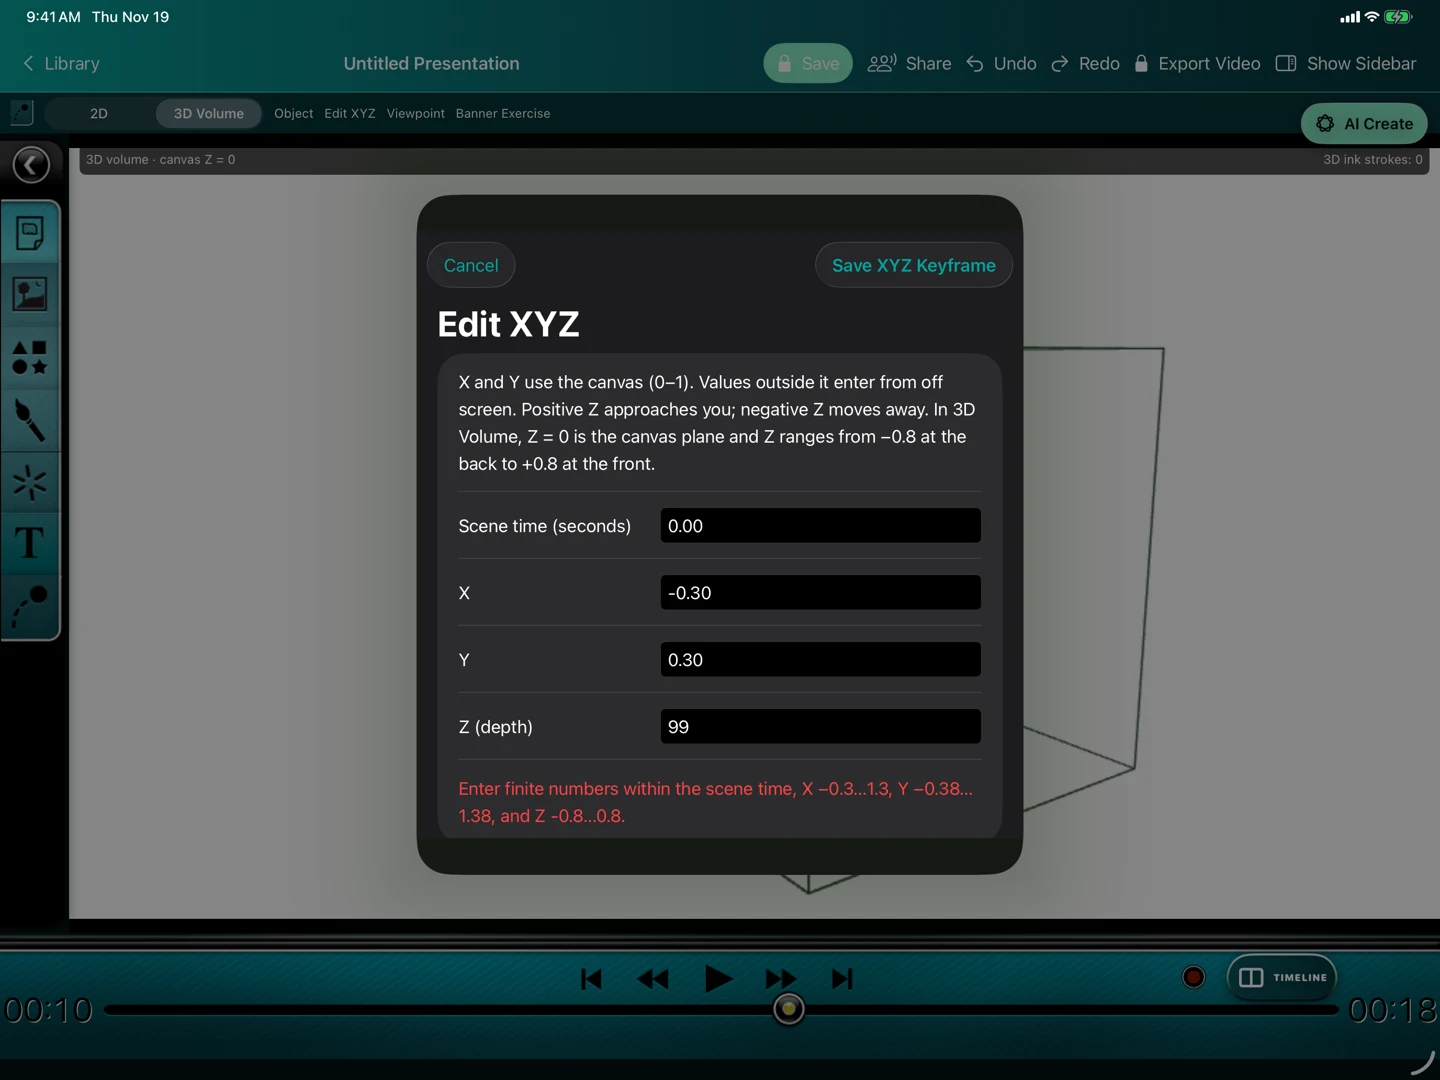
Recovery: correct the depth to −0.8…+0.8 in 3D Volume, or cancel without saving.
Download the banner exercise,
unzip it, and open the enclosed .musimotion package. This is a project fixture,
not an app installer. Its manifest records the archive checksum.
3. Open a bounded volume on Vision Pro
- Choose Open Volume. The new window contains a real three-dimensional box: extruded text and solid shapes occupy its depth; images and video remain textured surfaces positioned in space. The centre rectangle marks Z=0.
- Move the volume with the system window controls. View it from different sides to inspect depth. The volume scales uniformly instead of compressing Z.
- Use its original turquoise transport to play and scrub. The controls float in a system ornament so shrinking the art volume does not shrink the buttons.
- Choose Close Volume to return to the editor. Closing the volume pauses playback and disarms painting.
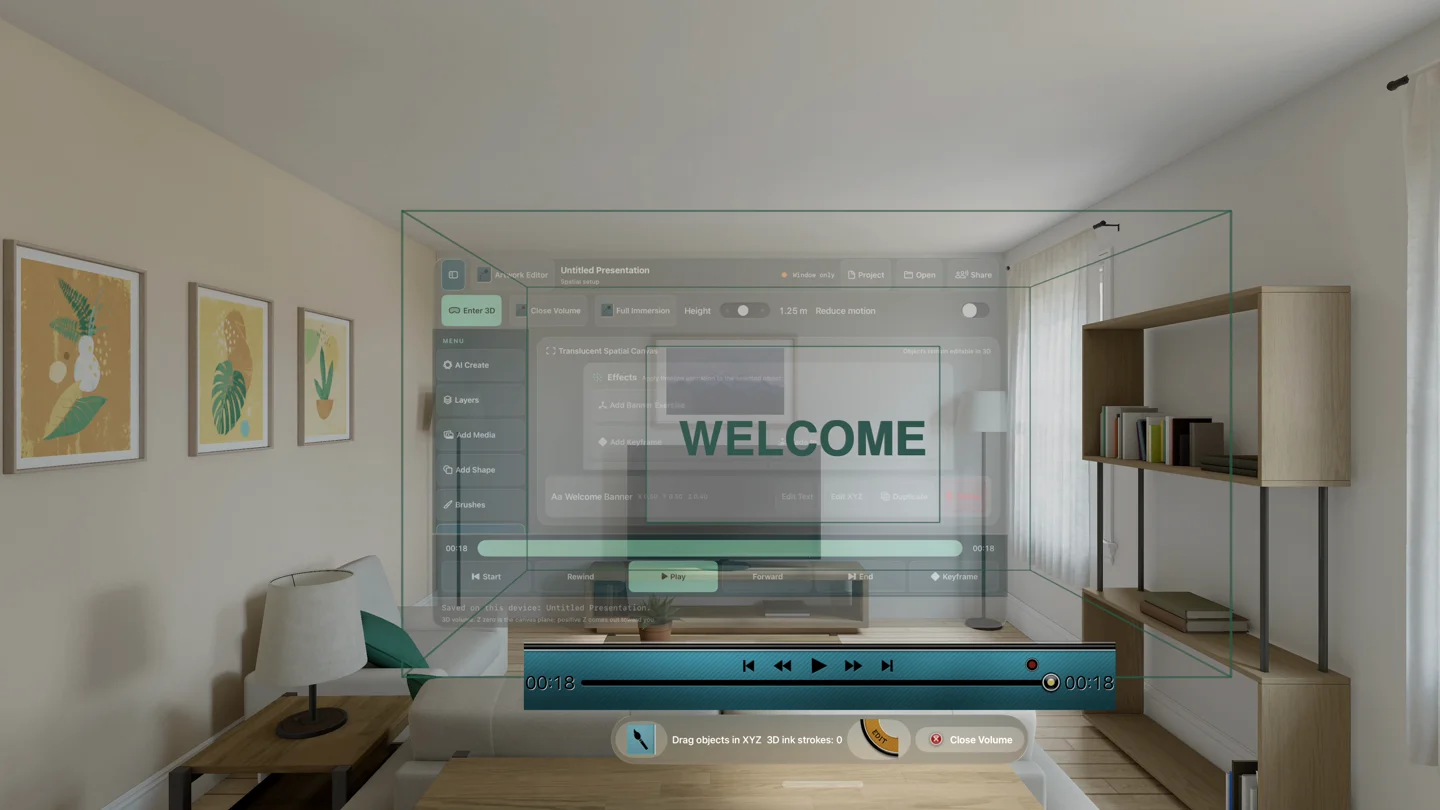
The wire box and canvas rectangle expose the depth relationship. The original editor may remain behind the volume; move the system window if they overlap.
The volume implements direct object dragging with a preserved grab offset and writes the resulting XYZ pose at the playhead. Direct headset gestures still require device acceptance testing. The visionOS 26.5 simulator exposes placeholder entity coordinates and cannot reliably synthesize this interaction. Use Edit XYZ for the automated, verified authoring route meanwhile.
When Play is running, selecting a layer keeps the song playing. Move or scale that layer as the playhead advances to write its pose at the current time. Pause and scrub back to review the movement. The spatial position and scale controls also write against the moving playhead. For a precise pose at a fixed time, pause before using Edit XYZ.
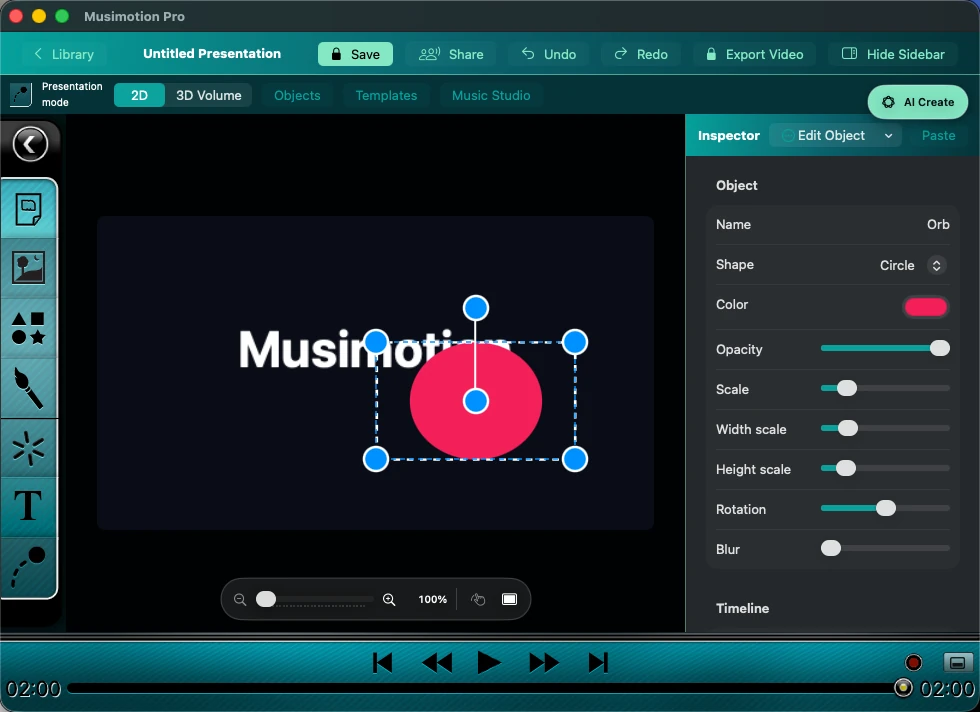
Mac. After moving and scaling the Orb during playback, pause and drag the scrubber between the start and end to compare its two recorded poses.
4. Present in full immersion
- Pause, select the intended scene/time, and choose Full Immersion.
- The editor closes and your presentation occupies an immersive space. Its scene background surrounds the content. Full immersion is a deliberate choice; Enter 3D keeps the mixed surroundings and editor workflow.
- Use the original floating transport above the content to play, pause and scrub. A presentation with multiple scenes plays them in timeline order.
- Choose Exit 3D. Playback pauses, painting disarms, and one editor window reopens. If you leave with the system controls instead, reopen Musimotion from Home to continue editing.
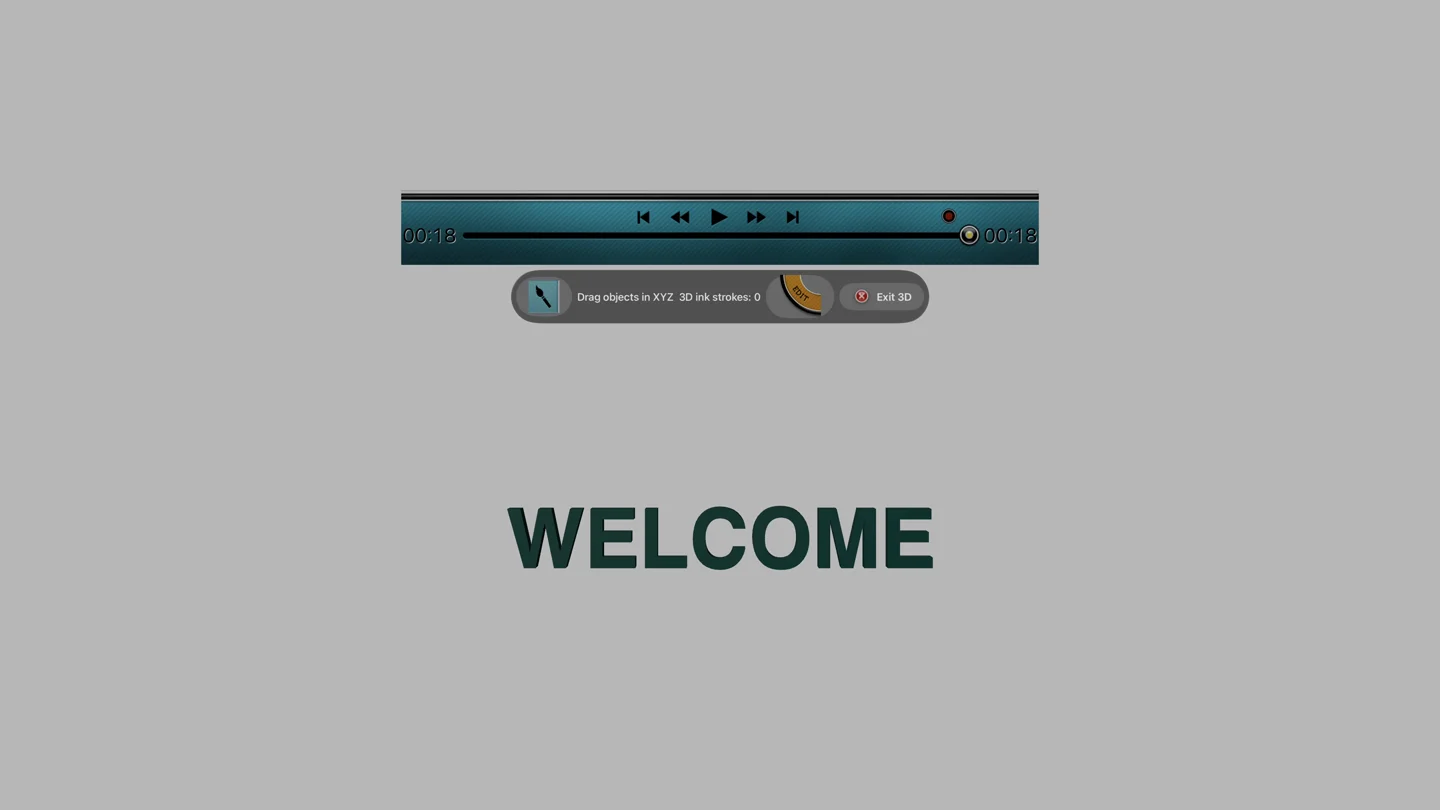
Full immersion removes the room passthrough. It does not turn the presentation into a flat video: the banner and other solid objects retain their geometry.
Start with short sessions and a stationary viewpoint. The app does not animate your camera. Position content and controls for relaxed viewing, check the entire animation path, and stop if uncomfortable. The sample is a test path, not a personal comfort guarantee after moving/recentring the workspace.
To adjust an object’s effects during editing, pause playback, select the object and look above your left hand. Look at the illustrated Open Effects Wheel badge and pinch. You can also press and hold the object for about two-thirds of a second. Painting and arcade performance use their own controls. Use the editor’s Effects panel if the wrist badge is out of view.
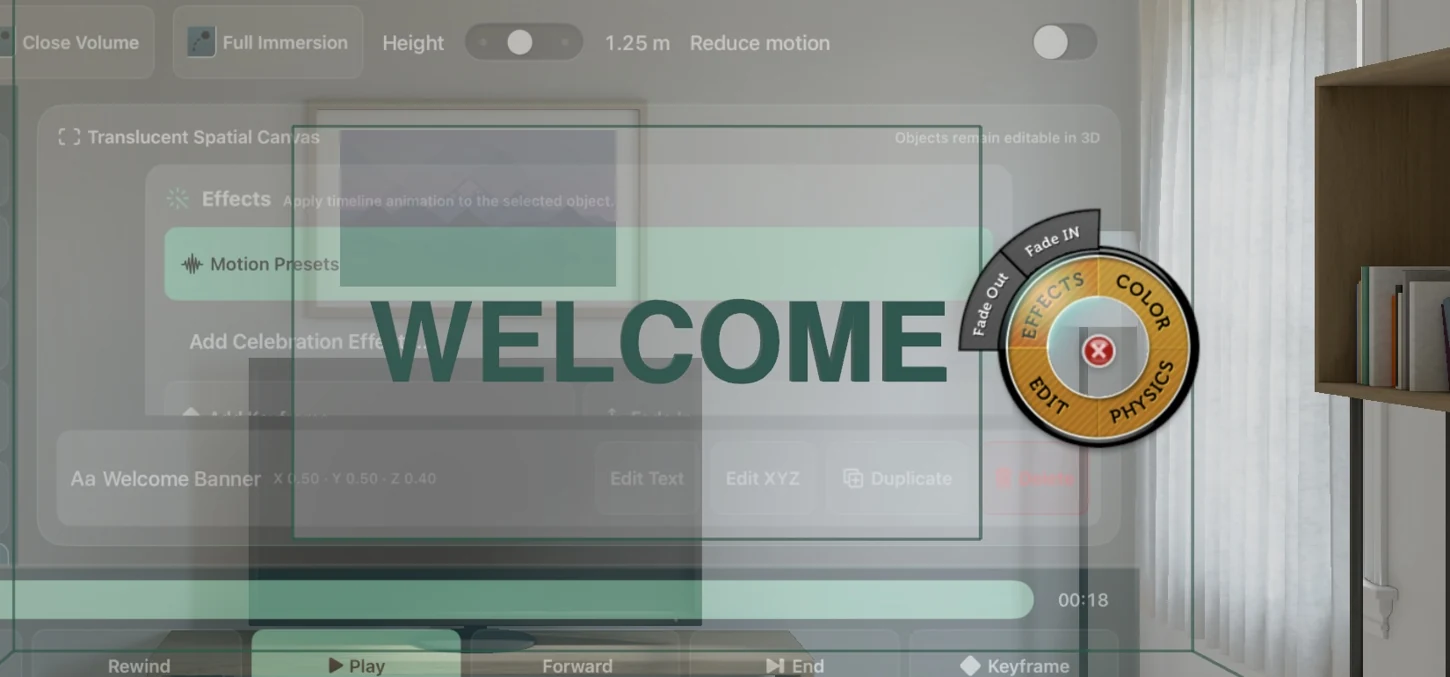
This Vision Pro simulator capture shows the same wheel opened from the illustrated Effects control in the transport. Testing the above-hand badge requires a tracked hand on the headset.
5. Paint, save and replay Sumi ink
- In 2D, open Brushes and choose Still Paint for a permanent mark or Live Paint to record how it was drawn. Choose a Sumi nib. In the brush panel, open Background and select Rice Paper. Close the background panel to return to the scene.
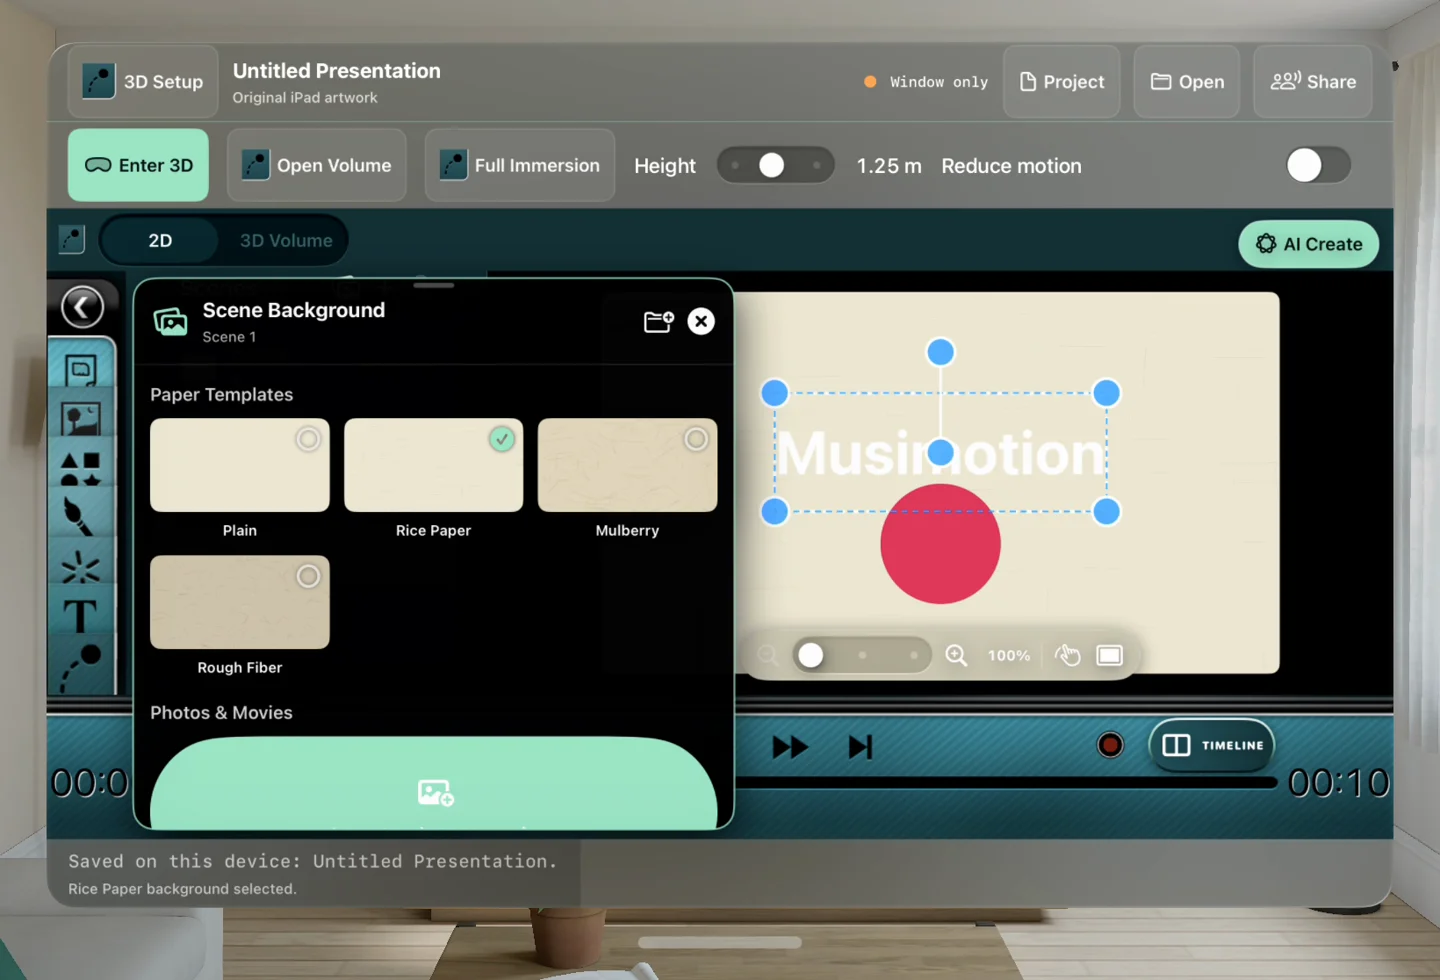
The paper and ink need enough contrast to see a pale wash. Use a light sheet and a dark ink color for this exercise.
- Start with Ink Wash. Leave Water near its wet end and Ink Load around one third. Make a broad stroke for the distant stalk. Cross it with a second stroke to see the gray deepen where the marks overlap.
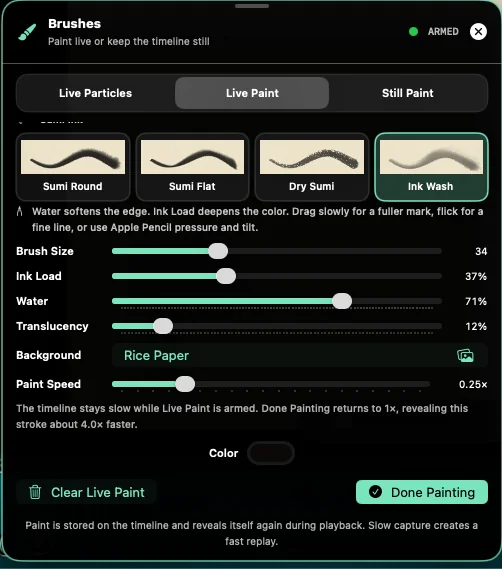
Water changes the reach of the feathered edge. Ink Load changes the amount of pigment. Translucency controls how much of the sheet or an earlier stroke shows through.
- Switch to Sumi Round for a leaf. Start lightly, press through the middle and lift toward the tip. With a Mac pointer or a finger, slow down for a fuller mark and flick to lift. Try Sumi Flat for the stalk joints, then use Dry Sumi with low Water on Rough Fiber to leave streaks of bare paper. Each nib remembers its mix while you switch between them.

This synthetic study uses 65 timed strokes. Download the editable bamboo study, unzip it, and open the .musimotion document in the development editor. Choose Go to End for the finished painting, or Go to Start and Play to watch the strokes appear. Watch the four-second movie exported from this study.
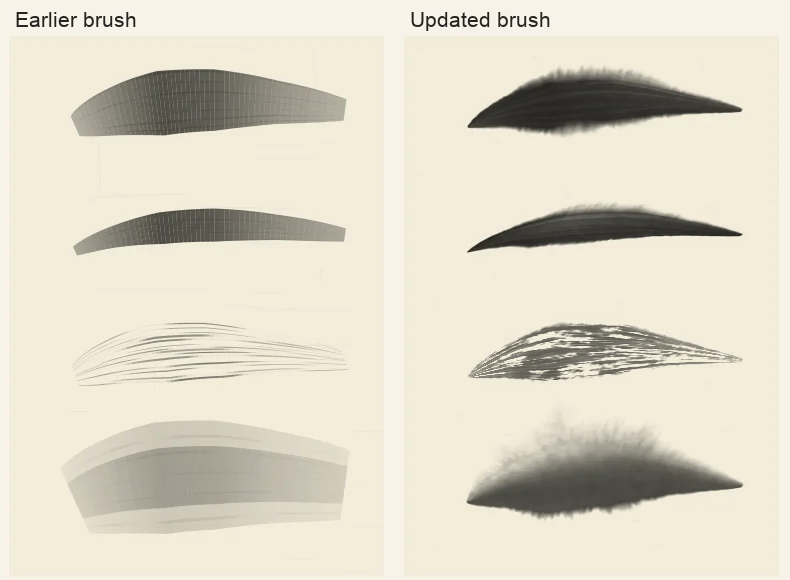
Identical recorded gestures in each column. From top to bottom, compare Sumi Round, Sumi Flat, Dry Sumi and Ink Wash. Look for the feathered edge of the wash and the slivers of paper in the dry stroke.
- In Live Paint, draw, release and scrub backward. Press Play to reveal your marks again. Use Objects to edit a recorded stroke’s Water or Ink Load. Choose Still Paint when you want ink baked into the selected paint layer. Change the paper before painting the still layer. Previously baked pixels keep their original appearance. Earlier Live Paint strokes replay with the updated nib and its default Water setting. The feathered edge appears as you paint and stays in place after you lift the brush.
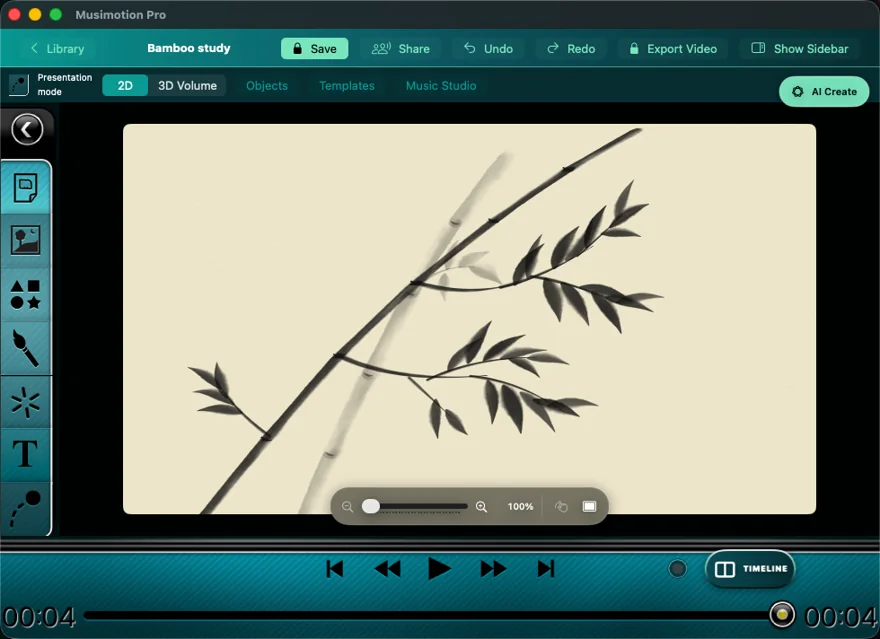
If the opened study looks blank, use Go to End. A Live Paint stroke first appears at its recorded time. For a new mark, also check the selected paint target and ink color. Undo removes an unwanted stroke.
- The optional 3D Setup → Brushes easel also offers Record Live Ink and Recording speed. Its saved stroke count confirms recorded data.
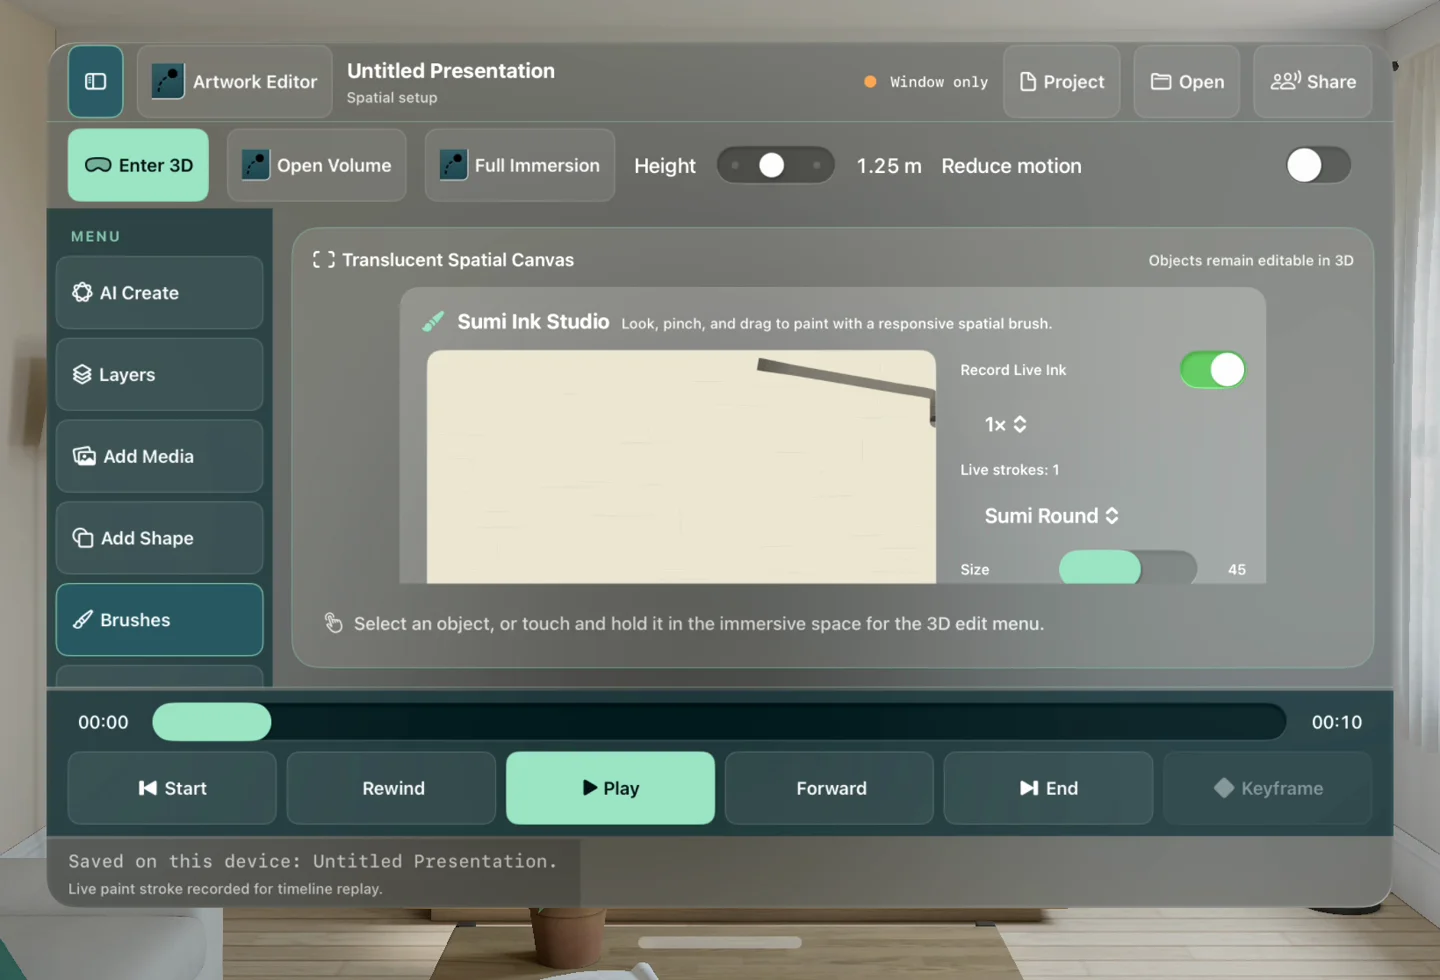
Paper ink, saved raster assets and timed reveal use the shared Sumi engine across Mac, iPad and Vision Pro. Entering a volume also renders these at Z=0.
- For solid spatial ink, switch to 3D Volume, open Brushes, choose Still Paint or Live Paint, and set Ink depth (Z). Drawing in the Mac/iPad camera preview places each point on that depth plane.
- On Vision Pro, Paint 3D Ink arms the volume’s drawing surface and exposes its depth slider. Done Painting returns to object manipulation. The physical hand gesture remains part of the device acceptance checklist.
- Eraser removes a whole touched spatial stroke at the chosen depth; undo restores the gesture. Clear 3D Ink clears spatial strokes with undo. Saved spatial strokes retain XYZ and timing when reopened on another platform.
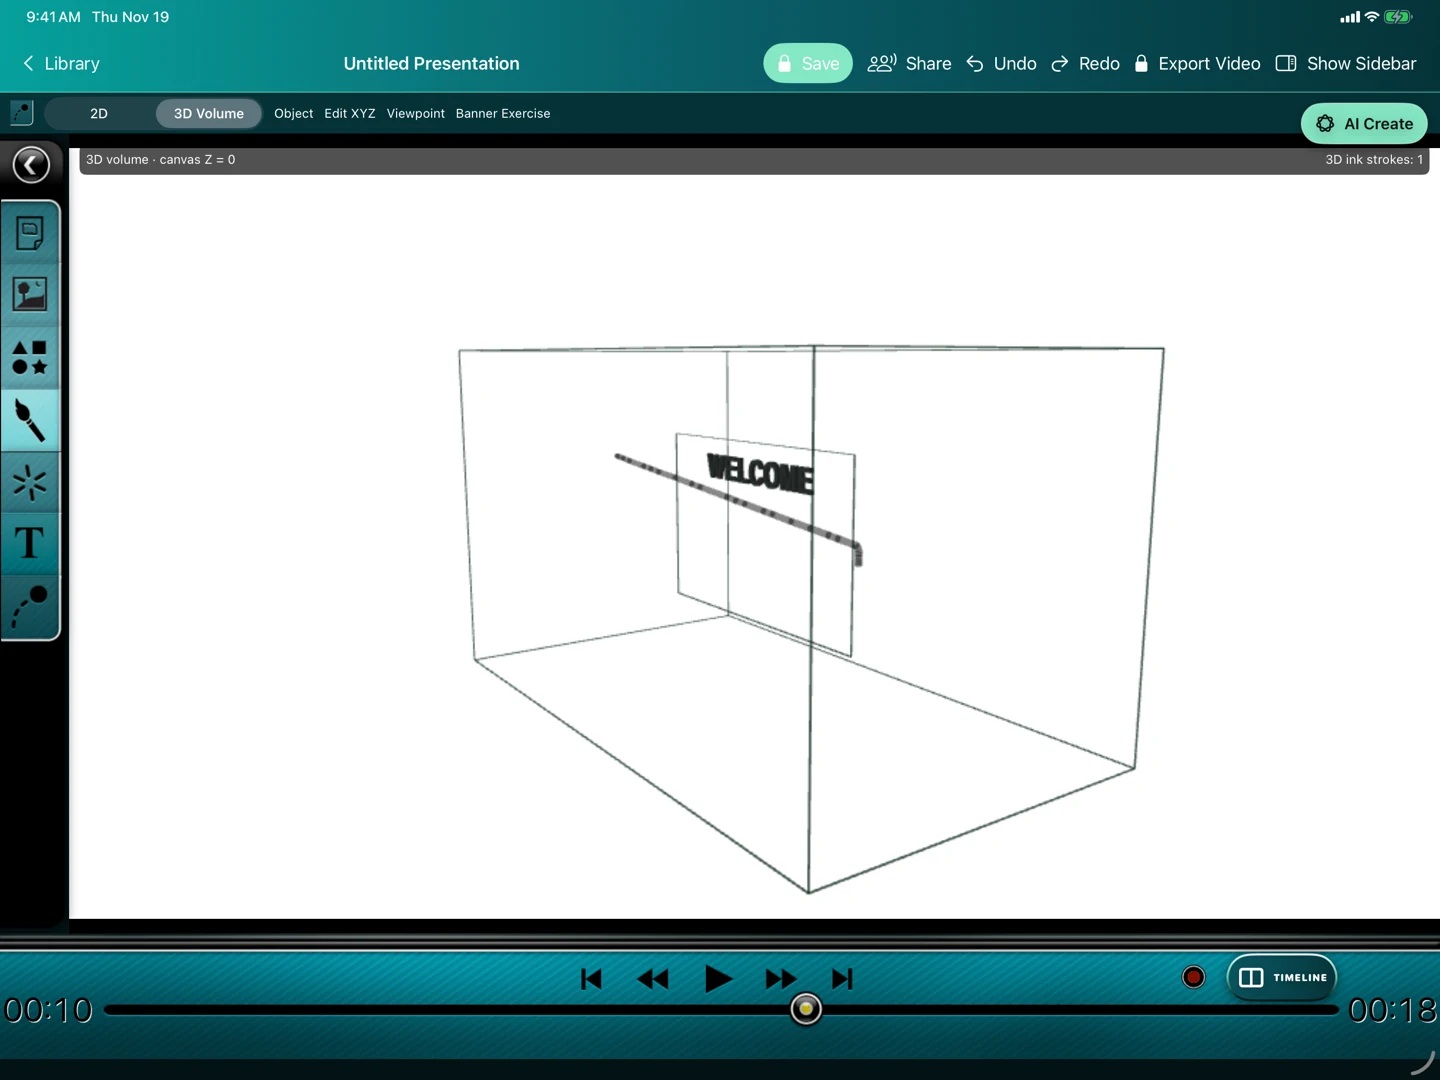
3D ink is solid geometry. Paper absorption, Pencil dynamics and particle recording belong to the 2D tools; they are not simulated as volumetric fluids. Flow and translucency affect the spatial stroke opacity.
6. Save, reopen and render on another device
- On Vision Pro choose Project → Save on Device and check the saved status. Local edits also autosave after a short idle interval, including full immersion.
- Choose Project → Saved Presentations to reopen from disk, or Save a Copy… for an independent title and project identity.
- Export Project… writes a portable package with embedded media/paint and the mode, camera, XYZ keyframes and spatial strokes. Transfer it using your chosen file-sharing route, then open it in the updated Mac or iPad build.
- Export Video renders the saved camera view for a 3D project and retains the original flat rendering path for a 2D project. A movie is a 2D view of the presentation; use the package for interactive spatial playback.
- When the export finishes, play the movie in the export sheet and choose Share Video. View Export reopens the last finished file. Use Export Video again after an edit to render the updated presentation.
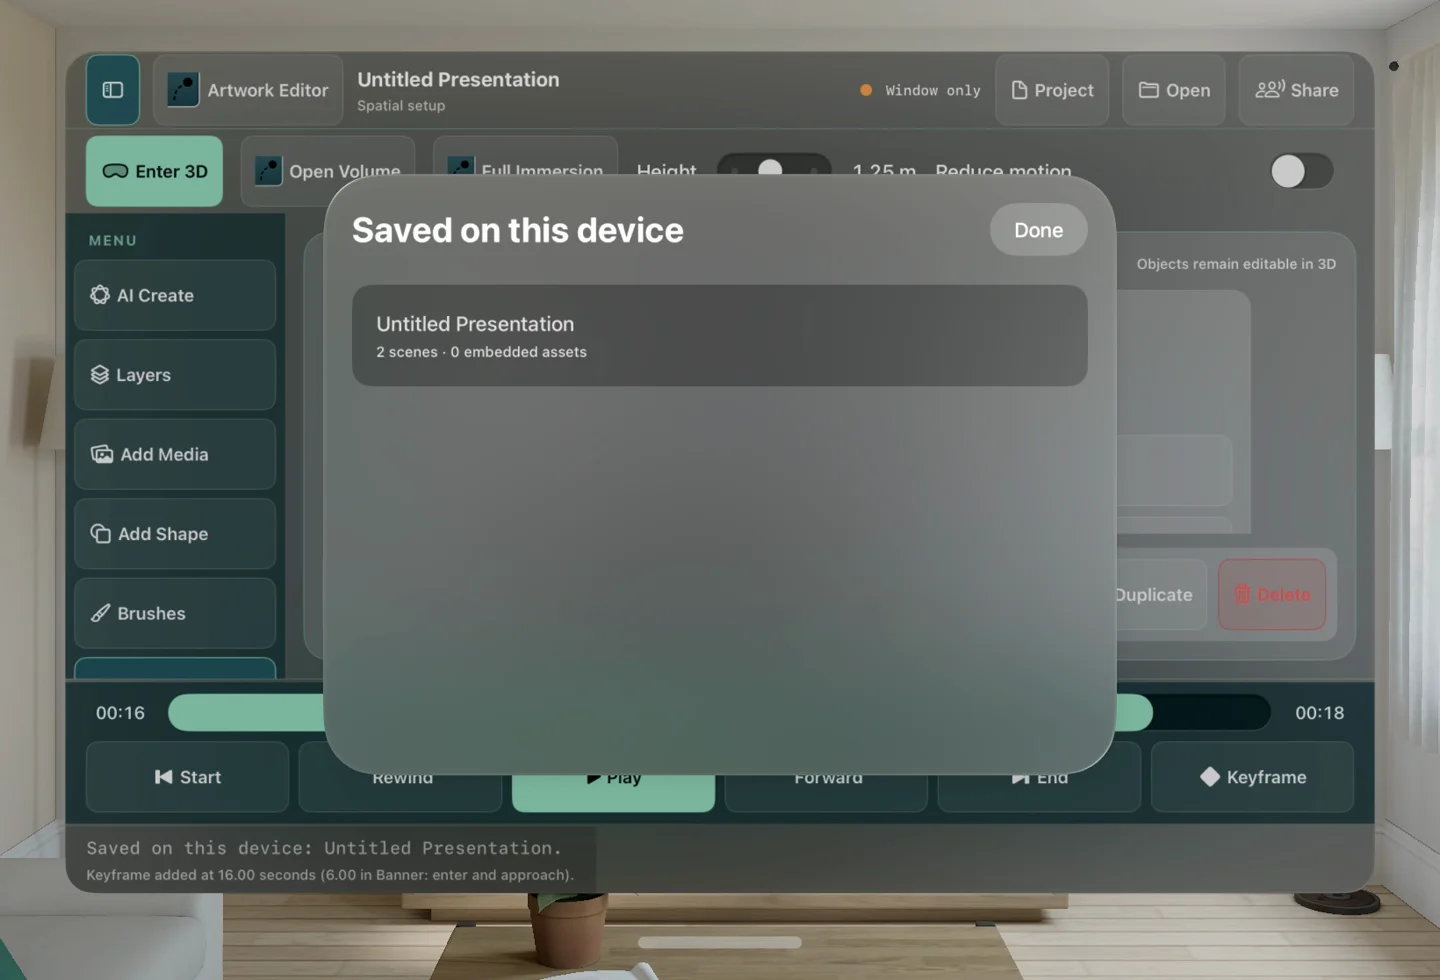
Local save is not cloud publication. Export may require the corresponding Pro entitlement. A cancelled picker does not mean the file was saved; a save error requires checking storage and preserving an exported copy before closing.
7. Effects, media timing and evidence limits
Use Artwork Editor for the original effects and media controls. Select the intended layer before applying masks, crop, blur, text style, opacity or transforms. Shared rasterization keeps textured layers and exported movies consistent. Blurred text/shapes use a textured surface so the effect remains visible; plain text and shapes keep solid geometry. Images and video remain planar media.
Layer start time and source trim differ: a layer starting at 0.7 seconds with a 0.5-second source trim begins that source segment at scene time 0.7 seconds. Seek, pause, rate and mute share a timing policy. Spatial playback suppresses window audio to avoid duplicated tracks. The 3D renderer also includes scene crossfades and background video surfaces. Celebration balloons have their own collision simulation. Ordinary animated layers use the existing trajectory model. Live video masks/blur and general-purpose spatial particle effects remain limited. Reduce motion suppresses decorative particles and physics motion while deliberate timeline animation remains available.
Automated tests exercise saved projects, real RealityKit frames, solid text thickness, behind/front poses, camera views, Sumi reveal, masks/blur and movie frames. Exported synthetic audio is decoded and checked within 80 ms. This does not measure physical speaker latency, headset acoustics, sustained frame rate or comfort. The test report records exact runs and the explicit simulator gesture limitation. The headset checklist remains the acceptance gate for hands, gaze, repeated grabs and longer sessions.
8. Make a birthday surprise
Select any picture below to enlarge the controls.
Choose Templates → Birthday Surprise → Import into Presentation to add a 16-second scene. It opens in 3D Volume. The first three seconds count down from three. At three seconds, the gold Happy Birthday! greeting moves forward as balloons and confetti begin to fall. Fireworks start two seconds after the effects cue.
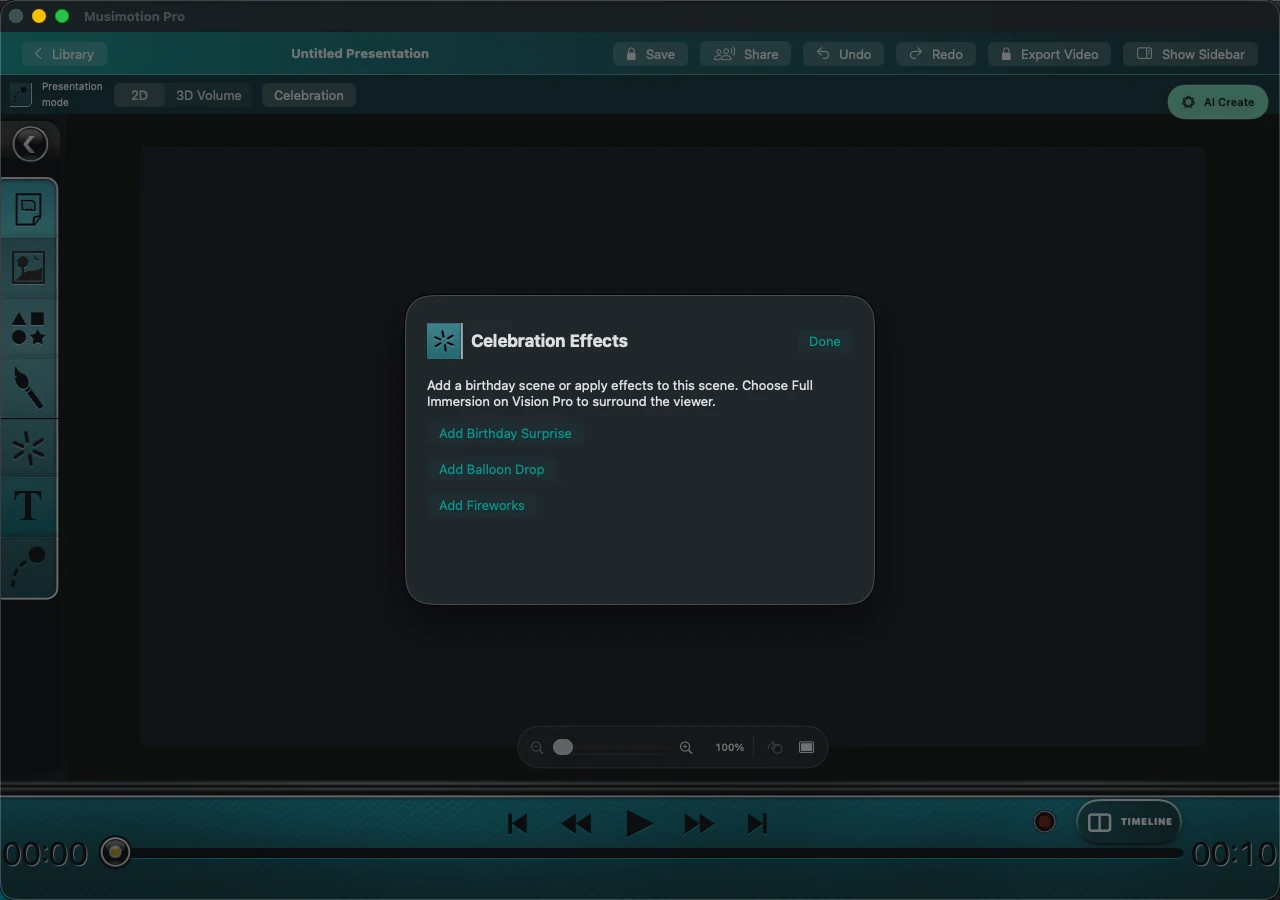
Earlier Mac development capture of the effects controls. The current editor opens the complete birthday scene from Templates.
To decorate a scene you already have, select that scene first, choose Effects → Celebration, then Add Balloon Drop or Add Fireworks. Turn Balloon Drop, Fireworks and Confetti on or off independently. Remove Effects clears these decorations. The countdown and greeting are editable text layers and can be selected or removed separately.
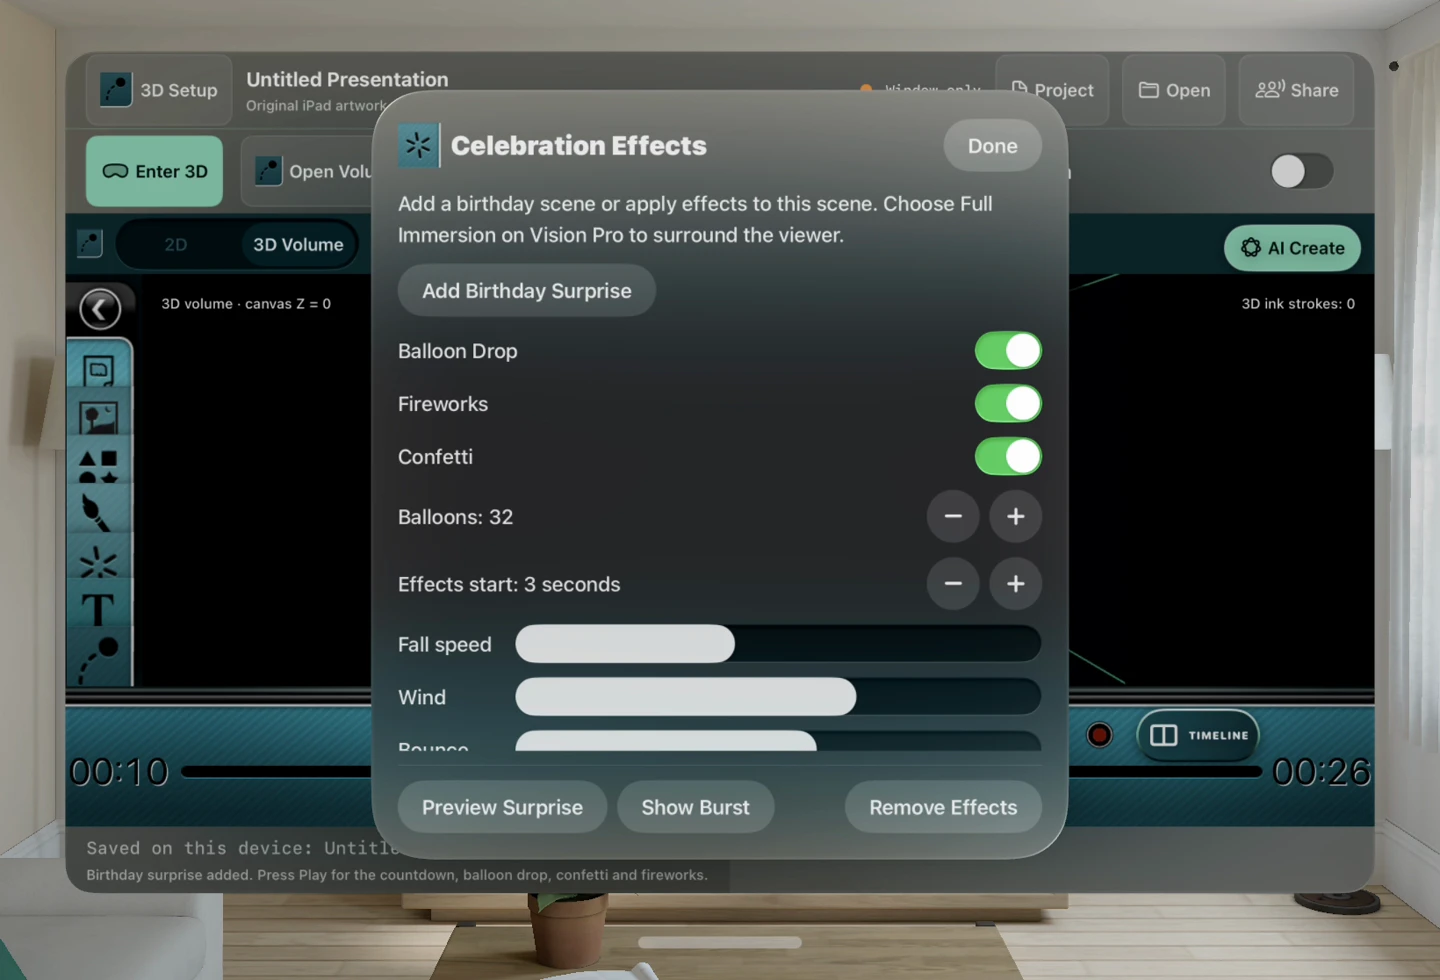
Vision Pro Simulator. The same scene settings are available in the artwork editor.
Use Balloons to choose 8–64 balloons. Fall speed changes how quickly they accelerate, Wind changes sideways drift, and Bounce controls how much speed they retain on contact. Effects start is measured from the beginning of the scene. Set it before the end of the scene so there is time to see the effects. Changing this cue leaves your text layer timing intact.
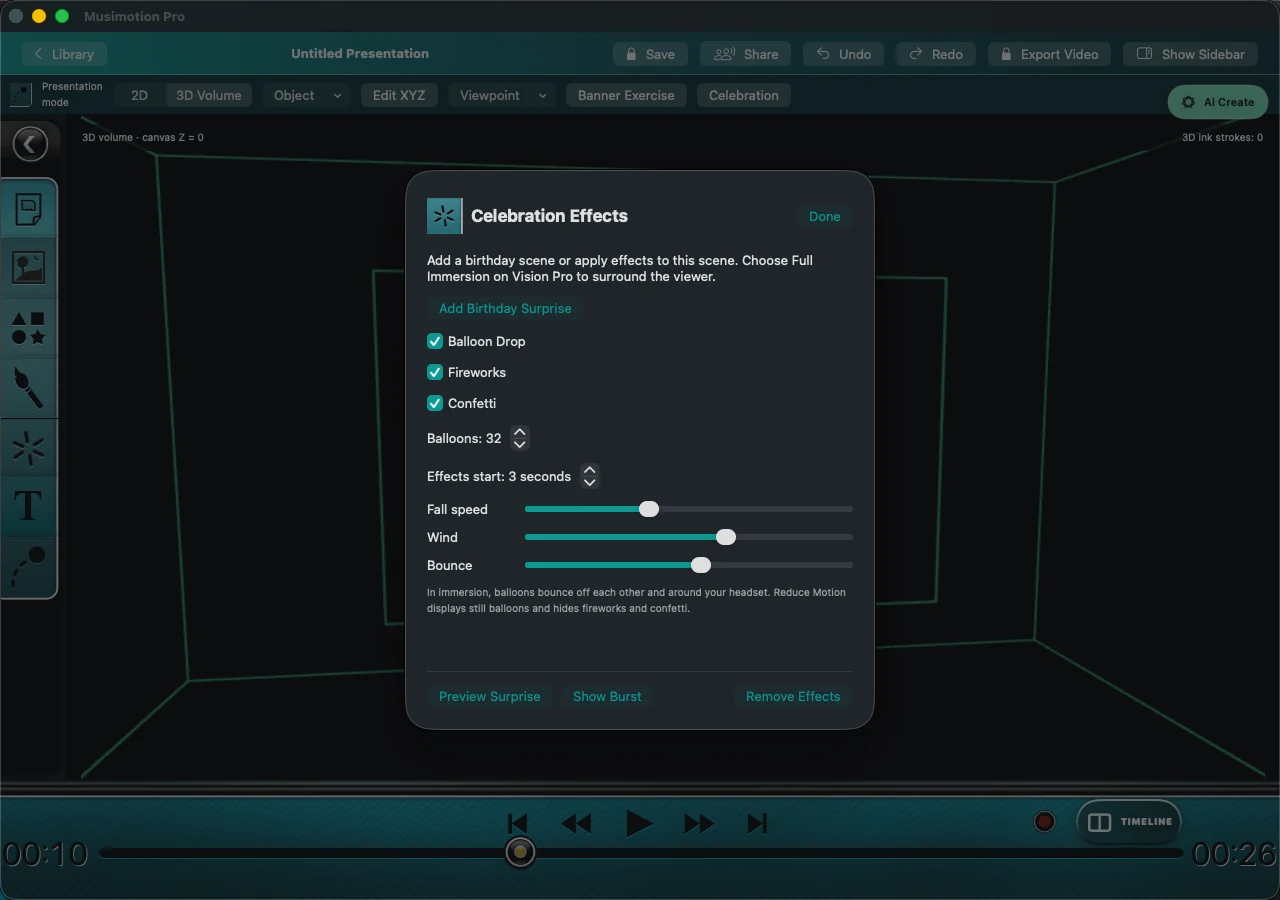
Mac. The switches control the decorations separately. Timing and physics belong to this scene.
Choose Show Burst to pause on the first firework, just under three seconds after the effects cue. Choose Preview Surprise to play from the start of the scene. Both preview buttons return a 2D view to 3D Volume. If Show Burst is dimmed, enable Fireworks and place the effects cue at least three seconds before the end of the scene. Pause with the turquoise transport. On Mac or iPad, choose Viewpoint → Celebration close-up to frame the party. Choose Right side or Rear to see the spacing between balloons. Save the project to keep the editable effects. Export Video renders a movie from the saved camera using a stationary reference viewer for balloon contact.
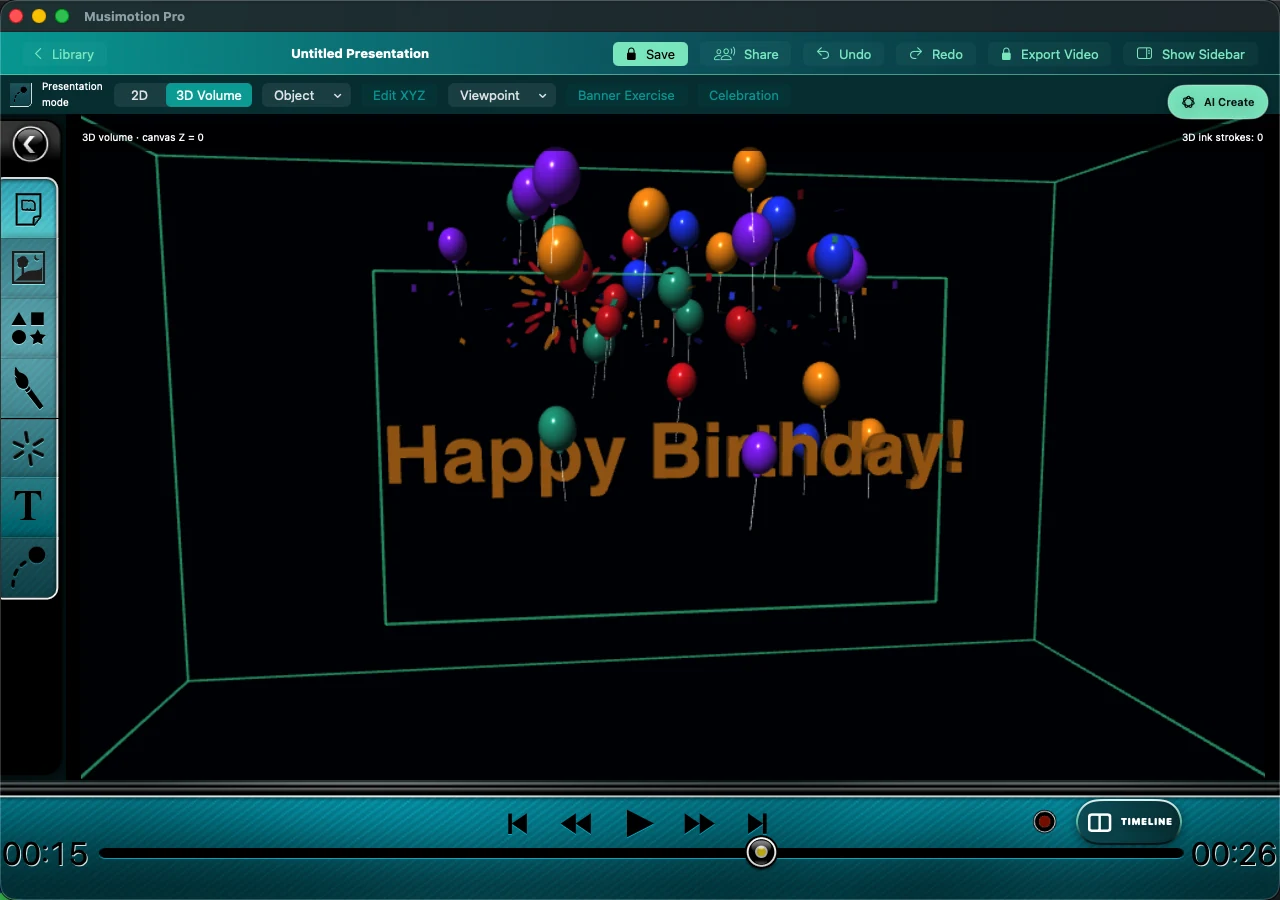
Mac. The saved camera frames the celebration for playback and movie export.
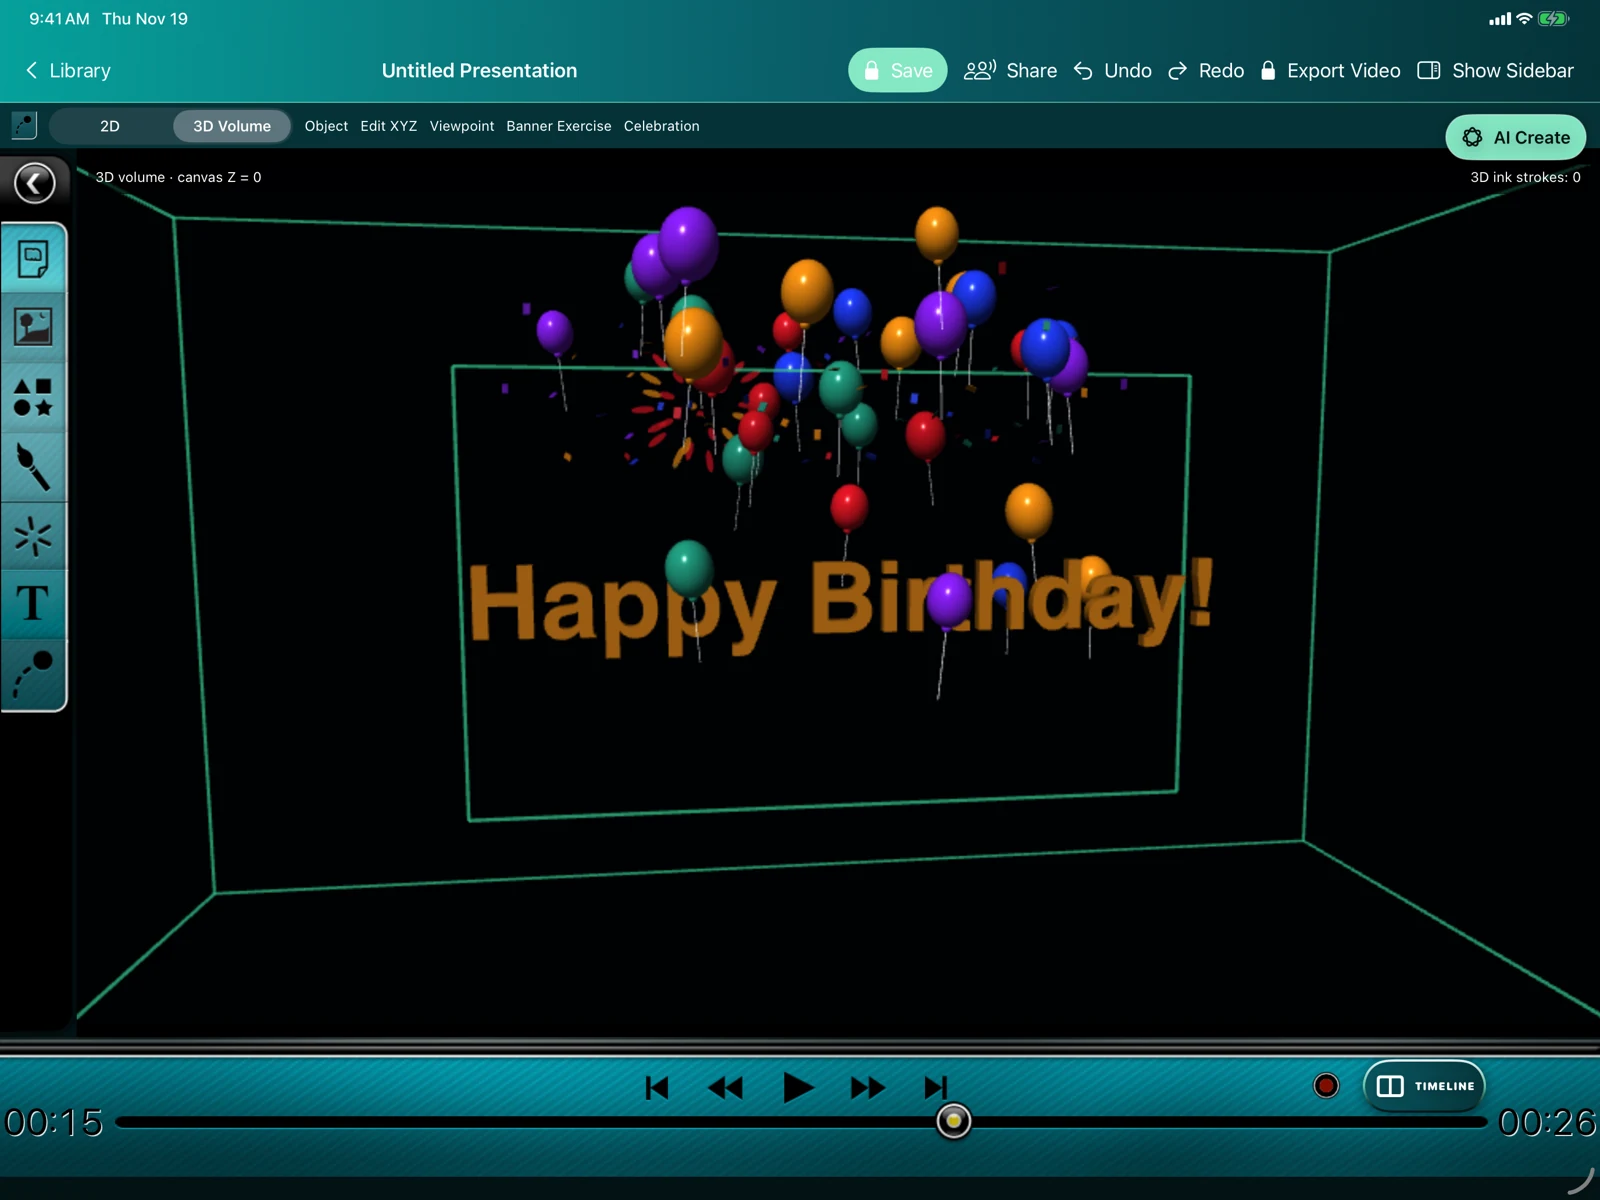
iPad Simulator. The same scene can be played and scrubbed from the original iPad transport.
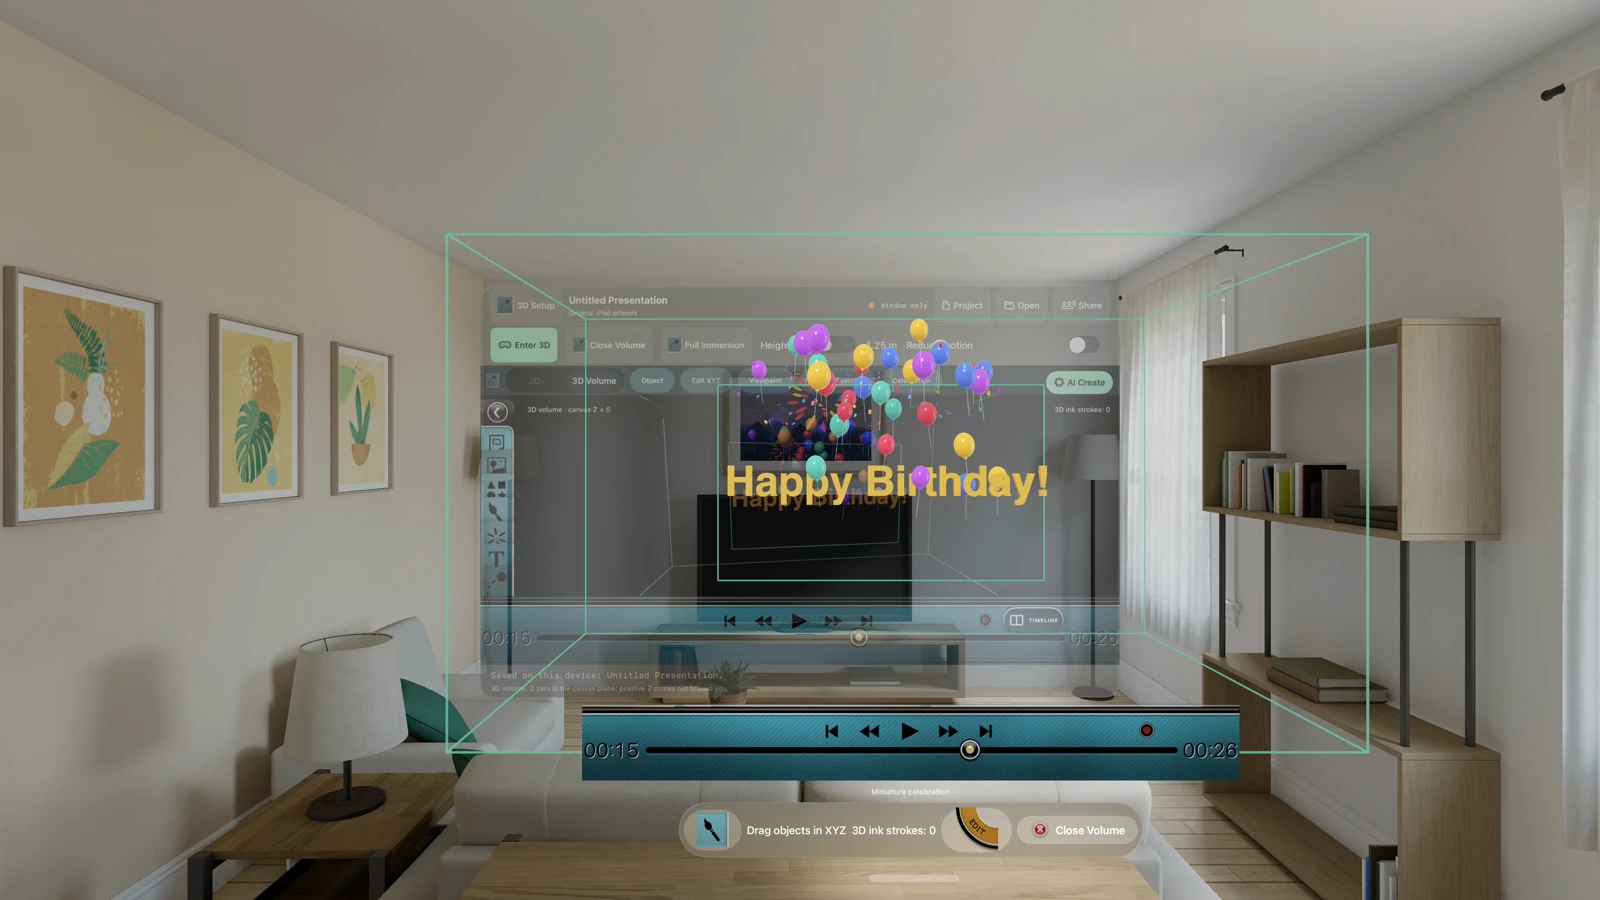
Vision Pro Simulator. Open Volume presents the party in miniature.
On Vision Pro, pause and rewind the birthday scene, choose Full Immersion, then press Play/Pause. Look up and around as balloons descend from overhead, collide with one another, glance off a virtual envelope around the viewer and settle at a virtual floor. The display reports Viewer contact active when device tracking is available. Musimotion uses the current headset position in memory and keeps the arena at its initial location. Balloons crossing your line of sight to the birthday greeting turn translucent while it is visible. Balloon contact is visual.
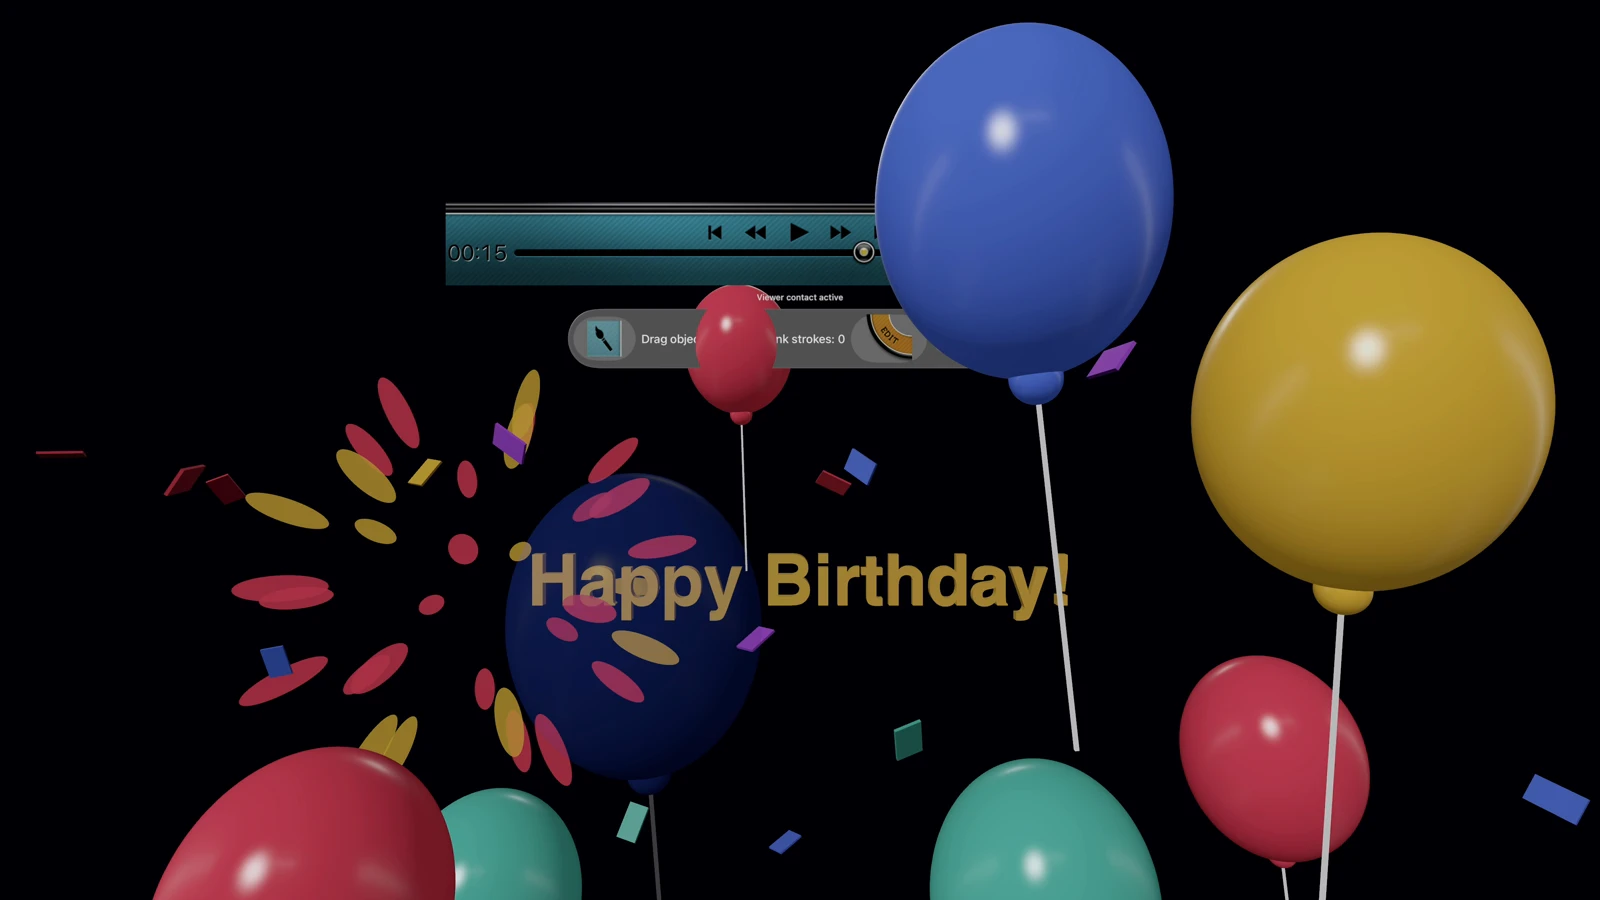
Vision Pro Simulator. In Full Immersion, a balloon in front of the gold greeting turns translucent while the rest of the drop remains visible.
If live tracking is unavailable, the presentation uses a reference viewer. To check the effect from a fixed position, use the 3D preview or export a movie. For a quieter presentation, enable Reduce motion in 3D Setup or the system Reduce Motion setting. The balloons form a still arrangement and the greeting plays without fireworks or confetti. Exit 3D returns to the editor.
To try the same scene used in the package test, download the birthday presentation, unzip it, and open the enclosed project on Mac, iPad or Vision Pro. The sample manifest records its size, checksum and source test.
9. Create a rhythm scene
Open the artwork editor and choose Templates → Rhythm Stage → Import into Presentation. The new scene starts with Orbit Pulse, an eight-bar House arrangement at 120 BPM. The two-second lead-in gives the first shape time to approach. The song then plays for 16 seconds, with 32 targets on the default chart.
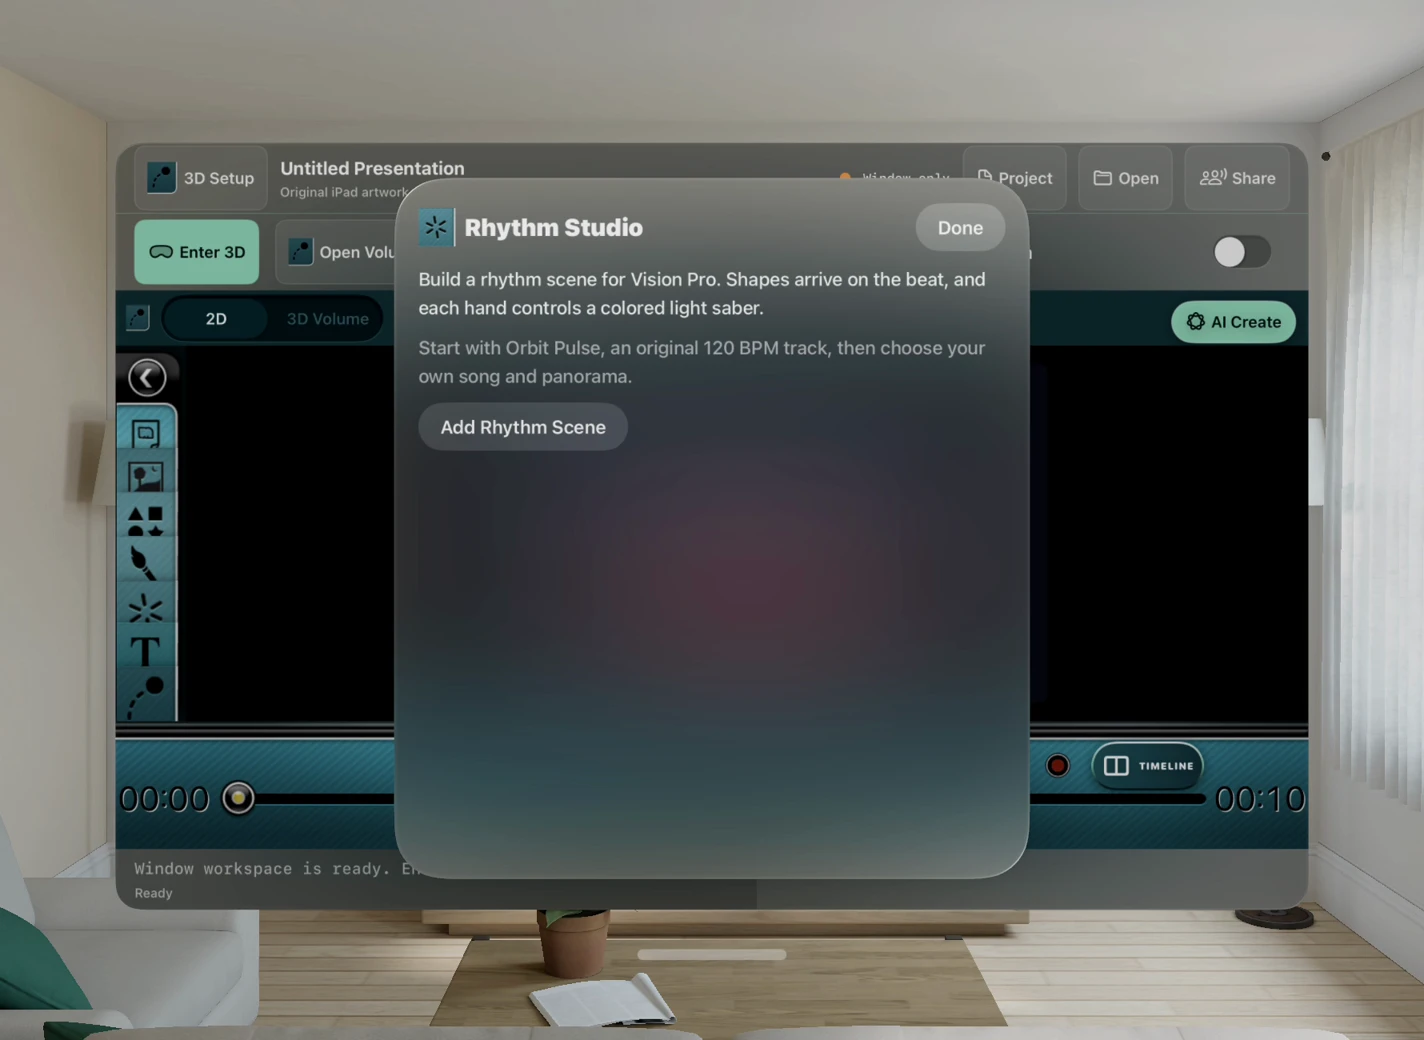
Earlier Vision Pro Simulator capture of the rhythm starter. In the current editor, import Rhythm Stage from Templates.
For a different soundtrack, choose Objects → Rhythm Settings… → Song → Generate Music…. Choose a style and ensemble, generate a take, and listen with Preview. Use as Rhythm Song puts that performance in the scene and builds a chart from its musical accents. Undo restores the previous song and chart. For instrument choices and audio examples, see Generate a soundtrack.
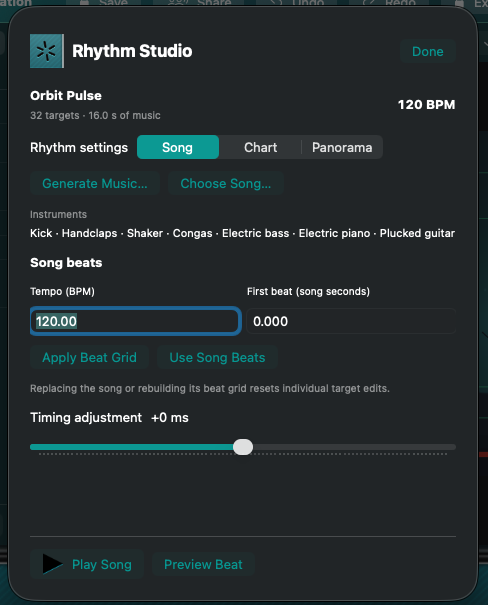
Mac development editor. The starter has 32 practice targets. Electric piano, guitar, bass and percussion play around that steady practice beat.
To import a recording instead, choose Choose Song… on the Song tab. Pick a local audio file between half a second and 30 minutes long, up to 128 MB. Musimotion measures rhythmic accents on the device and embeds the audio in the project. If you hear an accent where a target should arrive, use Timing adjustment to move the chart up to half a second earlier or later. This keeps your edits to individual targets.
For a song with a steady tempo or no detected beats, enter its Tempo (BPM) and First beat (song seconds), then choose Apply Beat Grid. For example, enter 120 and 0.35 if the first beat occurs 0.35 seconds into a 120 BPM recording. Use Detected Beats restores the analyzed accents when available. Replacing the song or changing the underlying beat grid clears per-target edits, so settle the timing before designing the chart.
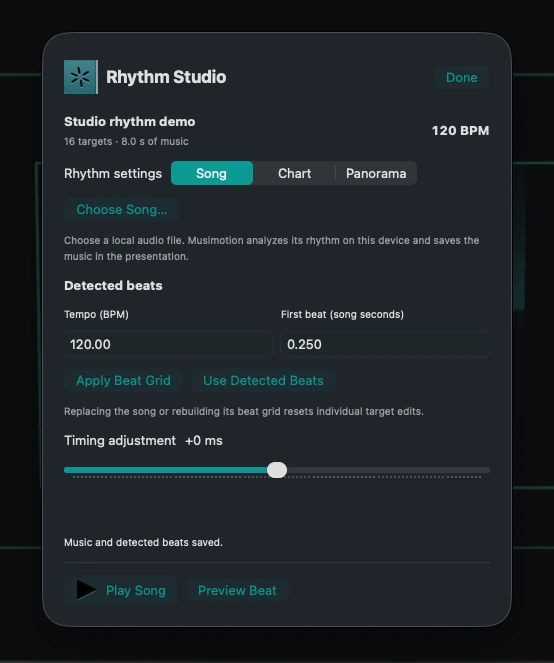
Mac. The synthetic recording has finished importing. The title and target count identify the new chart.
Open Chart. Use Target density to choose Every beat or Every other beat. Approach time controls how long you can see the target before it arrives. Select a target with Previous, Next or the slider. Set its Hand (left or right), Lane (inner or outer) and Shape (cube, orb or diamond). Use Reset This Target to restore its generated settings.
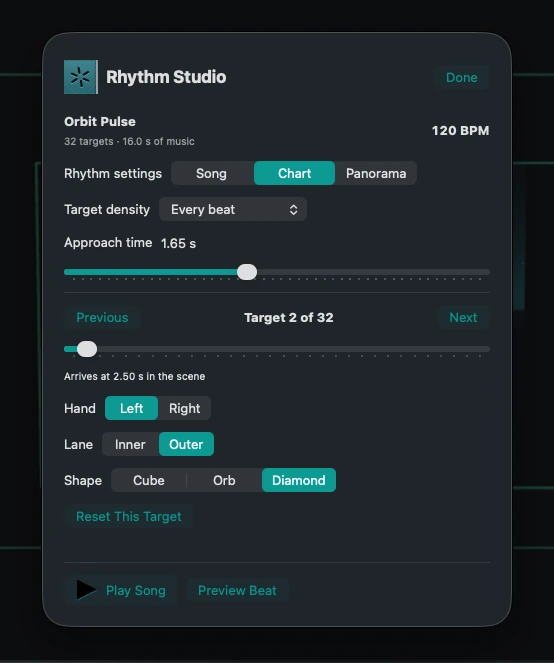
Mac. Use Previous or Next to choose which target to edit.
Preview Beat closes the sheet and pauses the 3D view at the selected target’s arrival. Play Song plays from the start of the scene. On Mac or iPad, use the original transport to pause or seek.
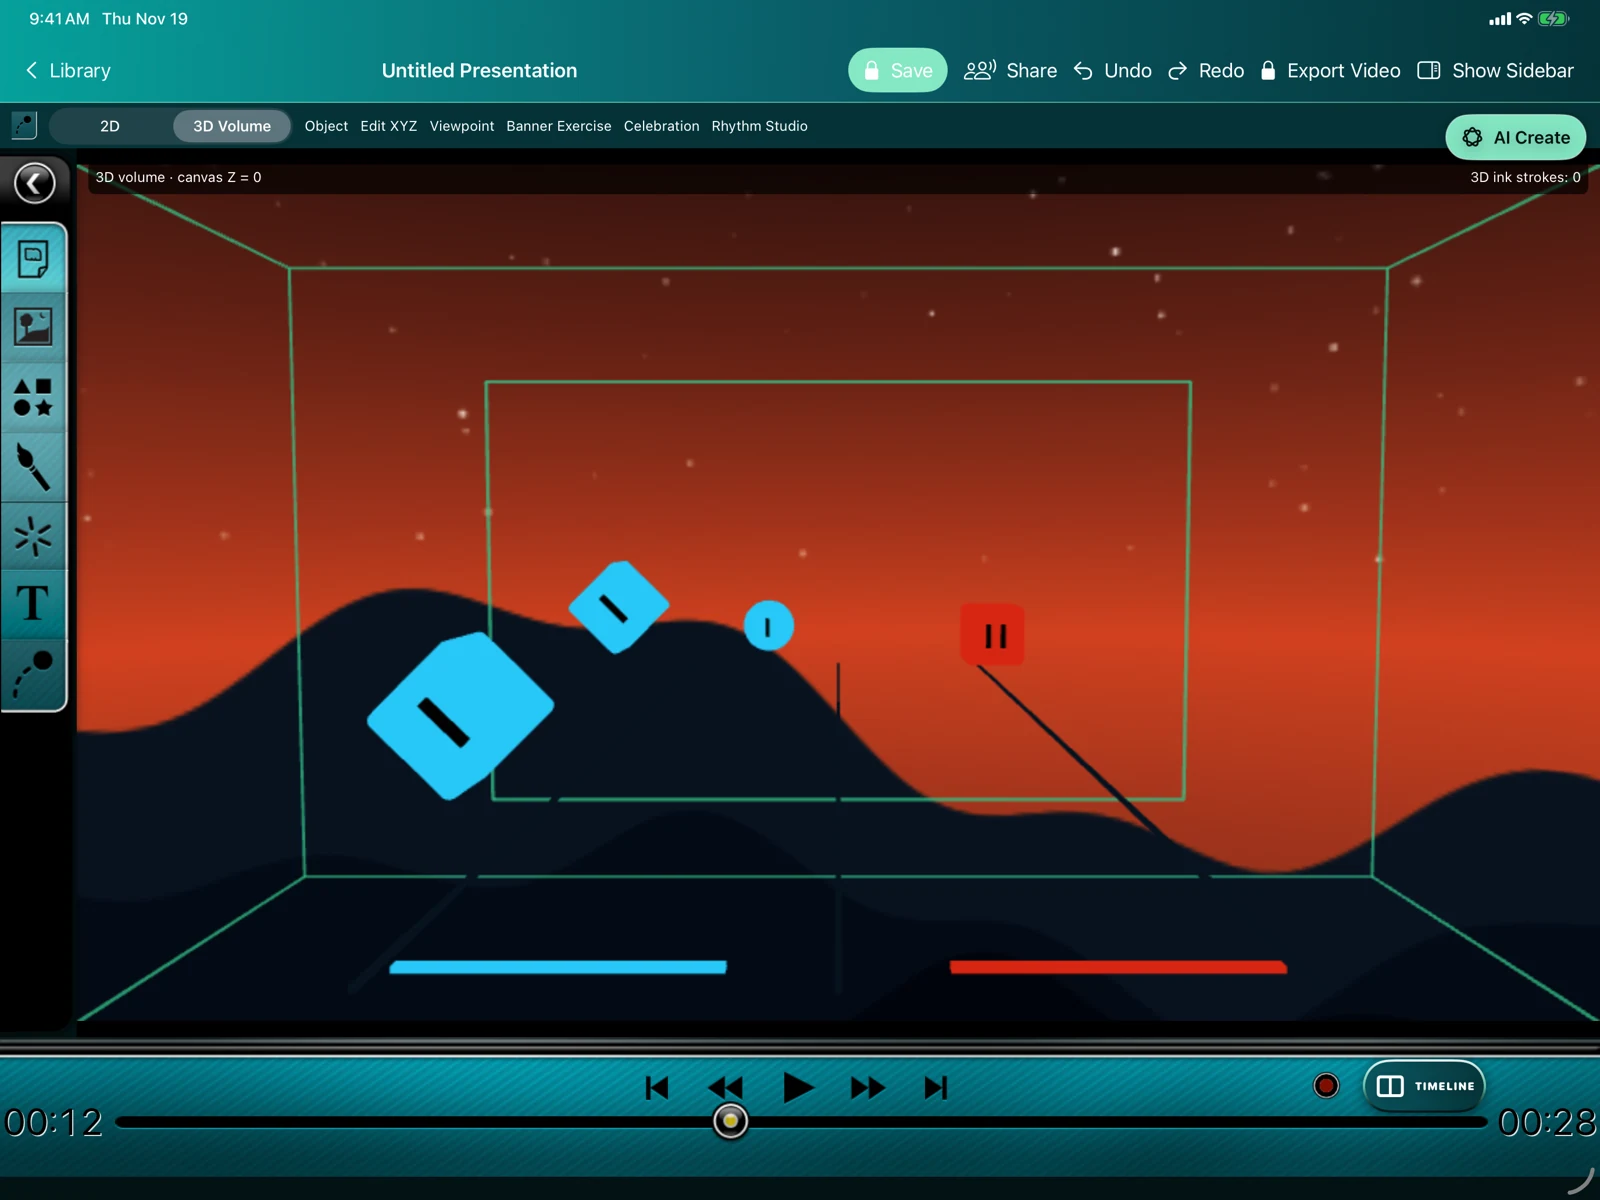
iPad Simulator. Preview Beat pauses the chart at the arrival time of the selected target.
Open Panorama and select Aurora, Sunset or Midnight. To use your own scene, choose Import Panorama… and select a wide 2:1 equirectangular image. The app embeds it in the presentation. Use Theme Instead returns to the built-in environment. The bounded volume frames the approach from the front. Mac and iPad place the camera inside the panorama. In Full Immersion the panorama wraps behind you as well.
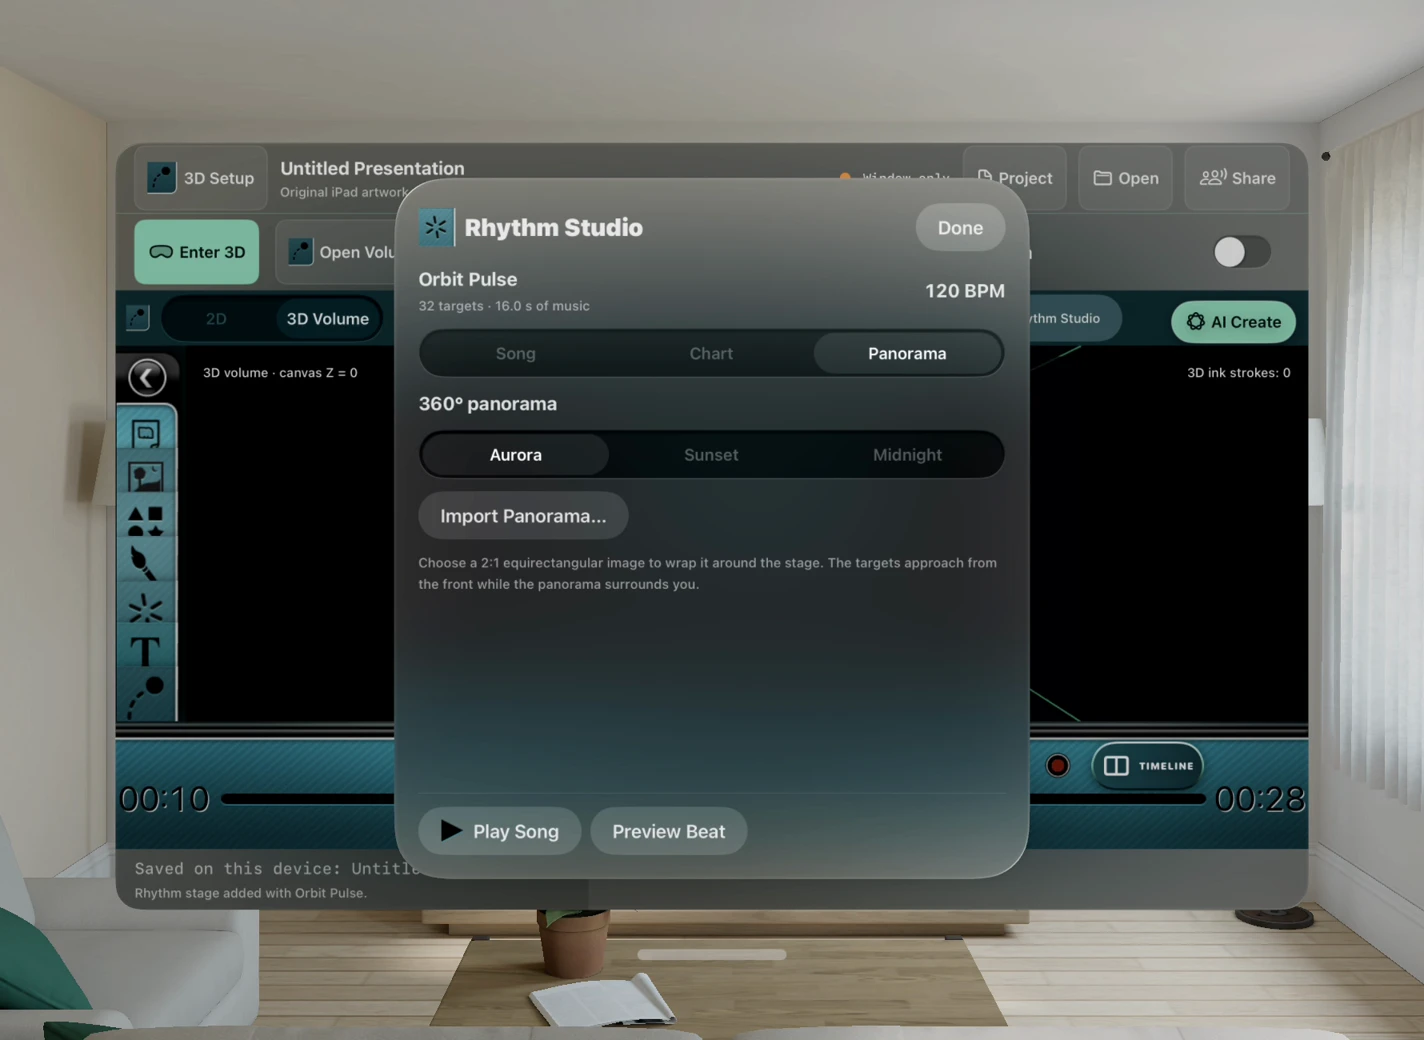
Vision Pro Simulator. Select a theme or import a 2:1 image to surround the lane.
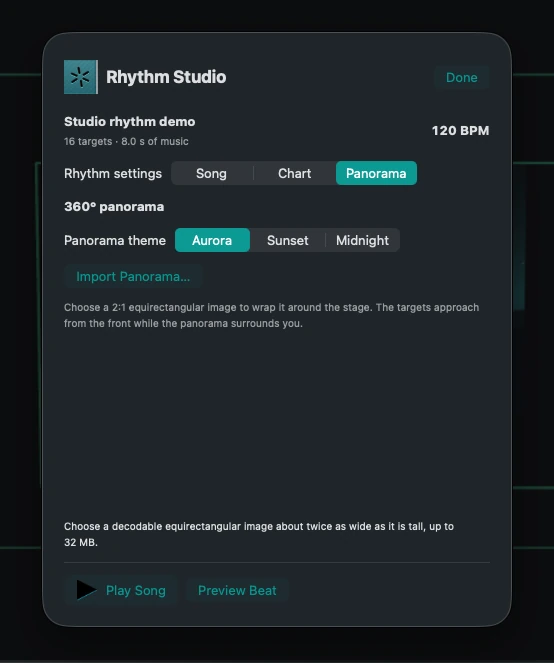
Mac. A square image triggers the aspect-ratio message. Use Import Panorama again to choose an equirectangular image.
On Vision Pro, face the direction you want the targets to approach from, open Full Immersion and choose Play with Hands. Allow hand tracking and hold both hands comfortably in view. Sweep the cyan left saber through a single-striped cyan target as it arrives. Use the coral right saber for double-striped coral targets. A successful cut splits the shape and adds one to Hits. Keep your feet in place as you follow the incoming shapes.
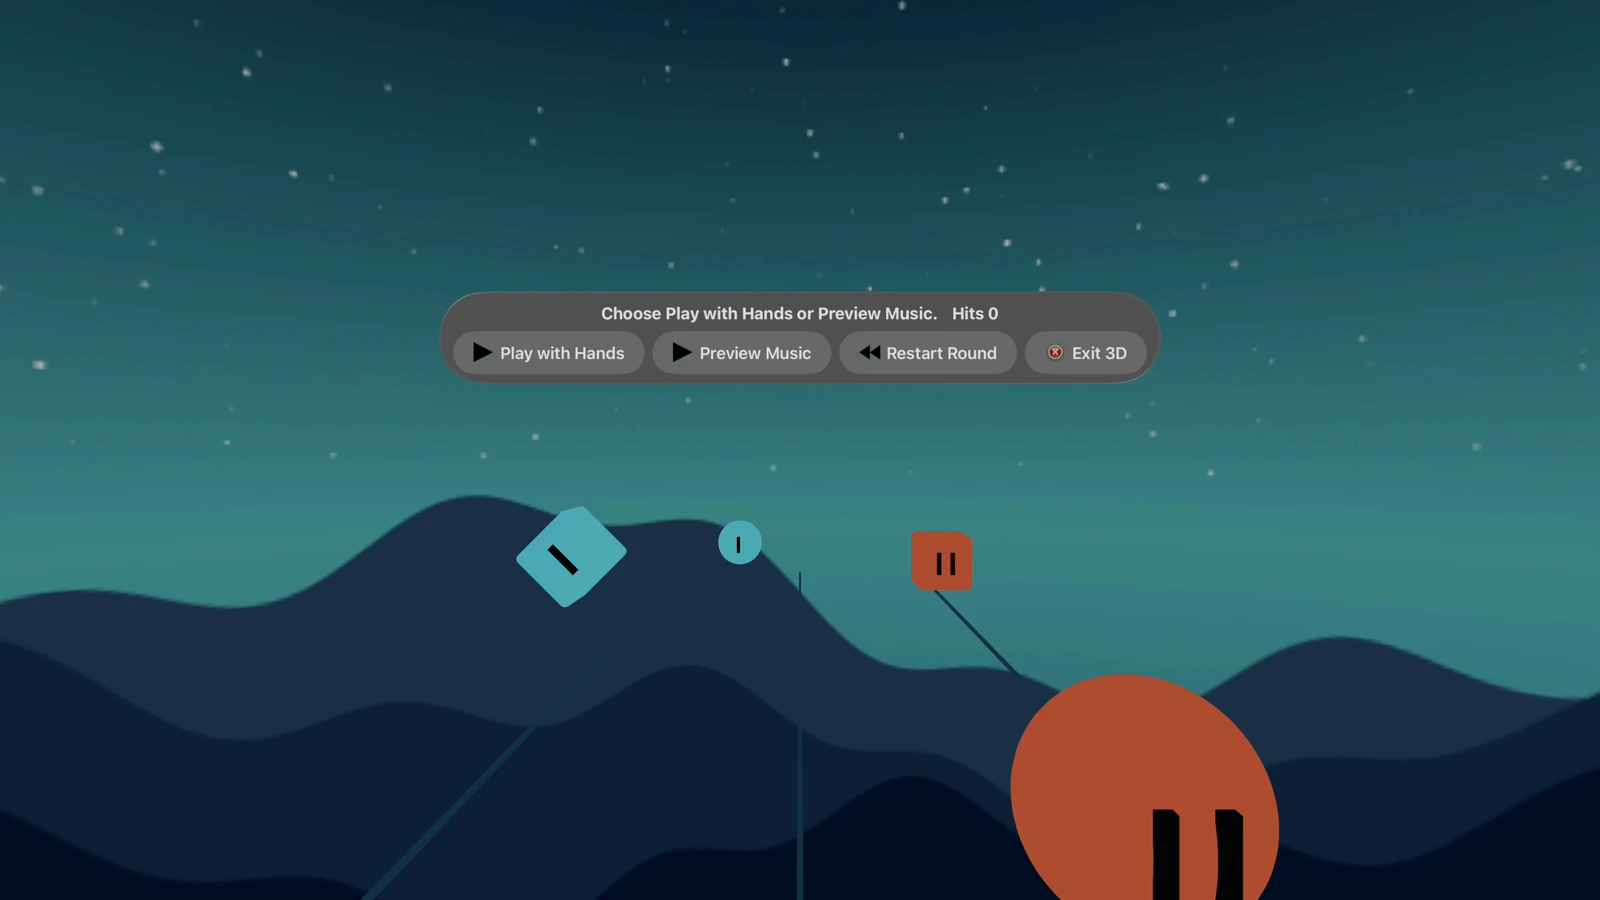
Vision Pro Simulator. A single stripe marks left targets. Two stripes mark right targets. The controls offer hand play and music preview.
If hand access is off or unavailable, choose Preview Music to hear the song and watch the chart. To resume after tracking loss, return your hands to view and choose Play with Hands. Enable Reduce motion to omit the split animation. Targets still approach on the beat, and the panorama stays fixed. Pause interrupts the round. Restart Round resets the playhead and score. Exit 3D returns to the editor. Tracked poses are used during play and are kept in memory.
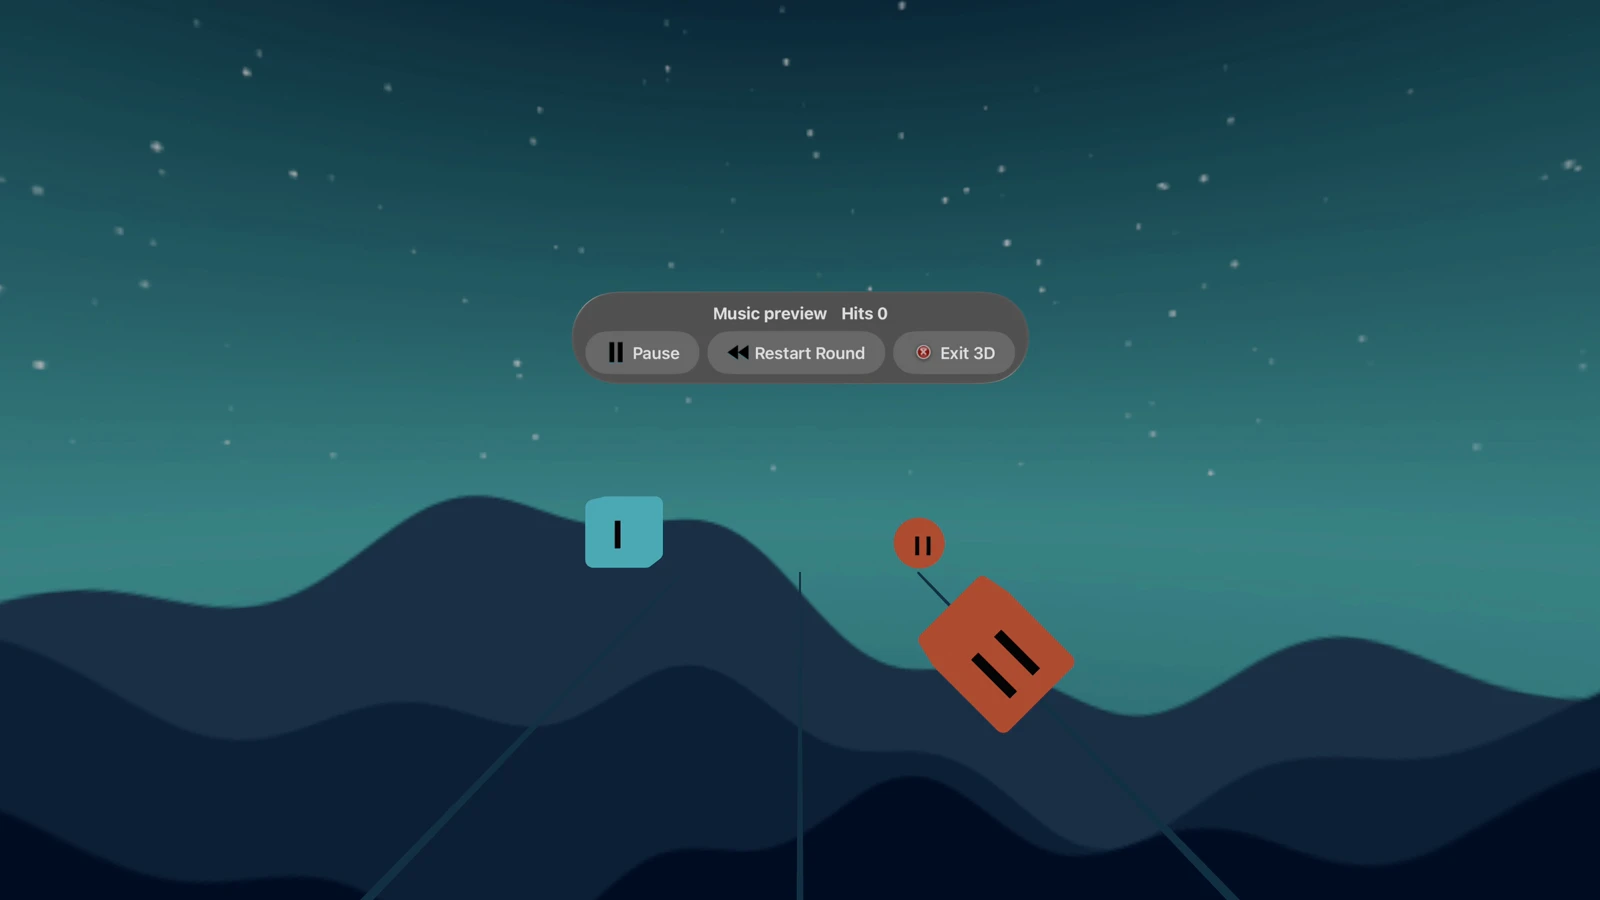
Vision Pro Simulator. Preview Music plays the song and target sequence. Hits stays at zero during preview.
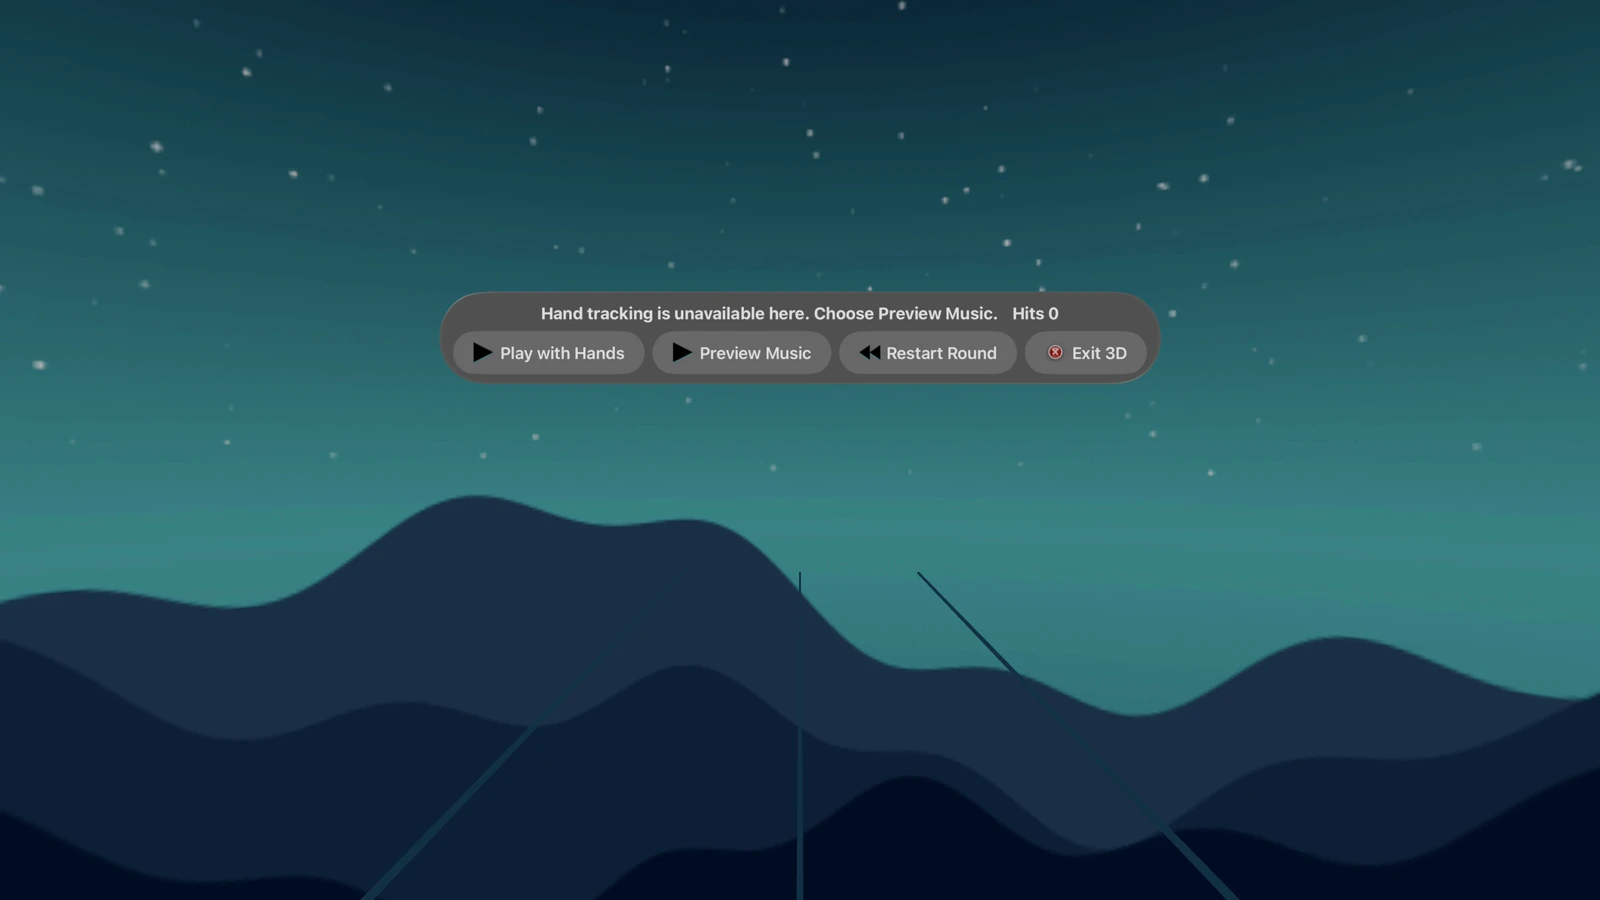
Vision Pro Simulator. The fallback gives you a way to play the song when the headset cannot supply hand tracking.
Save the presentation and open it in a matching development build on Mac, iPad or Vision Pro. The project contains the audio, editable chart and any imported panorama. Export Video renders the authored sequence and music from the saved viewpoint. Live hand poses and hit scores belong to the current round.
Download the original Orbit Pulse sample
to try the earlier chart with its original embedded recording. Import a fresh Rhythm Stage in the updated editor to hear the new arrangement. Unzip the download and open the
enclosed .musimotion project. The sample manifest
lists the download size and the checksums for the archive, presentation and
embedded song.
Play the 18-second Orbit Pulse movie with sound (1.85 MB). This camera-view export starts with a still mountain horizon. The first cyan cube reaches the lane marker as the music begins at two seconds. Cyan and coral shapes alternate with the beat for the rest of the song.
10. Generate a soundtrack
Select the scene that needs music and move its playhead to the point where the track should start. Choose Music Studio above the canvas in the artwork editor. In the Vision Pro spatial workspace, choose Add Media → Music Studio. You can score a still title card, an animation or a volumetric scene.
Open Style. For Techno, House, Breakbeat or Ambient, open Ensemble. Auto lets the composer pick a lineup for the take. Choose Electronic, Studio Band or Chamber to set the instrument family yourself. Retro 8-bit uses its own chip instruments. Shamisen pairs plucked notes with ringing open strings. In the updated development editor, you can also try Chill House, Rock and Classical Piano. To match a black dragon painting, choose Shamisen, set Tempo to the painting’s BPM and set the length to 4 bars. Set the tempo (60–180 BPM) and the length (2, 4, 8 or 16 bars). For a short techno cue, try 132 BPM, four bars and the description “driving kick, bright hats and a pulsing bass.” Four bars of four beats at that tempo last about 7.27 seconds.
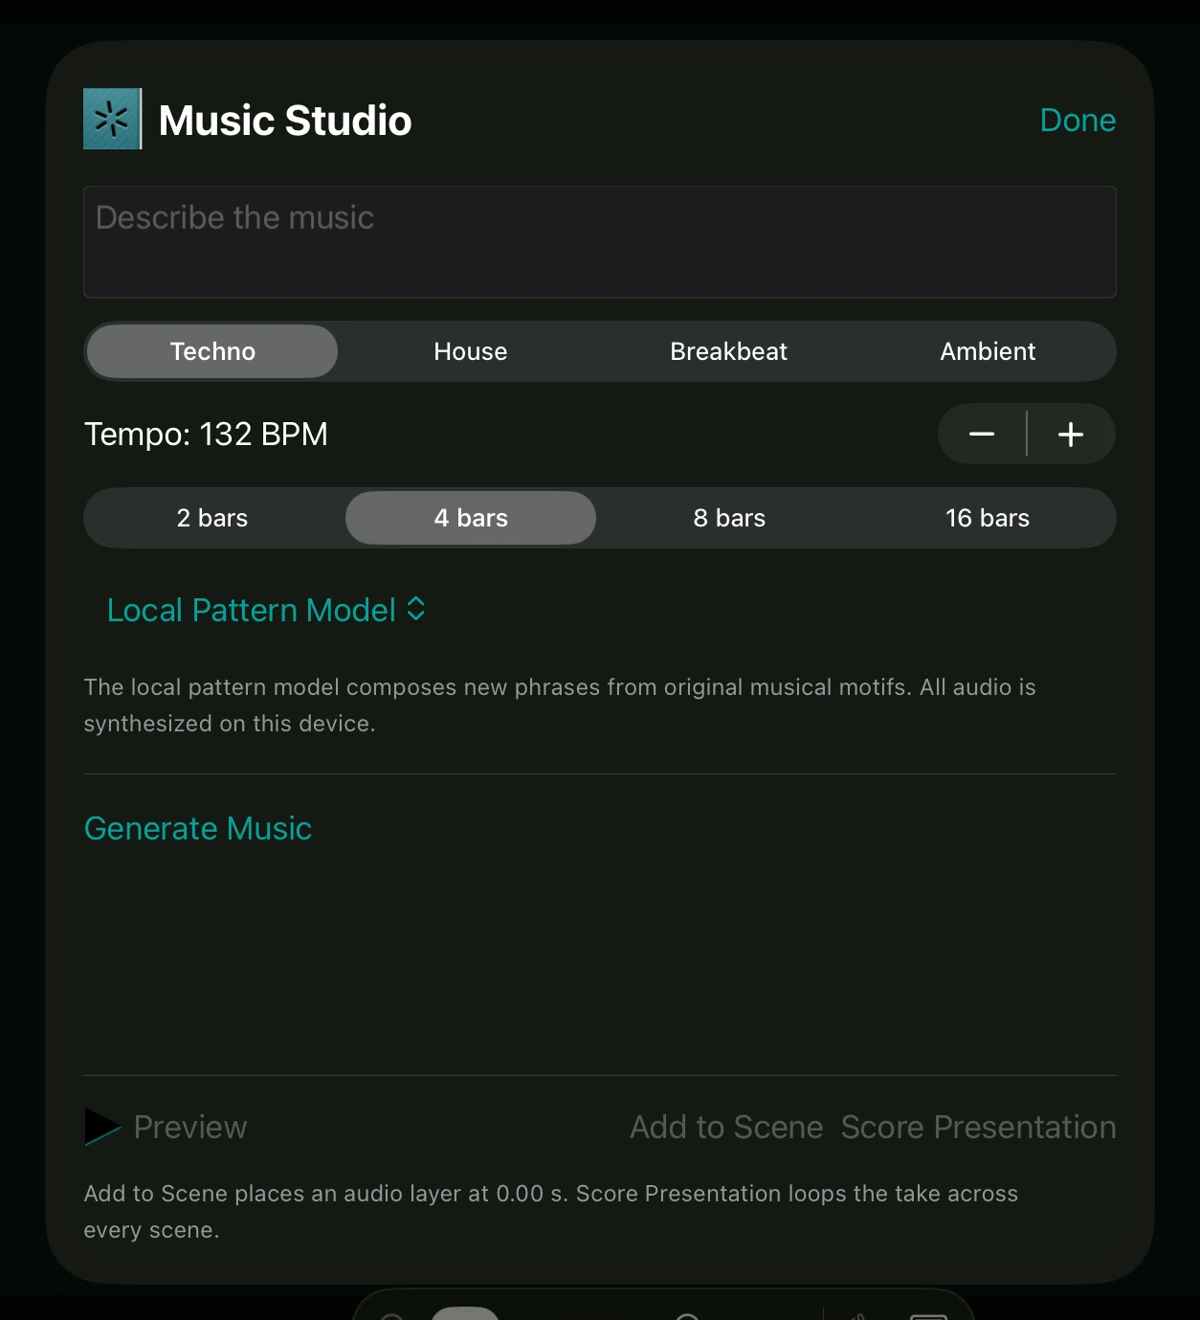
Earlier iPad simulator capture of the style, tempo and length controls. Choose Local Pattern Model in the Composer menu to generate offline.
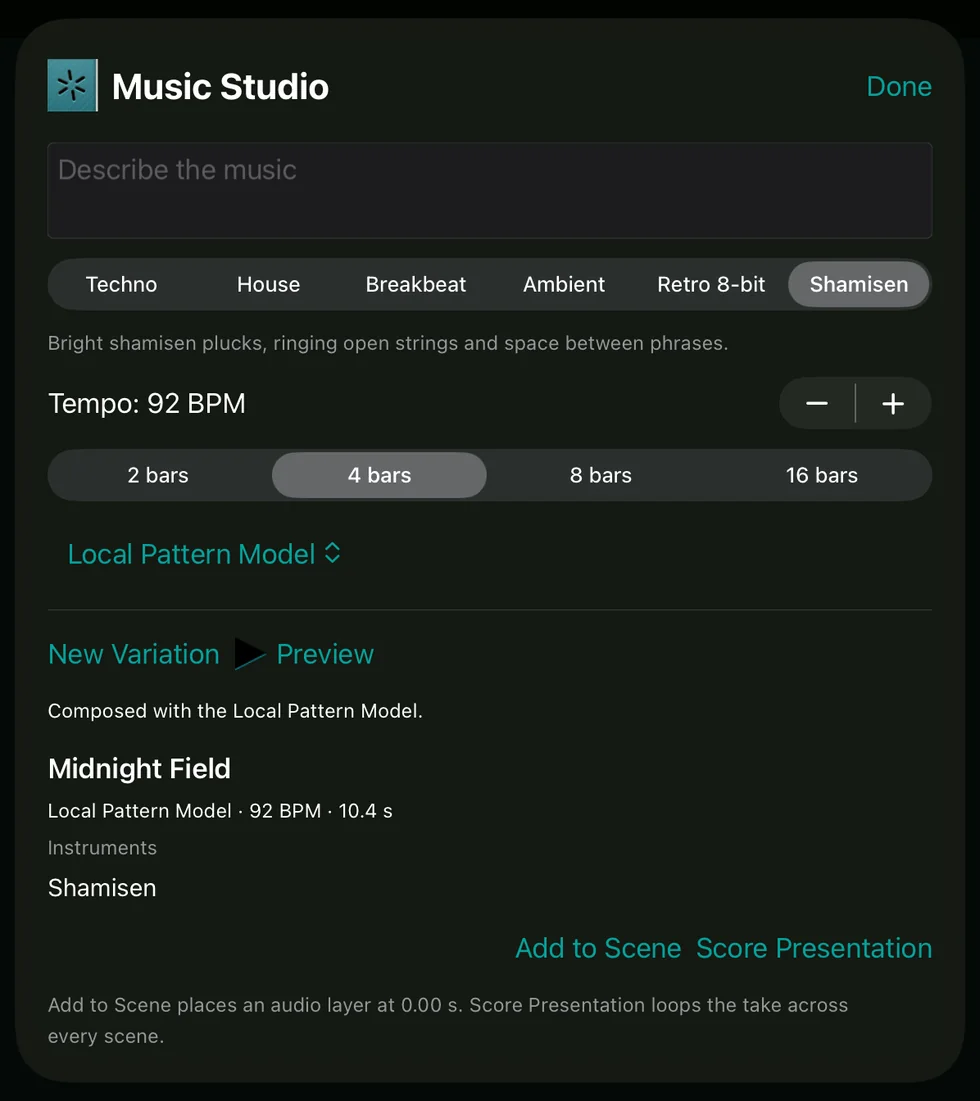
The generated Shamisen take shows its composer and tempo beneath its title. Preview plays this take. New Variation generates another.
Choose Generate Music. With Automatic, Music Studio asks Apple’s on-device Foundation Models framework to plan the arrangement when the system model is available. The Local Pattern Model samples note transitions learned from original musical phrases and works on devices without Apple Intelligence. Musimotion synthesizes the instruments on your device. Check the composer name under the generated title. If Apple’s model is unavailable or cannot finish, the take identifies the Local Pattern Model. The description stays on the device.
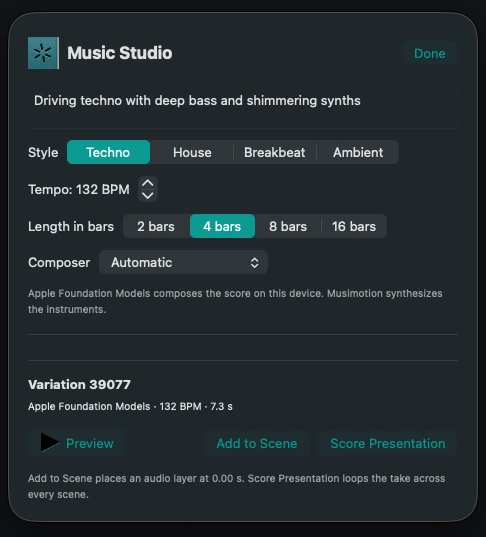
Mac. This take credits Apple Foundation Models in the result area. Preview auditions the take before you add it.
Listen with Preview. Choose New Variation to try another take with your settings. Select Add to Scene when you like the result. The audio starts at the current playhead. A take that extends past the scene’s end lengthens the scene so you can hear the ending.
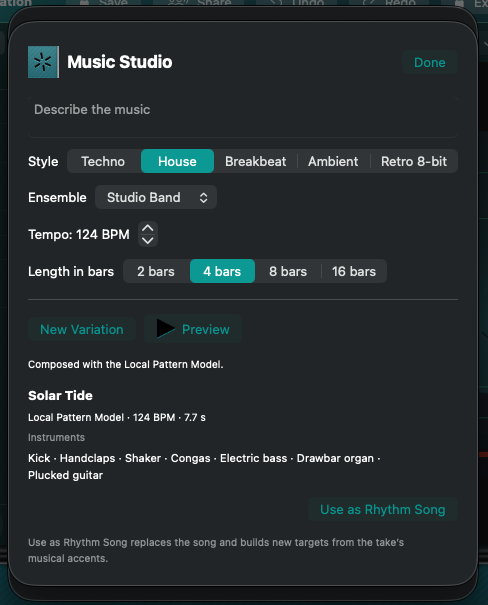
Mac development editor. The instrument list describes this take. Preview plays it, and New Variation composes another performance with the current settings.
Changing a setting clears the current preview. Add a take you want to keep before trying another setting.
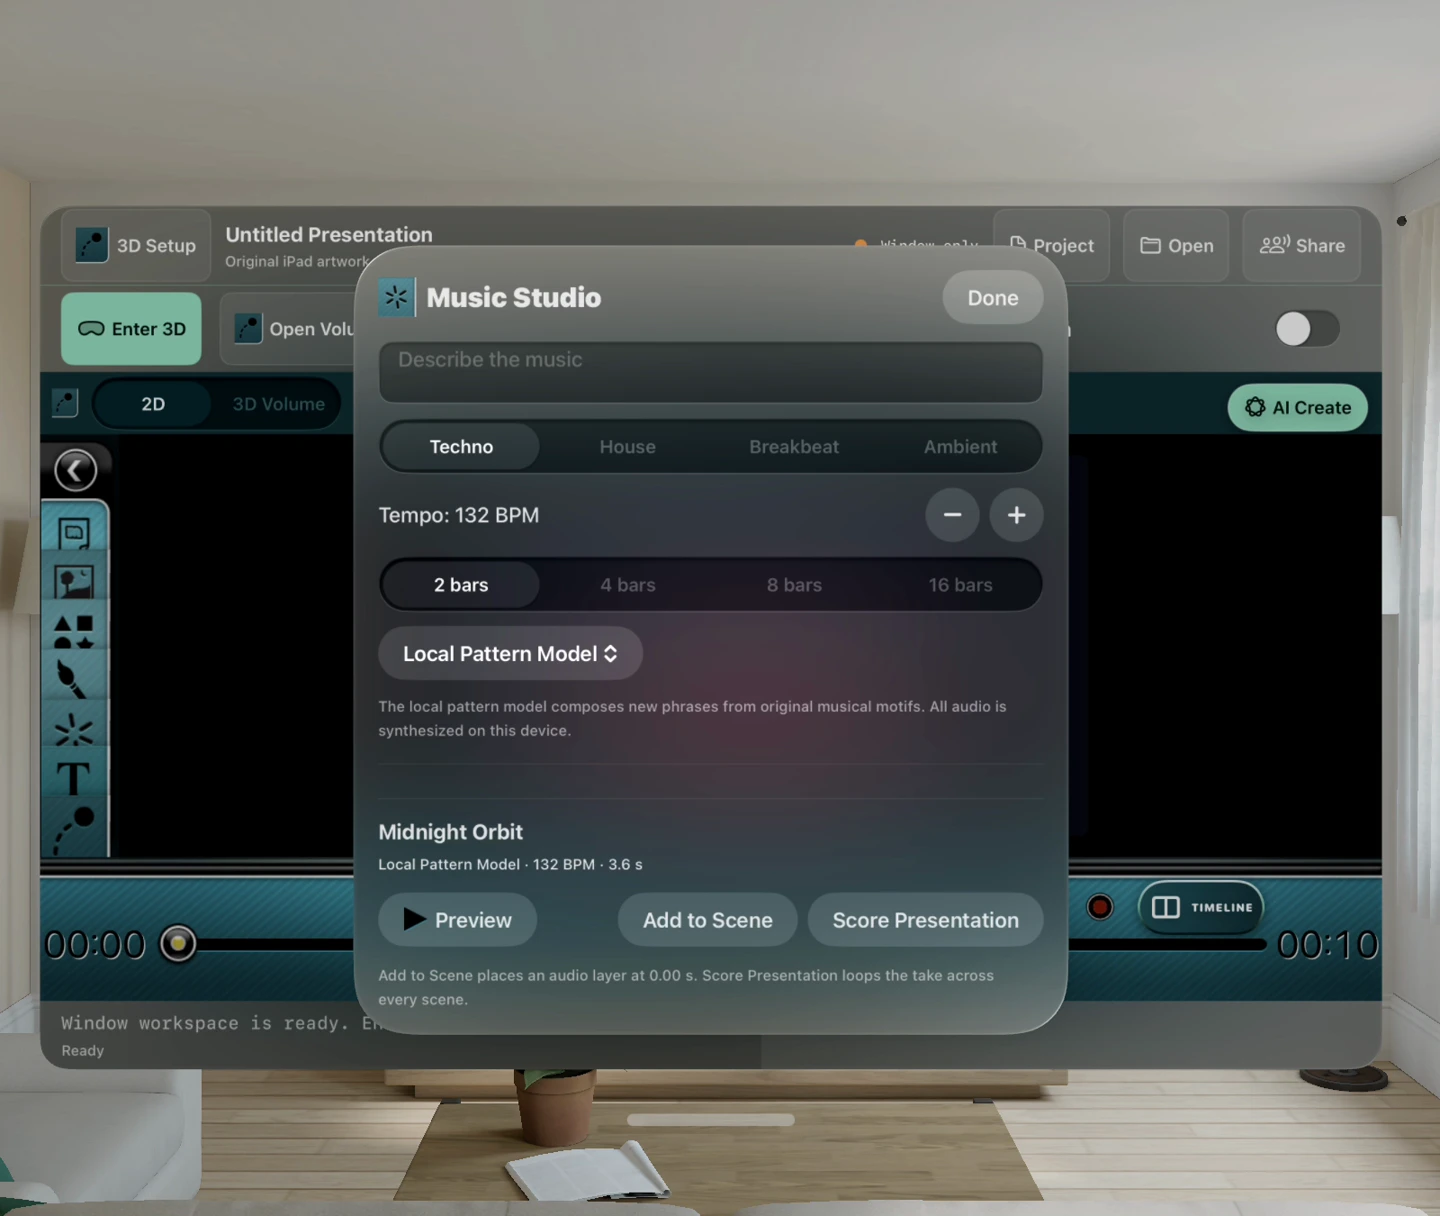
Vision Pro simulator. Midnight Orbit credits the Local Pattern Model. Preview, Add to Scene and Score Presentation sit below the result.
To keep an audio track that is already in your project playing after the opening, choose Scene Timing… → Continue soundtrack. You can also extend the opening by entering its new Duration (seconds). Follow the illustrated scene timing exercise.
For one continuous soundtrack from a freshly generated take, choose Score Presentation. Musimotion repeats the take across scene boundaries and preserves the duration of each scene. On a Rhythm Studio scene, Use as Rhythm Song replaces the song and places targets on accents from the new arrangement. Review the chart afterward to make any individual target edits for the new music.
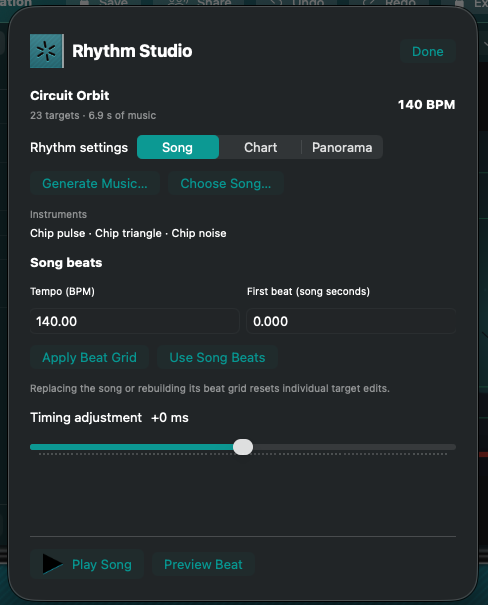
Mac development editor. After Use as Rhythm Song, the Song tab shows the new instruments and the editable target count. Leaving the generator with Done keeps the song you already have.
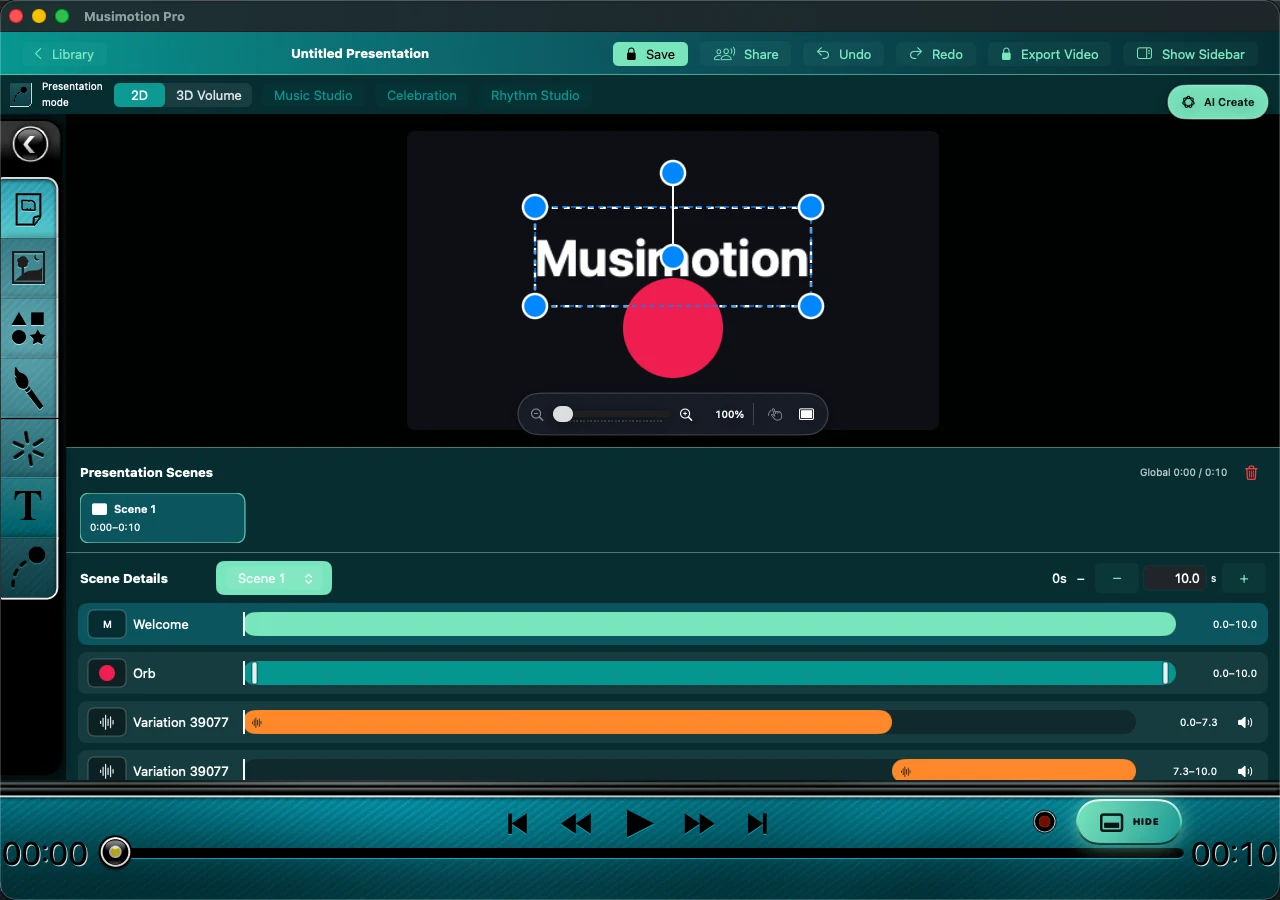
Mac. Score Presentation repeats a short take to reach the end of a ten-second scene. The second audio layer starts where the first one ends.
Play the presentation from before the insert point. The generated music is a regular audio layer that you can move, trim or mute. Save the project to carry its audio to another device with the updated build. Export Video includes the music in the presentation’s sound mix. The App Clip plays shared presentations. Music Studio lives in the full presentation editors.
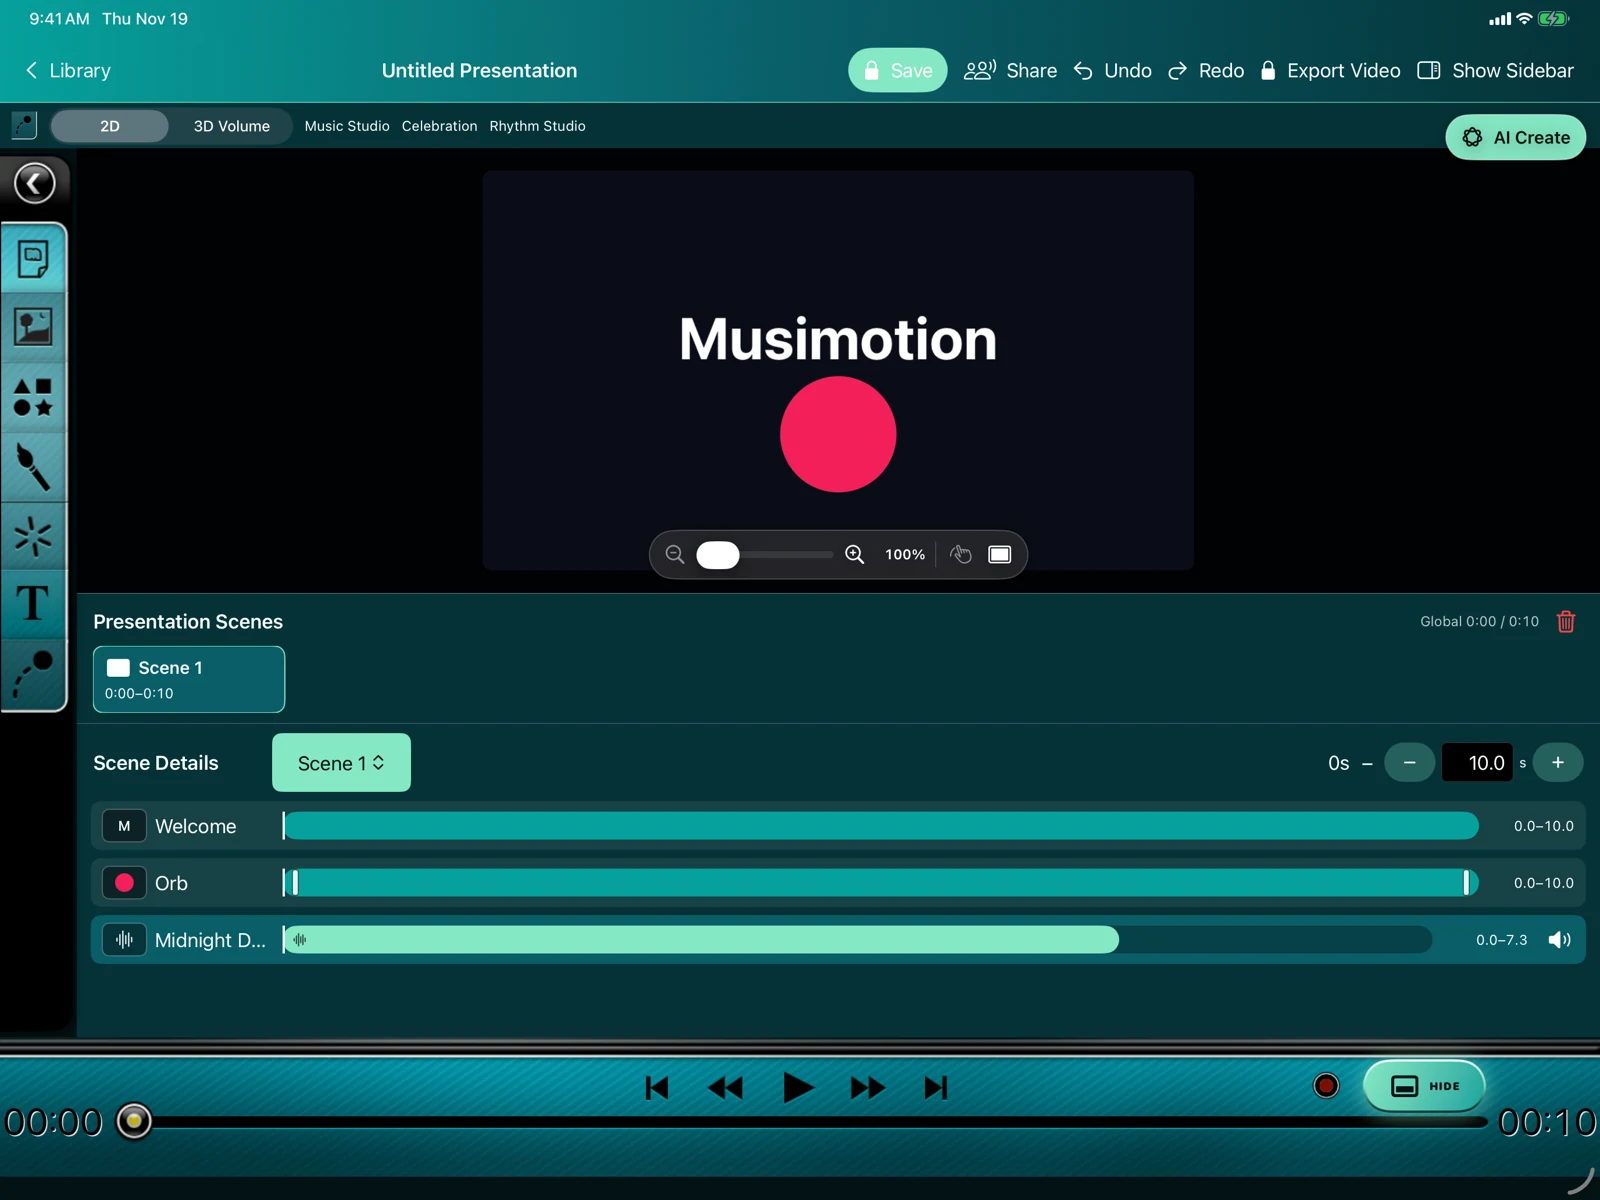
iPad simulator. The generated music is selected in the ordinary 2D timeline. Its bar shows where the take begins and ends.
To hear the revised Shamisen and Techno performances side by side with earlier takes, visit the listening and soundtrack replacement guide. It also shows how to audition a new take under an existing opening.
Try Chill House, Rock and Classical Piano
The Mac development preview includes Chill House, Rock and Classical Piano. The updated editor also passed simulator checks on iPad and Vision Pro. These screenshots show a synthetic presentation in the iPad simulator on November 20, 2026. Select an image to enlarge it. Screenshot details and checksums.
- Open a presentation in the artwork editor and choose Music Studio.
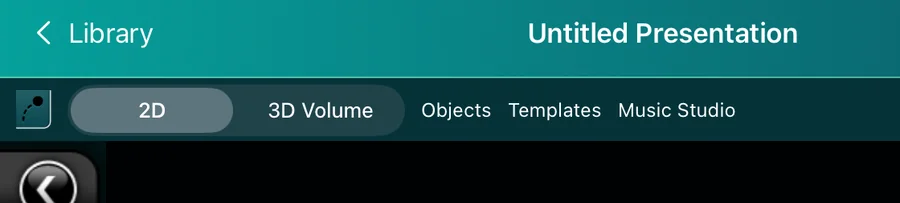
Music Studio opens from the artwork toolbar.
- Select the current style name, such as Techno, to open the menu. Choose Chill House, Rock or Classical Piano. The tempo changes with the style.
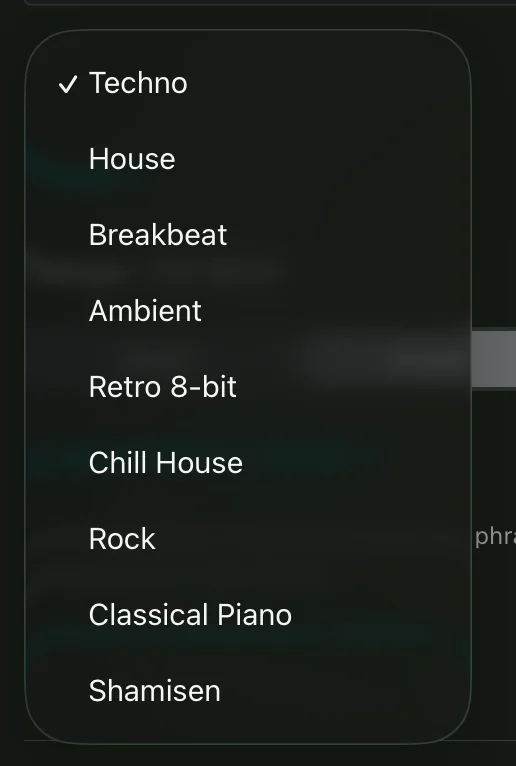
The menu shows the three styles together. A checkmark identifies the current selection.
- Choose 4 bars and Local Pattern Model, then choose Generate Music. If changing styles clears the previous take, choose Generate Music again.
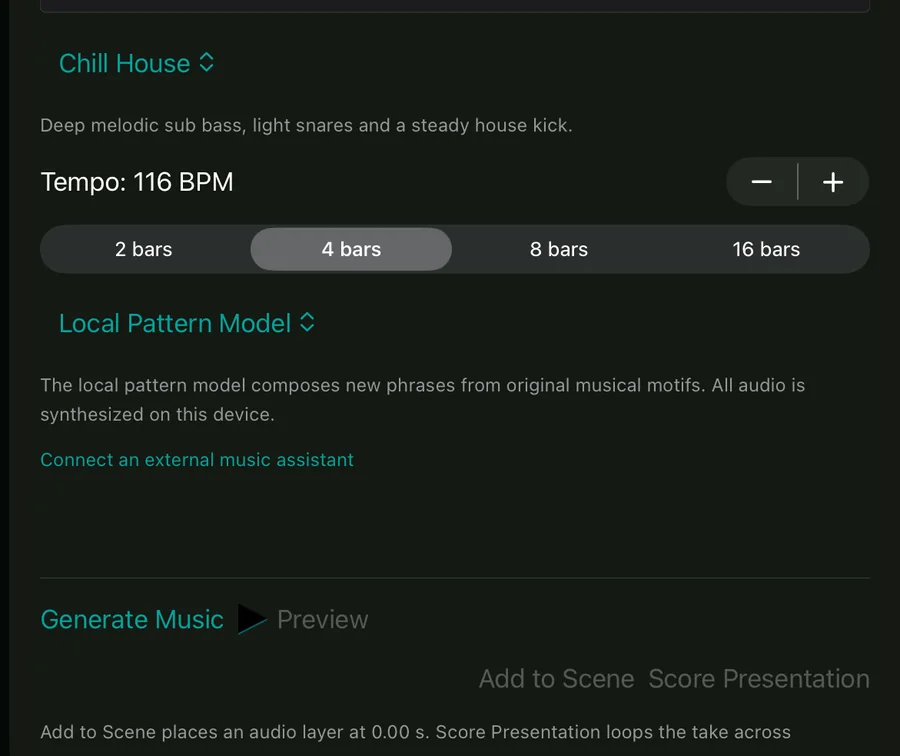
With a style selected, Generate Music is available. Preview and Add to Scene become available after generation.
- Choose Preview to audition the result or Stop Preview to stop. New Variation makes another take with the same settings. Choose Add to Scene to place the audio at the playhead. In the timeline, press Play to hear it alongside the artwork.

After Add to Scene, Solar Field appears as an audio lane beneath the two artwork layers.
Listen to the three arrangements
The integrated development synthesizer reproduced these three four-bar recordings on November 20, 2026. Each lossless FLAC contains the exact audio samples from its generated take. The screenshots show separate iPad takes. New variations can have different melodies and titles.
Chill House · 116 BPM. A four-on-the-floor kick anchors the groove. Listen for the moving sub bass below the light snare and soft keys.
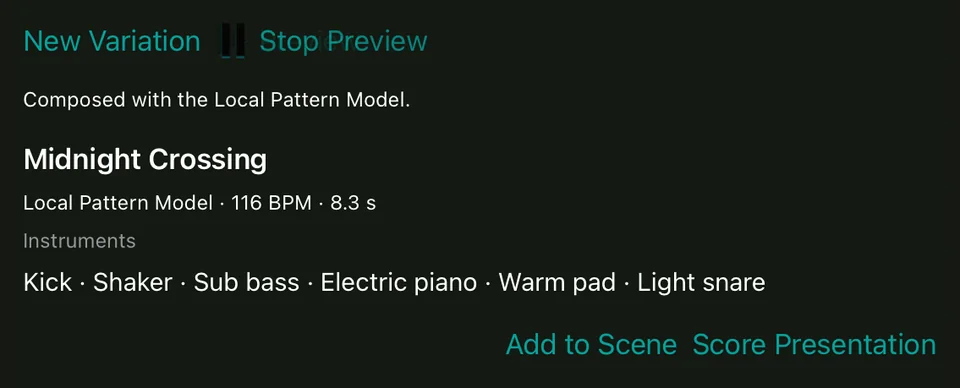
In this iPad take, Midnight Crossing plays at 116 BPM with sub bass, electric piano and a light snare.
Listen to Chill House (8.28 s, FLAC).
Rock · 112 BPM. A kick and snare set the backbeat. Electric bass follows the riff while an overdriven guitar strums staggered power chords.
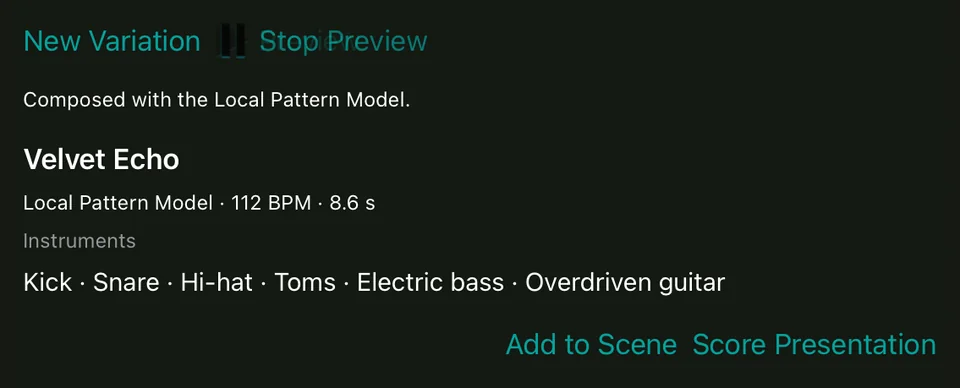
Velvet Echo plays at 112 BPM. The instrument list includes toms, electric bass and overdriven guitar.
Listen to Rock (8.57 s, FLAC).
Classical Piano · 76 BPM. A single acoustic piano plays both parts. The low notes outline broken chords while the higher melody moves across the beat.
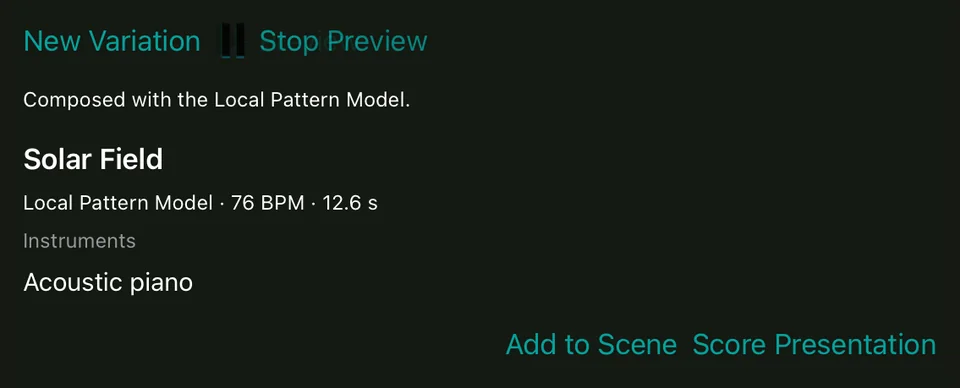
Solar Field plays at 76 BPM. Acoustic piano is the only instrument in this take.
Listen to Classical Piano (12.63 s, FLAC).
Recording details and SHA-256 checksums.
Compare the ensembles
These three on-device recordings each last eight seconds at 120 BPM. The House and Retro examples use the same variation seed so you can hear how the style changes the sound.
House · Studio Band pairs drawbar organ, electric bass and vibraphone with handclaps, shaker and congas.
Download House · Studio Band FLAC
Ambient · Chamber pairs bowed strings, vibraphone and upright bass with frame drum and shaker.
Download Ambient · Chamber FLAC
Retro 8-bit uses chip pulse, triangle and noise voices for the arcade sound.
The audio example manifest lists the instruments, variation seed and checksums for the lossless FLAC and original WAV for each performance.
Download the earlier Warehouse Techno example (7.27 s, 931 KB). Apple Foundation Models composed this particular four-bar take at 132 BPM on the test Mac. Musimotion rendered its drums, bass and lead into the stereo WAV. The direction was “Driving warehouse techno with deep bass, bright open hats and a melodic metallic hook.”
11. Play Droid Arena
On Vision Pro, choose Project → Templates → Droid Arena → Import into Presentation. This adds a new 42-second scene. Select Full Immersion to stand inside the arena. Each of its three waves lasts 14 seconds. Look for an energized droid as it prepares to release a glowing pulse.
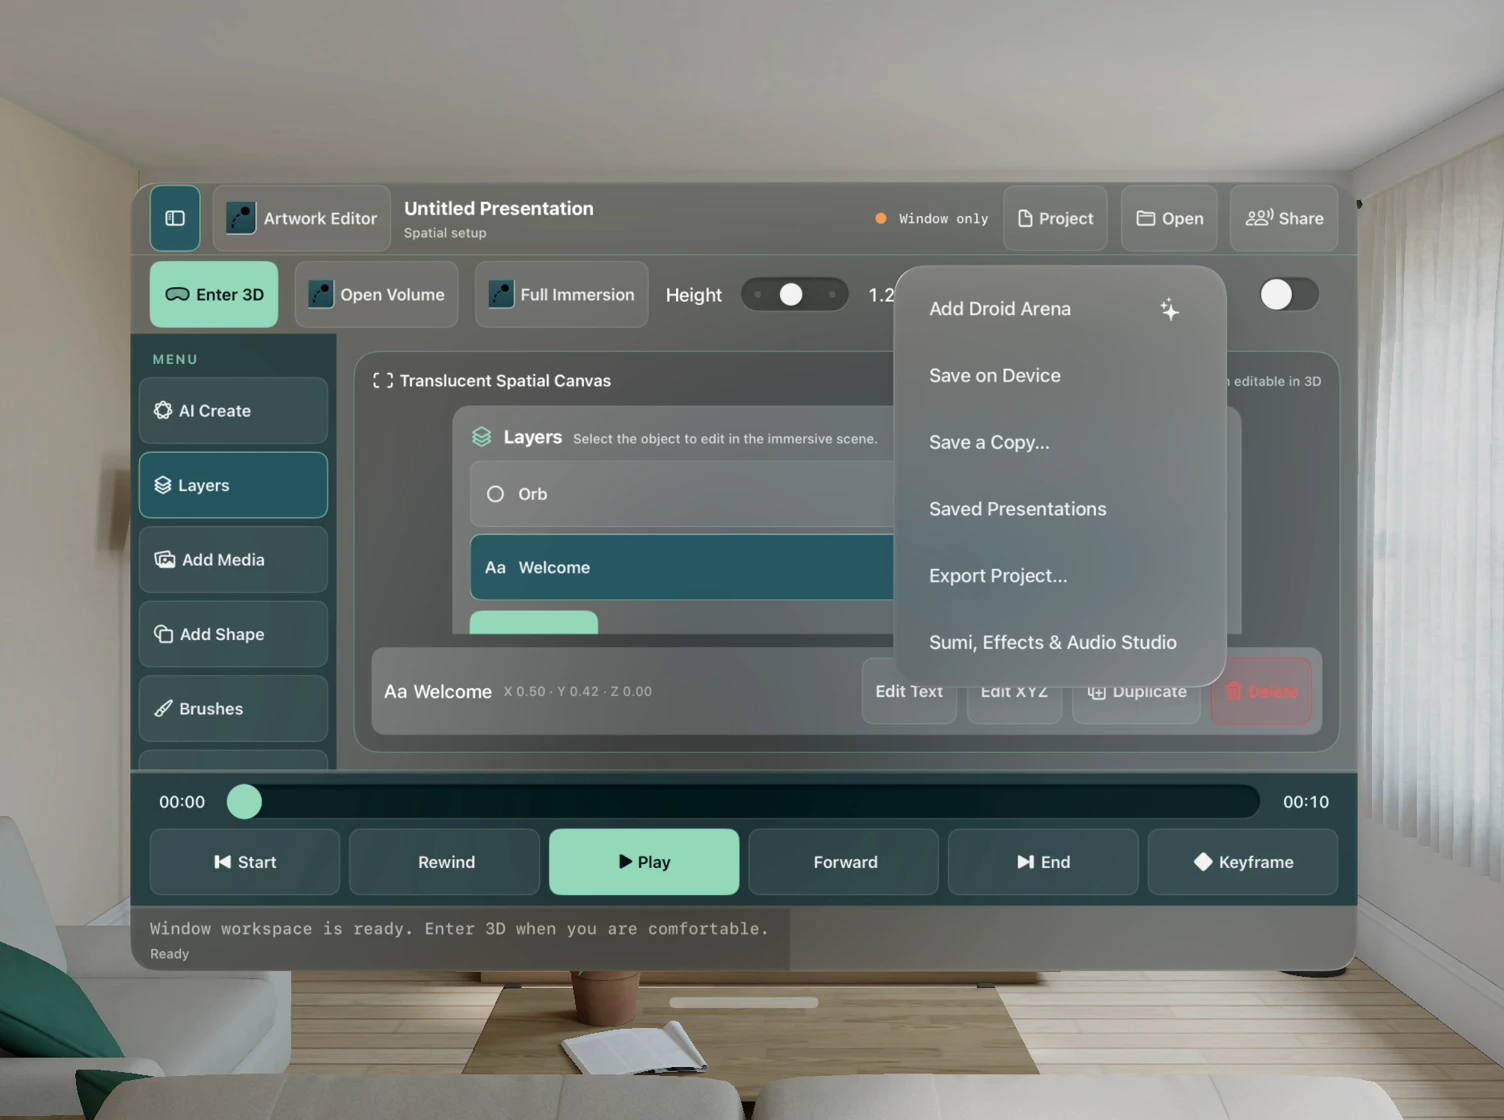
Earlier Vision Pro Simulator capture of the Project menu. In the current editor, Project opens Templates. Full Immersion remains above the stage.
Start with Preview Waves to see the formations and the incoming pulses before playing. The first wave has three droids, the second has four and the third has five. They follow circular patrols, sweep sideways or hover. Learn the single pulse in wave one. In wave two, a scout sends two pulses in quick succession and darts sideways. A guard’s violet shield spins around its eye and opens briefly as it fires. Time your pulse to reach the exposed eye. In wave three, a heavy droid can send five pulses at once in a widening fan.
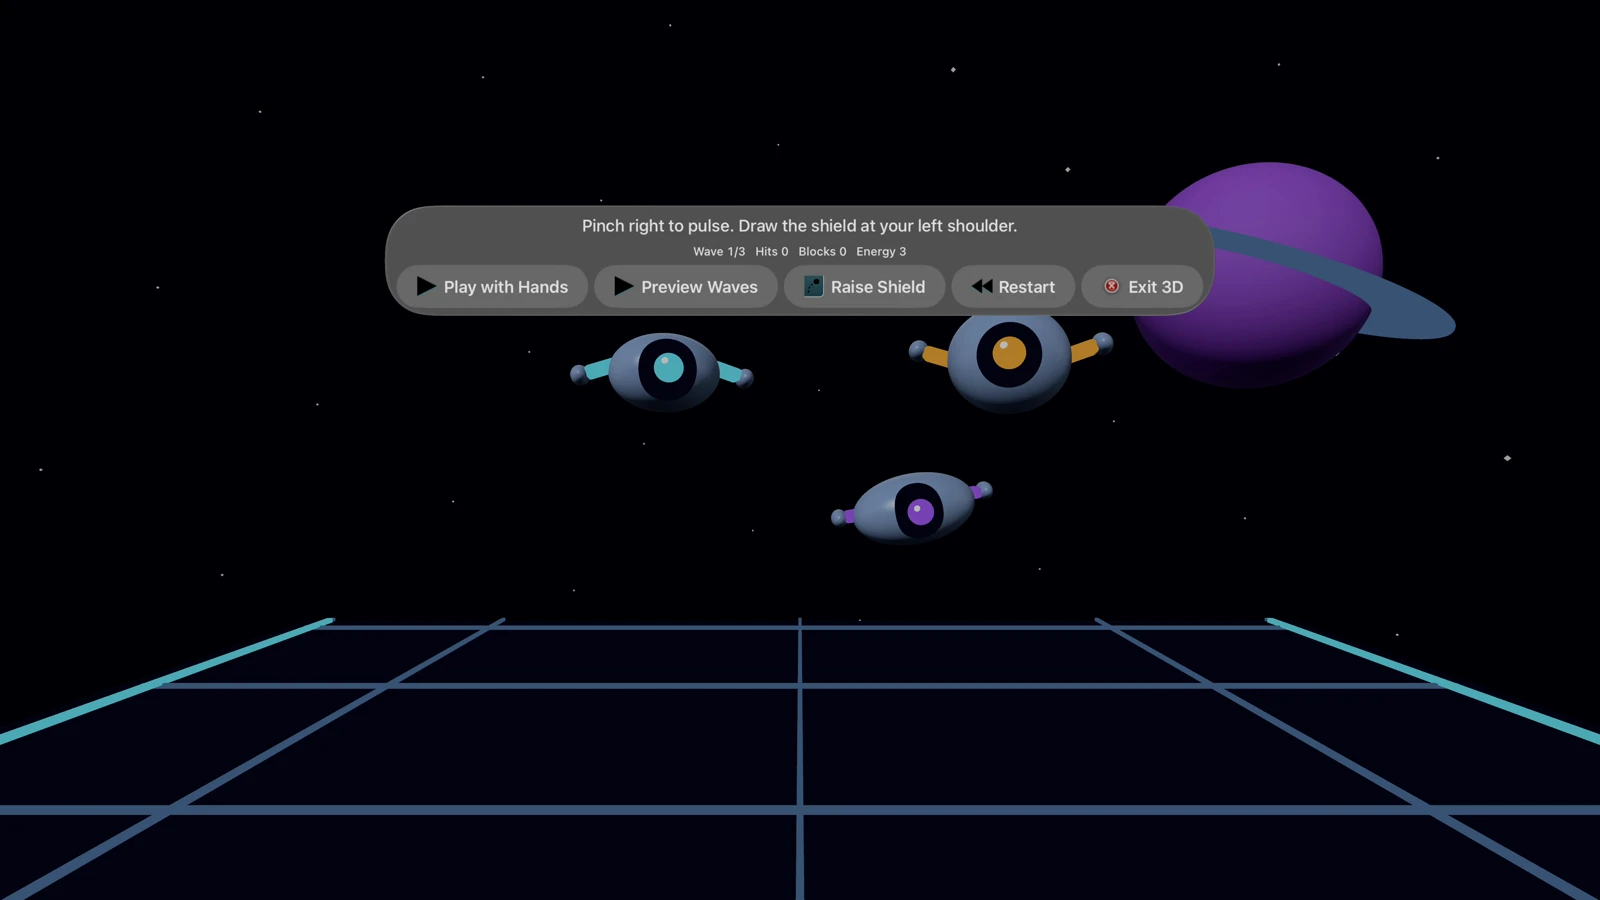
Vision Pro simulator. The first wave opens with three droids and three energy points. Select Preview Waves to watch the formation.
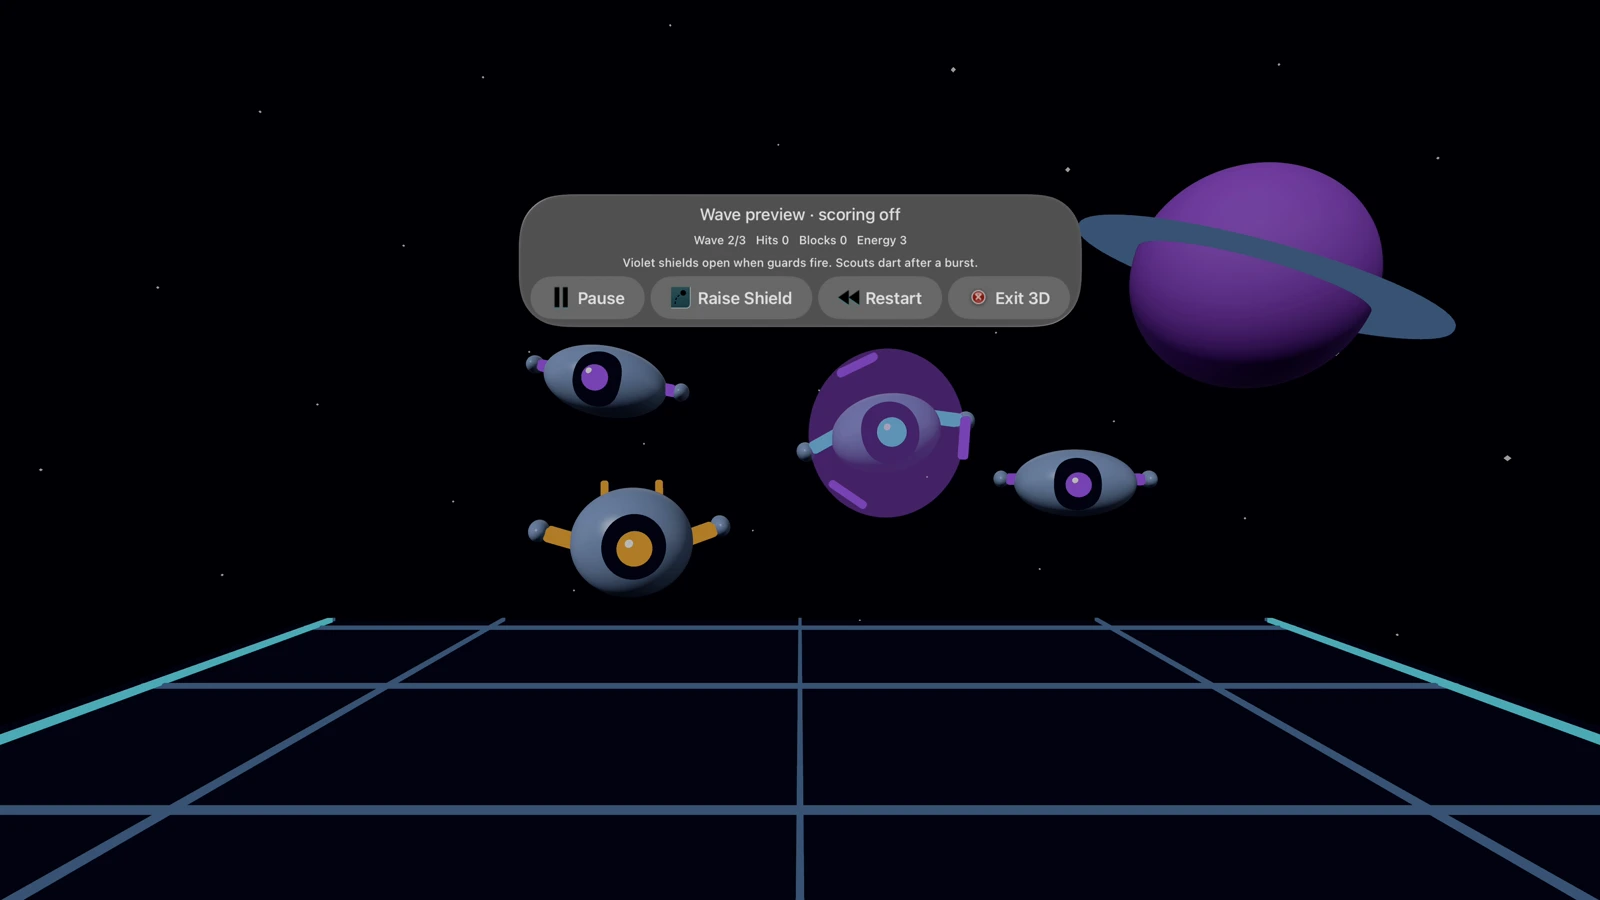
Vision Pro simulator. The guard in the middle has its violet shield closed. The wave-two prompt explains when to watch for the opening.
Choose Play with Hands and allow hand tracking when prompted. Keep both hands comfortably in view. A pulse tool follows your right hand. Point it at a droid and pinch once, then release your fingers before the next pulse. Watch the hit count when a droid disappears.
To draw the shield, bring your left hand beside and slightly behind your left shoulder, then bring it forward. The shield follows that hand. Move it into an approaching pulse’s path to register a block. A pulse follows the course it had when it left the droid. Repeat the shoulder action to stow it. Use Raise Shield or Stow Shield to change the equipped tool within sight if the headset loses sight of your hand near the shoulder.
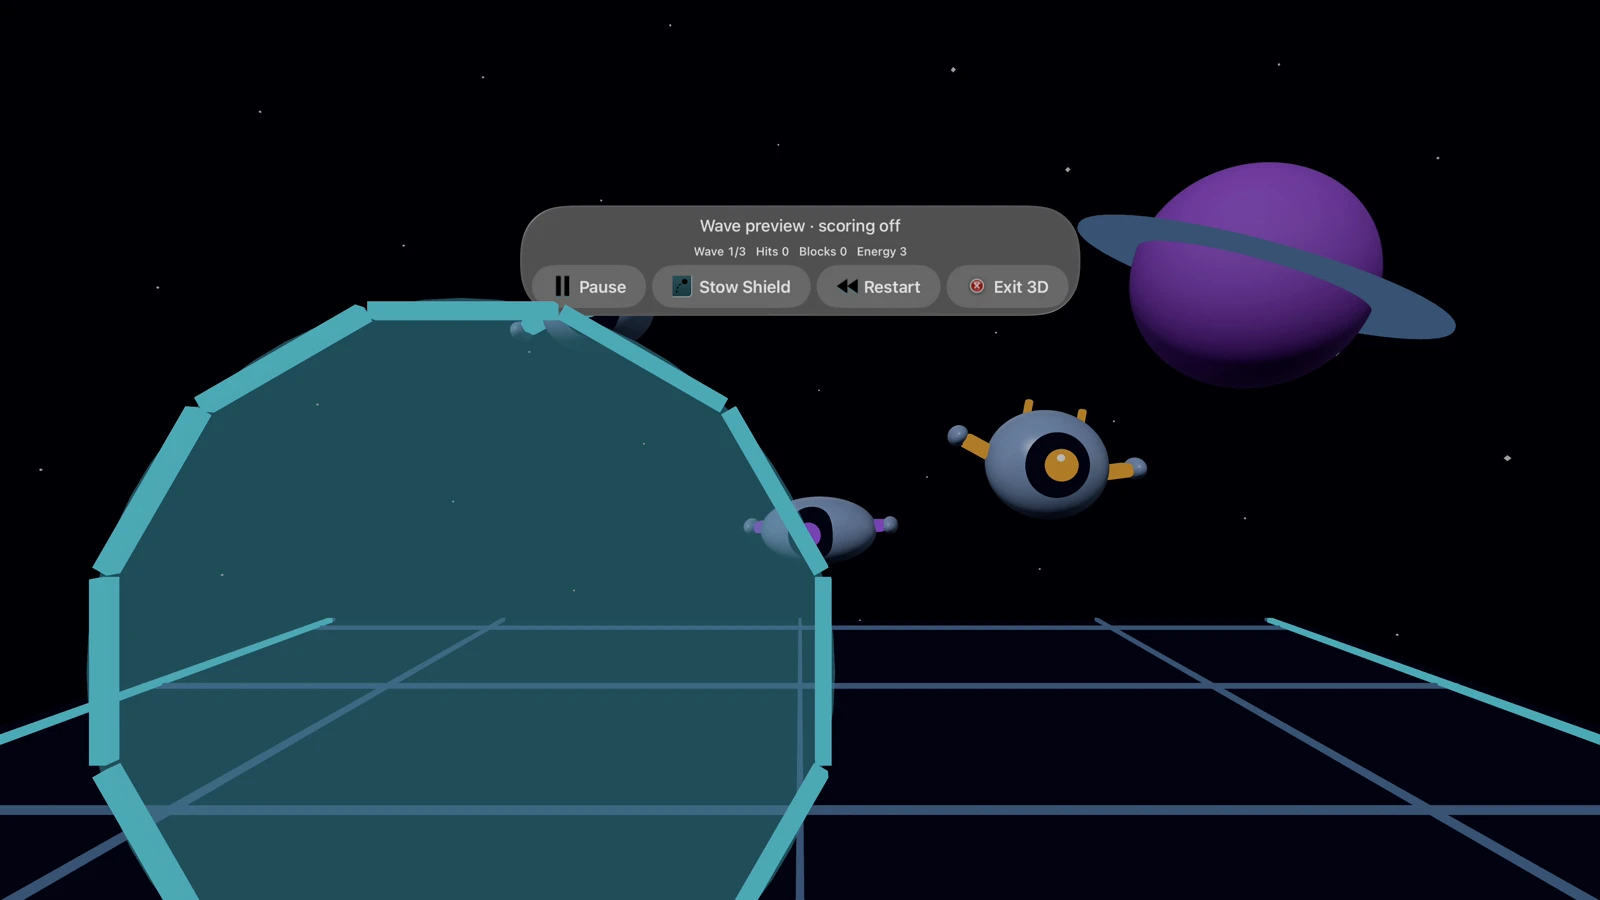
Vision Pro simulator. Raise Shield displays the shield in a reference position during preview. Live play attaches it to your tracked left hand.
Watch the wave, hits, blocks and remaining energy. Use Pause to take a break. If the right hand leaves view, tracking pauses. Bring it back and choose Play with Hands to resume. If the left hand leaves view, bring it back to place the shield. Preview Waves remains available if tracked play cannot start. Restart starts another round. Exit 3D returns to the editor.
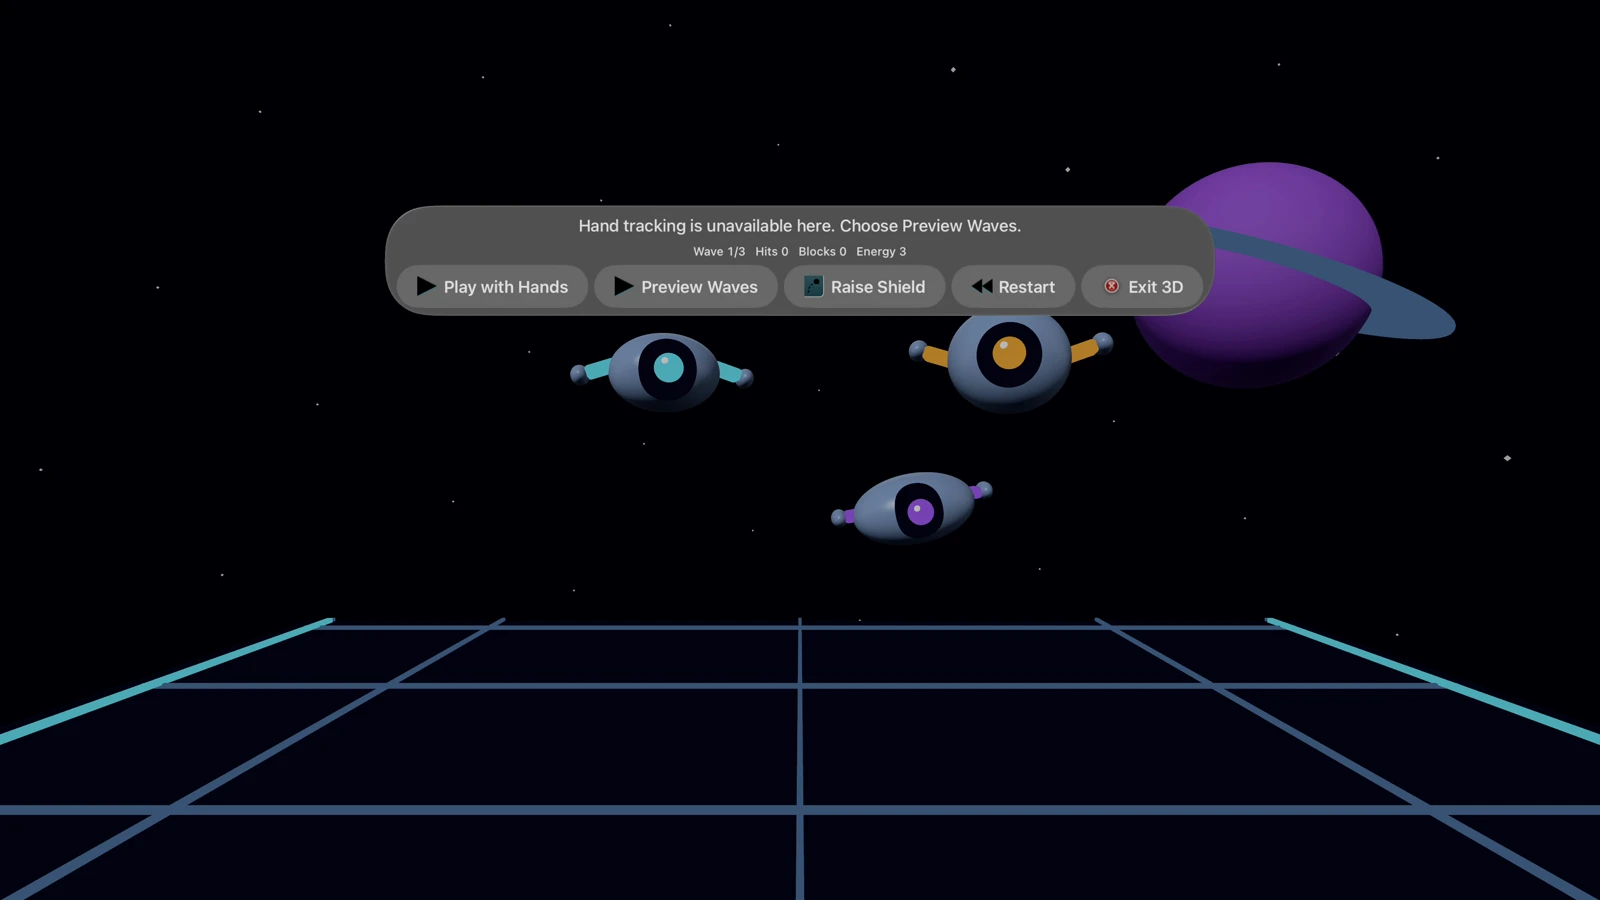
Vision Pro simulator. If hand tracking is unavailable, Preview Waves plays the sequence with scoring off.
For a quieter scene, enable Reduce motion in 3D Setup or Reduce Motion in system accessibility settings. Droids then hold their positions. A guard’s shield stops spinning and still opens at its firing cue. Incoming pulses and the game controls remain active.
Save the presentation to preserve the arena. Mac and iPad show the authored wave sequence in the camera preview and movie export. Hand poses and the round’s hits, blocks and energy stay with the live session.
Open the editable Techno Droid Arena project. Unzip it and use Open in an updated Musimotion editor. Its score spans all three waves. On Vision Pro, use Full Immersion to play.
Watch the full 42-second camera preview with music. The preview shows the authored droid formations and incoming pulses. The native sample manifest records the project, movie and music checksums and the composer credited for each take.
12. Select, edit and copy objects
Open your presentation and pause at a time when the object is visible. On Mac, click a shape or visible lettering once in 2D or 3D Volume. Where an arrow and a banner overlap, clicking the arrow selects it. Clicking exposed lettering selects the banner. A 3D ink stroke is selectable along the part drawn by the current time. Inspector opens for the selected object. If a brush is active, finish painting before selecting an object on the canvas.
To add the example arrow, open Shapes, enter
arrowshape.left.circle.fillin Search all SF Symbols, and select Use exact symbol or press Return. Close Shapes to work on the canvas again.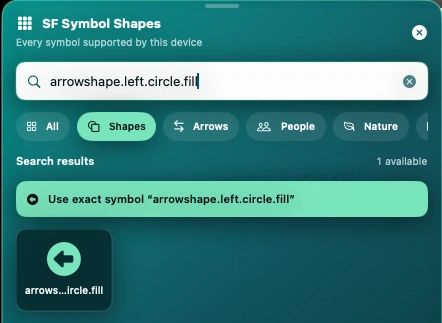
Mac, synthetic presentation. The exact name brings up the mint action and the matching arrow in the results below.
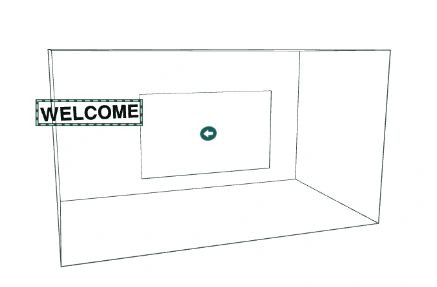
Mac. The outline is on the welcome lettering. Click the small teal arrow near the center of the box to switch objects.
To reach an object behind another object, a hidden object or a silent audio layer, choose Objects above the canvas. Select the scene, then the object’s row. You can also select paint buffers, ink and particle strokes, emitters and the scene’s celebration, rhythm or droid settings. Choosing an object from this list works even when its layer is outside the current playhead time.
In Inspector, change Name, then use the controls for that object. For a shape, change its color, scale or rotation. Edit XYZ sets a precise position at a chosen time in a 3D scene. Text, media, strokes and scene effects each expose controls for the data they contain. For a balloon drop, open Celebration Effects… to adjust balloon count, fall speed, wind and bounce. For a droid formation, Droid Arena Settings… changes its number of waves.
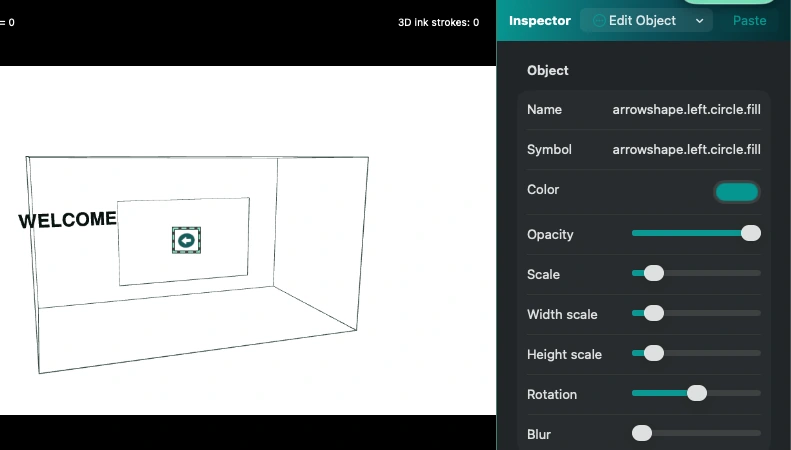
Mac. After one click, the outline moves to the arrow. Its SF Symbol name and appearance controls appear in Inspector.
If an object from an older presentation has the same Enters and Exits times at the very end of its scene, it has no time to appear during playback. Select it in Objects. At the top of Inspector, choose Use Final Second. In an eight-second scene, an 8.00–8.00 second layer then spans 7.00–8.00. The playhead moves to 7.00 so the object is visible immediately. For a different interval, edit Enters or Exits in the inspector’s Timeline section.
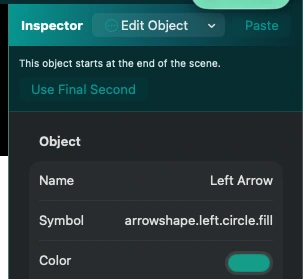
Mac, synthetic legacy project. Left Arrow is selected even though the camera has no arrow to draw at the current time.
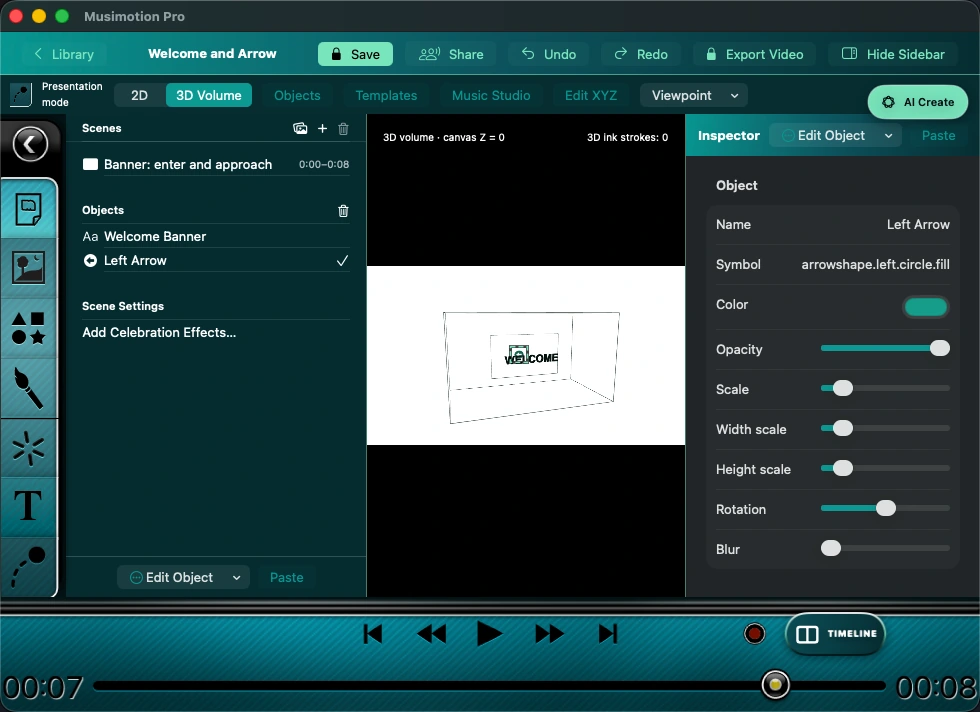
Mac. Use Final Second moved the playhead to 00:07. The camera shows the arrow and the welcome text together. The original eight-second duration is preserved.
Choose Edit Object → Copy, select a destination scene, then choose Paste. Select the pasted copy and edit its name or color. The source keeps its own settings. On Mac, use ⌘C, ⌘X and ⌘V for the selected object. Inside a text field, these shortcuts edit the selected text. Use Duplicate for another copy in the same scene, or Cut to move it. For a scene effect, Duplicate in New Scene creates a separate scene with an editable effect. A copied rhythm chart brings its song and custom panorama with it.
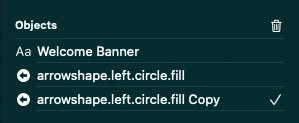
Mac. The checkmark identifies the pasted arrow. Both the original arrow and the Welcome Banner remain in the scene.
Select the small split-rectangle icon at the far right of the transport row to show or hide the layer tracks. Its accessibility label switches between Show Timeline and Hide Timeline. Drag the scrubber on the separate row underneath to find a frame.

The editor controls walkthrough shows both timeline states.
From the library, choose Create to browse presentation templates and motion presets. Inside an existing presentation, choose Templates. Choose Black Dragons for ten HeiLongWuShu ink paintings with shamisen music. Choose Spatial for Depth Gallery, Welcome Banner, Birthday Surprise, Rhythm Stage or Droid Arena. Import into Presentation adds a scene to the project you are editing. Undo removes that import. Open as New Presentation saves your current work in the library and opens a separate editable project. If saving fails, the browser displays the error and keeps your current presentation open. On Vision Pro, Project → Templates opens the same browser from the spatial workspace.
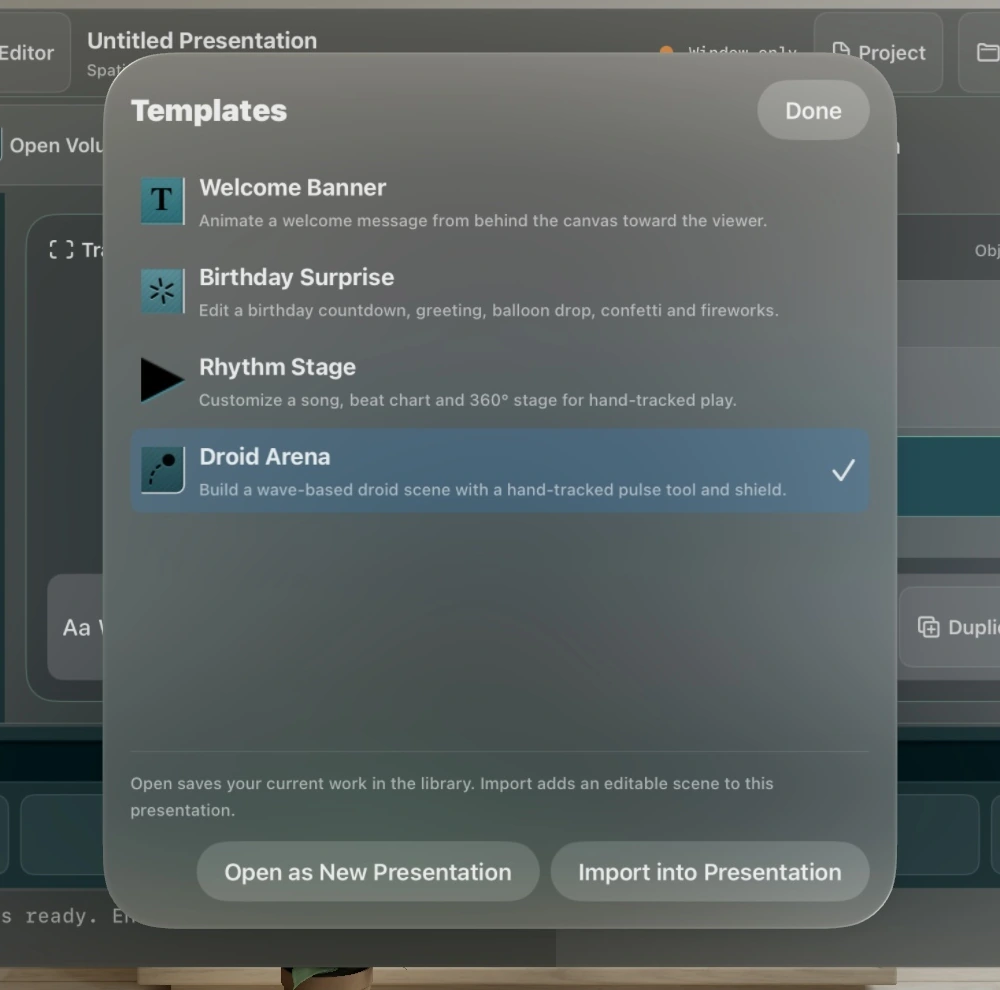
Earlier Vision Pro simulator capture with Droid Arena selected. The current gallery groups these choices under Spatial.
13. Make a 3D music video
Watch Robot Panorama Wall with its original score.
The screenshots show the running visionOS 26.5 simulator with synthetic template presentations and the public Orbitus films. Select a capture to see the controls at full size.
Open Project → New Presentation… on Vision Pro. Choose 3D Music Videos, select Beat Rail Express, then choose Create Presentation. The 32 designs include trains, expanding flowers, spirals, waves, orbits, gateways, mandalas and particle showers. In an existing project, Templates → Import into Presentation adds the selected scene.
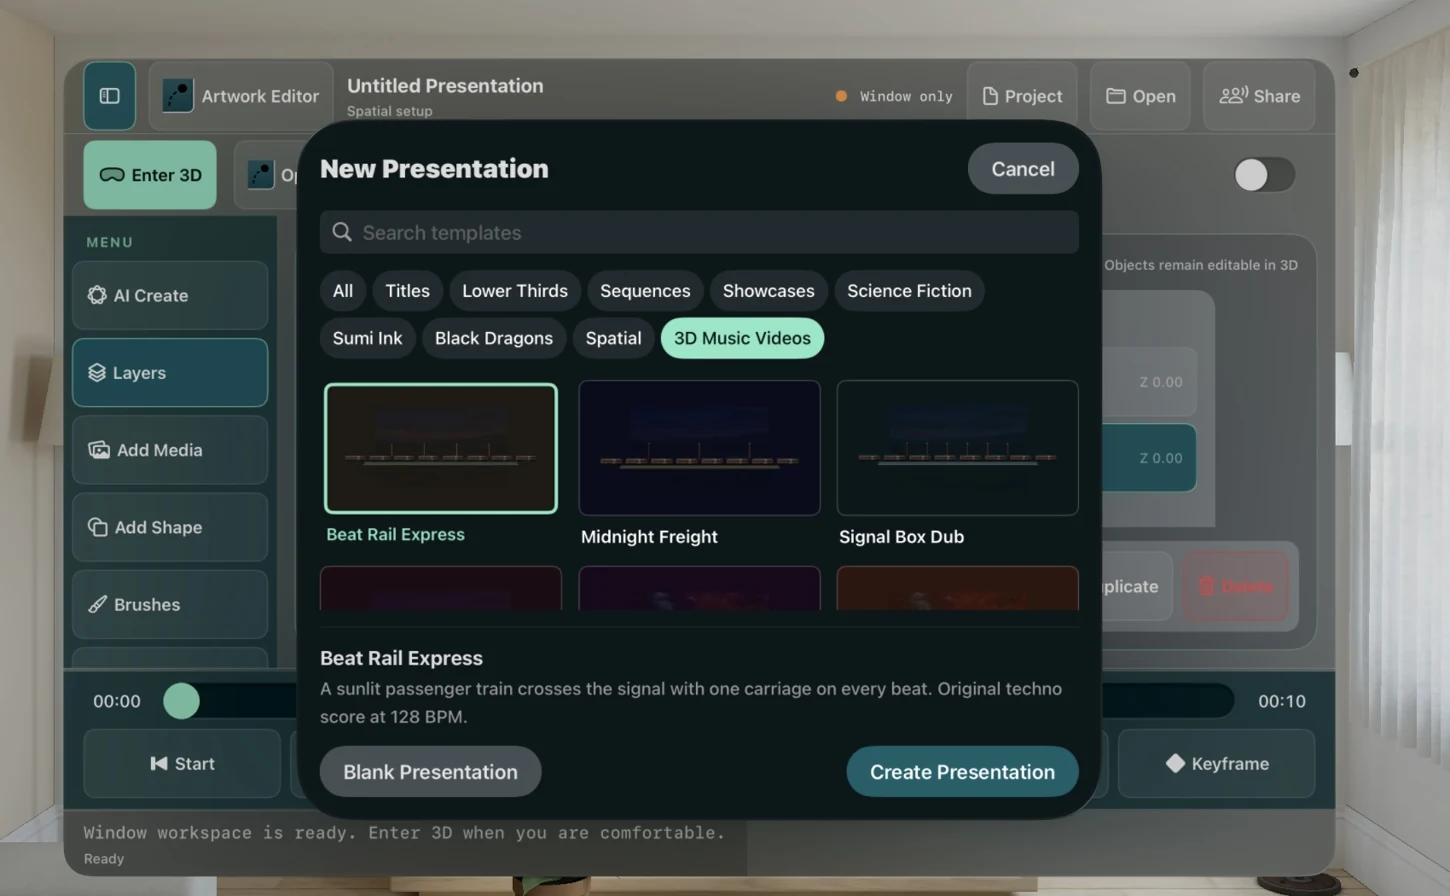
The selected design lists its original score tempo. Create Presentation opens a new editable project.
Press Play. In the updated Beat Rail Express, each carriage crosses the signal on a beat of its original 128 BPM score. The train follows an angled track in three dimensions. Nearby overhead poles cross faster than the distant road traffic and depot. Pause and select a carriage to edit its position and keyframes. Choose Open Volume to see the layers at different depths, or start Full Immersion to surround yourself with the scene. Try Chroma Nova for a lime-and-fuchsia burst at 140 BPM. Five 360° panoramas surround the templates with a railway valley, colored pigment, a prism pavilion, a starry desert or a kelp forest. The fifteen bundled images include those panoramas, background plates and transparent props. The presentation stores its artwork for offline playback. With Reduce Motion on, the beat-driven background tint stays at the scene’s base color.
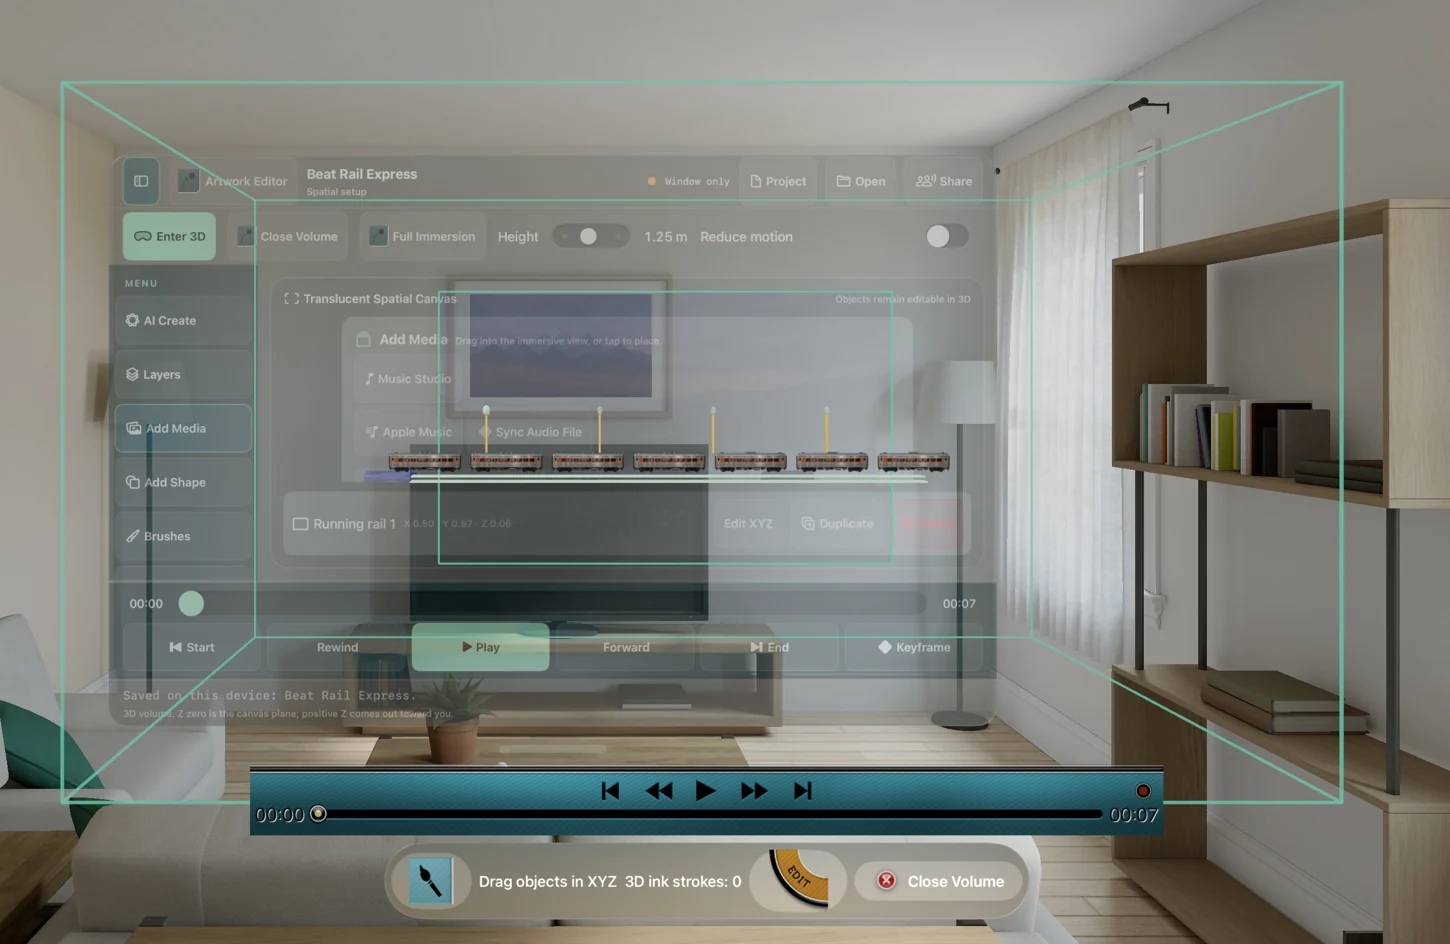
The cyan box marks the bounded volume. This earlier capture shows the geometric train. The movie below shows the current train and its surroundings from the saved camera.
Watch the movie exported from the template’s saved camera. The train crosses the signal to the beat while overhead poles, platform lights and distant traffic move at different rates. Open the scored movie.
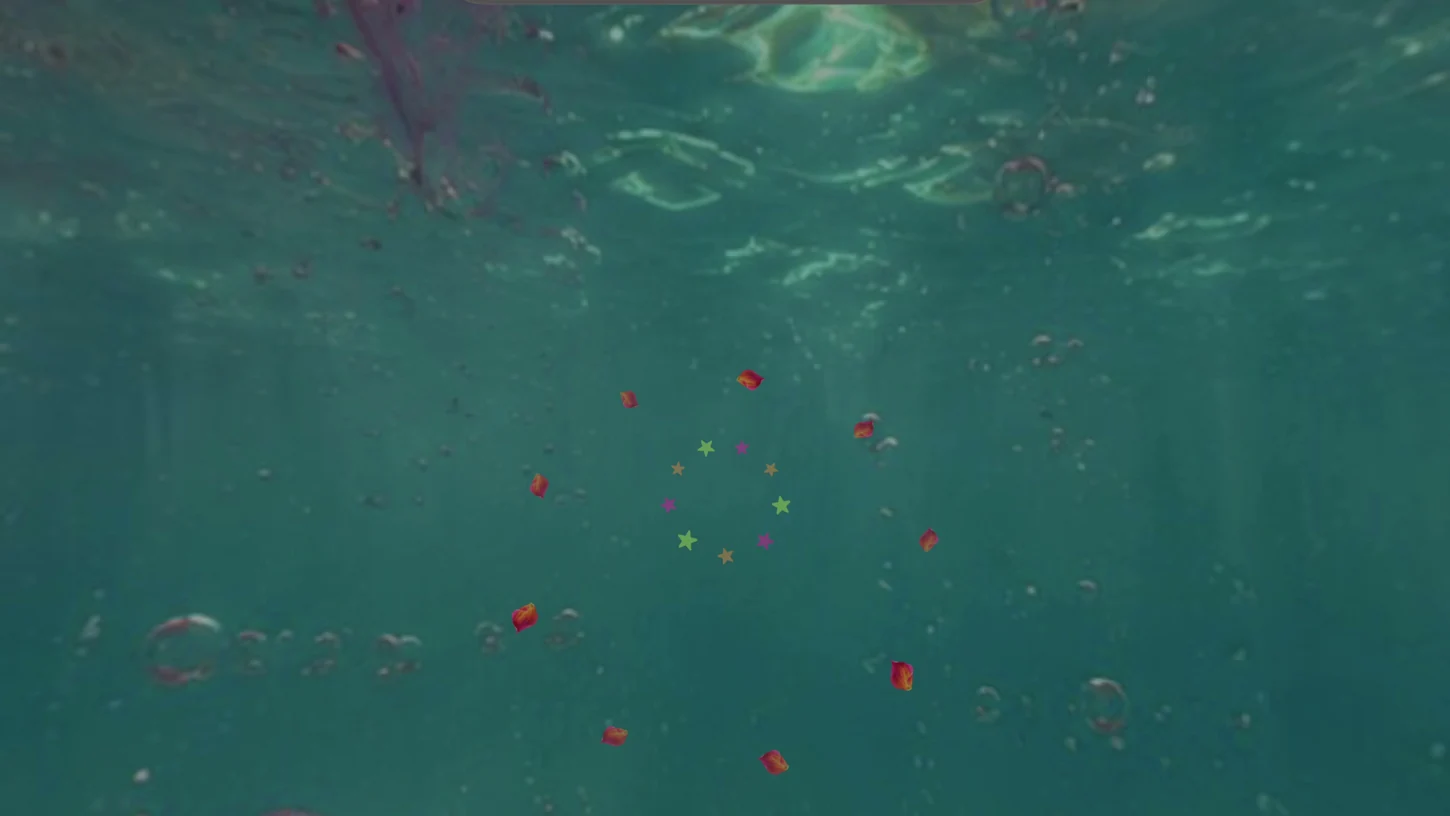
Chroma Nova plays colored stars and petals against a spherical backdrop. This is a frame from the running simulator.
To build a variation on Vision Pro, open AI Create, choose Train on the Beat or Psychedelic Bloom, and edit the brief. Choose Build Scene Plan, review the design, then use Add Scene. Replace Scene applies the plan to the current scene when Replace current scene is on.
To use your own recording, open Add Media → Sync Audio File → Choose Audio File. Select a local MP3, M4A or WAV you have permission to include. Wait for the musical accents to finish processing, then choose Done and Play. The scene follows the song’s duration and repeats its visual phrase on detected accents. The project embeds the file for playback on other devices. If the file cannot be decoded, choose a playable local copy.
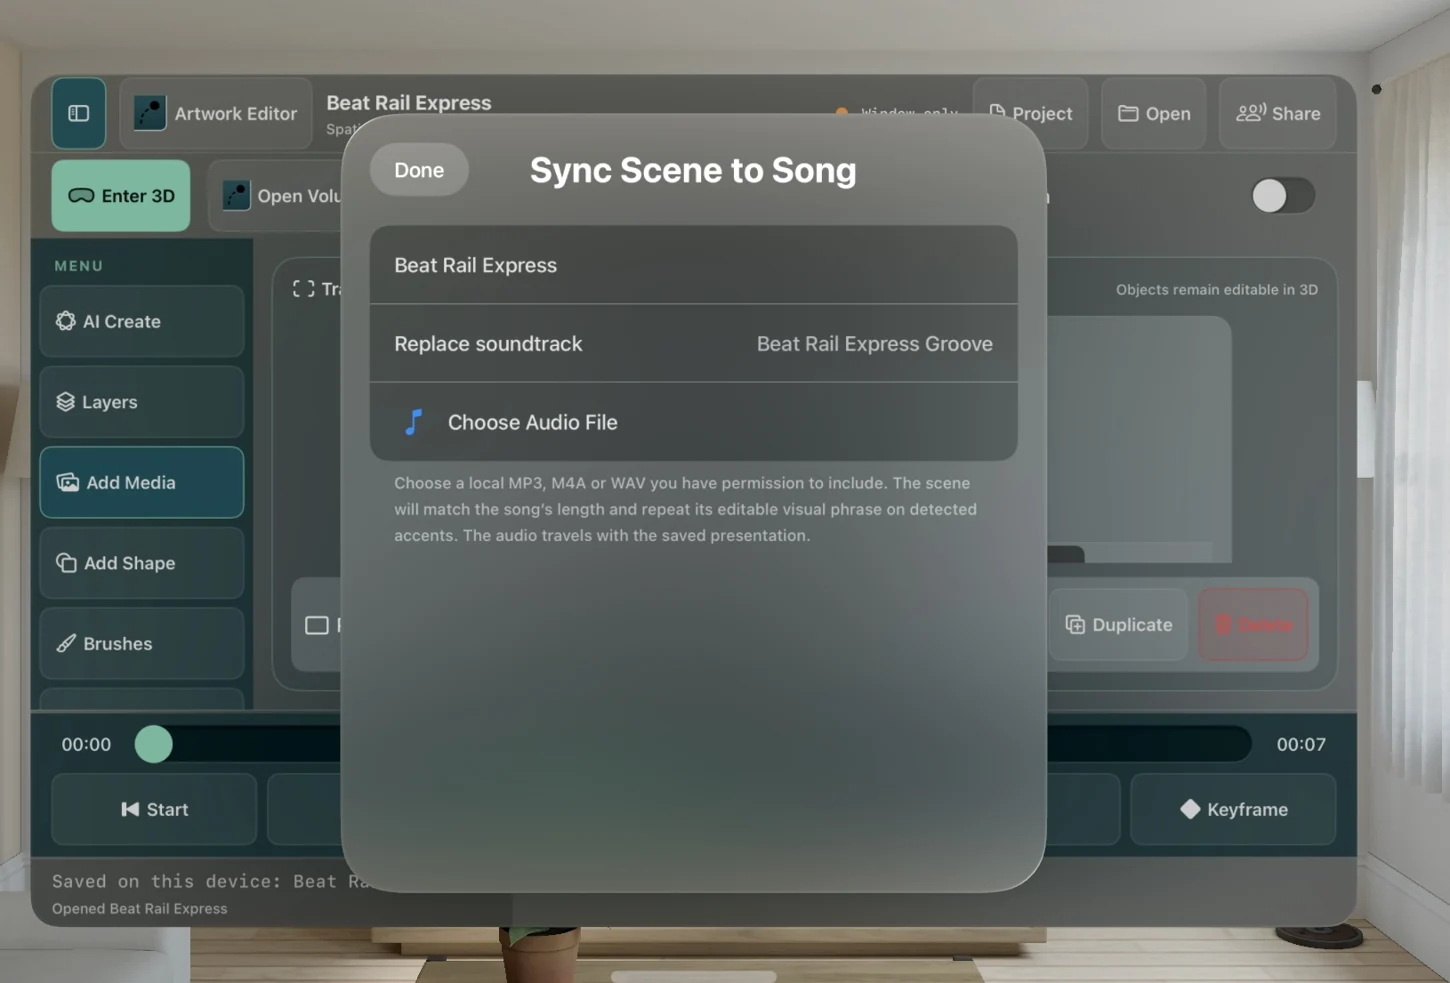
Check the name of the soundtrack before choosing its replacement.
For reference listening, open Add Media → Apple Music. Search by artist and title, paste a song link, or select The Bells, Energy Flash or Knights of the Jaguar. Select a song in the results to play it, then use Pause, Play, Previous, Next or Stop. Done returns to the editor while the song continues. Reopen Apple Music to stop or change it. Full-song catalog playback requires Apple Music access, an active subscription and availability in your storefront. The listening window also offers Open in Apple Music. Save or export a presentation with its original score or your imported audio file.
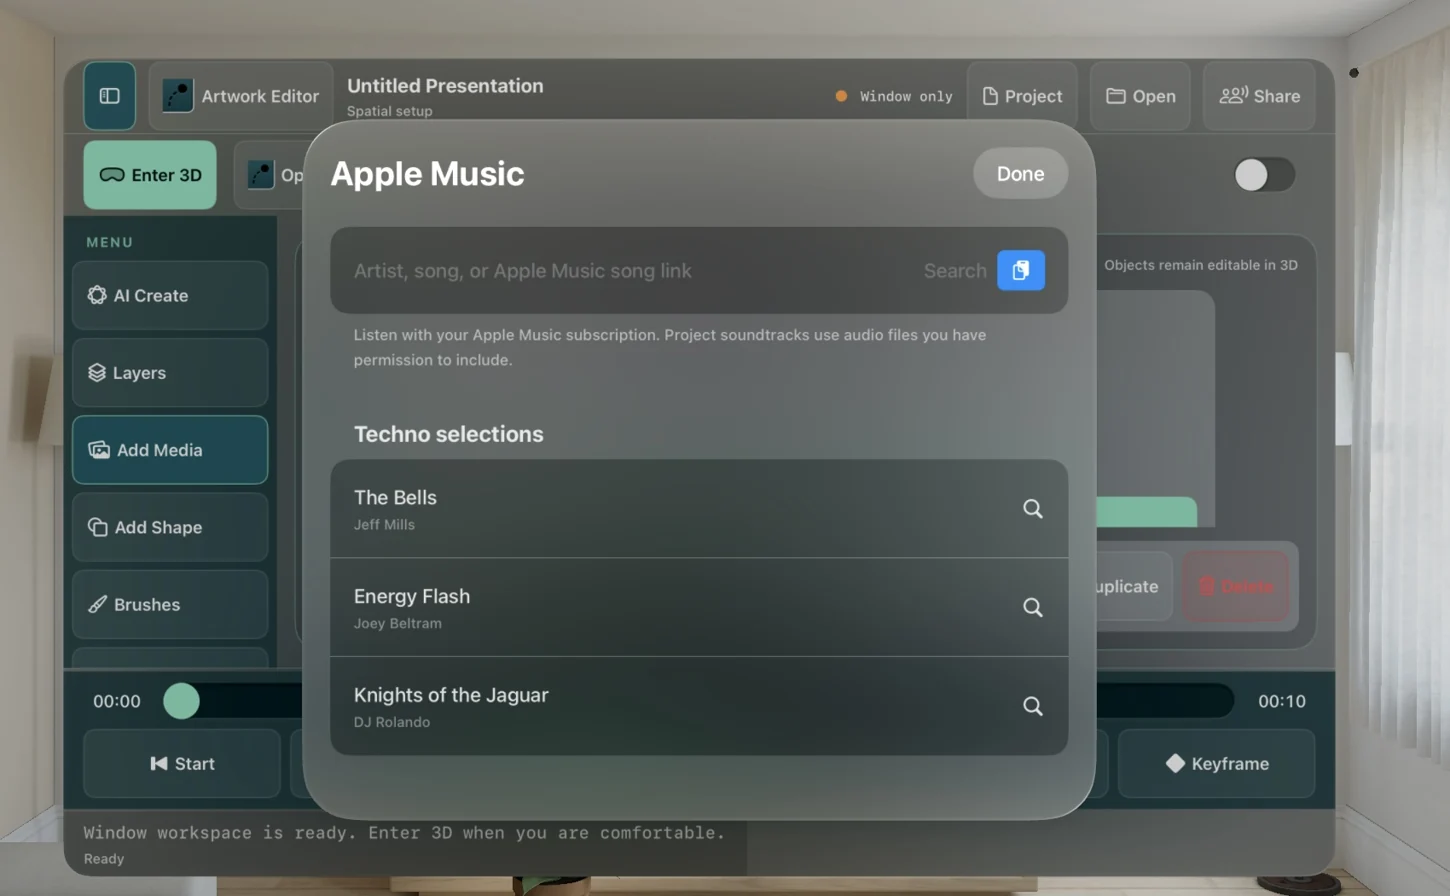
These three catalog references open in Apple Music. The sample uses synthetic project visuals. Musical recordings from the catalog stay in the Apple Music player.
Choose New Presentation → Movie Walls for a three-panel film presentation. The updated development preview includes three complete 2026 scenes: the outdoor Maker Faire drive, the droid hall and the turning chassis in the workshop. Each panel approaches the viewer and sweeps away as the next one takes its place. Select Use all 19 full Orbitus robot films (97 MB download) to embed the original movies across seven scenes. Follow Create a robot movie wall and watch the 19 source films.
On November 20, 17 iPad simulator tests passed, including downloading all 19 full films, reopening the saved project, playing the three wall designs, editing the 3D train, synchronizing a local song and switching between 2D, 3D and ink. On the visionOS simulator, pointer drags recorded six move and independent X/Y scale keyframes while playback continued, with a second layer unchanged. On Mac, the saved project retained eight keys and scrubbing returned to both recorded poses. Physical hand tracking and headset comfort remain part of the headset acceptance run.
14. Import and animate a 3D model
Choose New Presentation → 3D Models for a photographed ROB scan or an eleven-joint display rig. Learn how to import a robot, record a focus pull and animate its joints.
AI, sharing and support
For a walkthrough of Use Answer, Import AI Draft… and Import AI Score…, see Create scenes and soundtracks with AI. A desktop model can author the scene or musical notes. Transfer its JSON file to Files on Vision Pro, review the draft in AI Creation Studio, or listen to the score in Music Studio before adding it.
AI Create uses Apple’s on-device Foundation Models framework when available, with an editable deterministic fallback. Availability depends on device, OS, language and region; it does not establish China distribution compliance. Image Playground has separate requirements. Tests use fixtures rather than a model response.
File import uses the system picker. Local saving does not publish the project. Share, Live Together, Send Clip, Invite People and Community can send project data, media or rendered clips to other people and Apple CloudKit. Public community posts and unlisted links have different visibility. Fixture checks do not establish live SharePlay, delivery or production account permissions.
For support, include OS, development revision, exact steps, expected/actual result and whether you used a simulator or physical device. Keep private project content and account details out of public reports. The Advanced Engineer’s Book retains its labelled August 24, 2026 baseline; this guide describes the new workflow.